Getting started: Starting Quill
Achieved so far in Getting Started:
Signing up - your deployment has a name, a license key, and a dashboard API key.
-
This page covers the second Getting Started step, Starting Quill, walking you through running Quill on the machine whose public IP address you gave at sign-up, and signing into the management dashboard.
-
Quill runs as a single Docker container, started by the Docker command you copied at the end of signing up.
-
On its first run, Quill uses your license key to fetch the certificate and configuration for your domain.
Once the certificate and configuration are in place, your dashboard becomes reachable. -
In this article:
Prerequisites
Before starting Quill, make sure you have:
- Docker, on the machine that will run Quill, at the public IP address you gave at sign-up.
- Docker Desktop on Windows and macOS, or Docker Engine on Linux.
- Port 443 available on Quill's machine.
- The dashboard, the API, and the chat channels of your deployment are all served on this one port.
- Internet access from Quill's machine to Docker Hub and to
api.ravendb.net.- Docker pulls Quill's image from Docker Hub.
- Quill fetches the certificate and configuration
for your domain from
api.ravendb.net.
- The Docker command and the dashboard API key you copied at the end of signing up.
- The command carries your license key.
- The API key signs you into the management dashboard.
Starting Quill
Running the Docker command
Open a terminal on Quill's machine and run the Docker command.
Its two forms differ only in the character that continues a command across lines.
- bash
- PowerShell
docker run --sig-proxy=false --name quill-baloo \
  -p 443:443 \
  -e QUILL_LICENSE_KEY=QUILL-... \
  -e QUILL_API_KEY=primary/QUILLDASH-... \
  -v quill-baloo-data:/var/lib/quill \
  ravendb/quill-nightly:latest
docker run --sig-proxy=false --name quill-baloo `
  -p 443:443 `
  -e QUILL_LICENSE_KEY=QUILL-... `
  -e QUILL_API_KEY=primary/QUILLDASH-... `
  -v quill-baloo-data:/var/lib/quill `
  ravendb/quill-nightly:latest
The Docker command carries your license key and your dashboard API key: share it with no one.
For example, pasting the command into a support ticket or a chat exposes both keys.
The command's parts:
| Part | Description |
|---|---|
--sig-proxy=false | Quill runs in the terminal you start it in, where an interruption, e.g., Ctrl+C, would ordinarily reach the container and stop it. This setting keeps interruptions from reaching Quill, so it will keep on running. |
--name quill-baloo | Names the container quill- followed by your deployment's name, so later commands can address Quill by name. |
-p 443:443 | Publishes port 443, Quill's only external port. |
-e QUILL_LICENSE_KEY=... | Your license key, which Quill uses to fetch the certificate and configuration for your domain. |
-e QUILL_API_KEY=... | Your dashboard API key, exactly as issued, prefix included. |
-v quill-baloo-data:/var/lib/quill | A Docker volume holding everything Quill keeps: its settings, its certificate, and your mirrored data. When Quill is updated, the new container mounts this same volume. |
ravendb/quill-nightly:latest | Quill's image. |
The Docker command does not return to the prompt.
Quill goes on running even after you close the terminal you ran it in, since its container is run by the Docker
service.
Watching Quill come up
Quill reports its progress in the terminal you ran the Docker command in, one line at a time, with the seconds
elapsed since the container started.
The first run is longer, since Quill also fetches the certificate and configuration for your domain.
  Logs:      /var/lib/quill/logs/{ravendb,web,proxy,certwatch}.log
2026-08-26 10:23:42  Sharpening the quill... (5s)
2026-08-26 10:23:48  Warming up the inkwell... (10s)
2026-08-26 10:23:53  Dipping the quill... (15s)
2026-08-26 10:23:58  Unrolling the parchment... (20s)
2026-08-26 10:24:03  Status:    READY
                     Dashboard: https://dashboard.baloo.myquill.ai
                     Database:  https://db.baloo.myquill.ai
- Status: READY: indicates that your deployment can be accessed.
- Dashboard: this is where you sign in to manage Quill.
- Database: reaches the RavenDB server inside the container, allowing you to read the mirrored data directly.
When Quill does not come up
If Quill stops before reaching Status: READY, the terminal reports the failure.
-
A failed activation prints
Status: FAILED, aReason:naming what went wrong, and aDetails:line naming the log the error is written to.2026-09-03 13:12:37 Sharpening the quill... (5s)2026-09-03 13:12:42 Status: FAILEDReason: activation failed: the license key was not recognizedDetails: /var/lib/quill/logs/web.log
-
Two kinds of failure print an
ERROR:message and aDetails:line naming the log the error is written to.-
Quill was started without its license key:
2026-09-03 13:09:50 ERROR: QUILL_LICENSE_KEY is not set, so the appliance cannot activate.Details: /var/lib/quill/logs/web.log
-
Quill did not become ready within its startup grace period:
2026-09-03 13:14:20 ERROR: still not ready after 180s.Details: /var/lib/quill/logs/web.log
-
-
To read the log that holds the error, replace
<name>in the command below with your deployment name and<log>with the file named on theDetails:line, then run the command:docker exec quill-<name> sh -c "tail -40 /var/lib/quill/logs/<log>"
e.g., for the deployment
balooand the failures above:docker exec quill-baloo sh -c "tail -40 /var/lib/quill/logs/web.log"For more ways to read and follow Quill log files, see Read a log file.
Signing in to the management dashboard
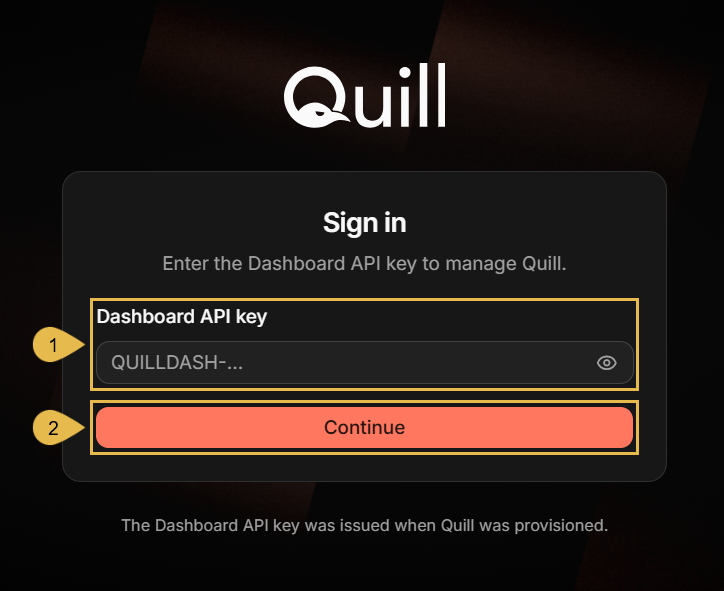
Open the Dashboard address the terminal printed (e.g., https://dashboard.baloo.myquill.ai) in a browser.
Quill asks for the dashboard API key that was
displayed and sent to you by email at the end of signing up.
-
Dashboard API key
Enter the dashboard API key you copied at the end of signing up. -
Continue
Click to sign in.
The management dashboard opens on My apps, where Connecting your database begins.