Getting started: Adding a chat widget
Achieved so far in Getting Started:
Signing up - your deployment has a name, a license key, and a dashboard API key.
Starting Quill - Quill is running on your machine, and its management dashboard is open.
Connecting your database - Quill can reach your source database, and the tables
your app will work with are selected.
Mapping your tables - your app is created, and Quill keeps its internal database
current with your source data.
Adding an AI agent - your app has an agent that answers from its internal database.
-
You have now created an agent that is ready to answer, but your users have no way to reach it yet.
In Adding a chat widget, the sixth Getting Started step, you create the app's first channel and place a working chat on a page of your own site.- A channel carries the conversations between your users and an agent.
- A chat widget is a channel that runs inside a page of your site.
-
The chat widget is one of the channel types Quill offers. You can also add channels that carry conversations through a Telegram bot, a Slack app, or a Discord bot, reaching your users where they already are.
-
A channel has no address of its own.
A chat widget is opened through an embed link, an address you generate for the channel and place on your page.
You can choose how long a link will last before it expires, and how many chats are allowed through it. -
Once the widget is on your page, your users can use it to ask their questions and are answered from your app's data. They are not required to have an account or know anything about Quill.
-
In this article:
Creating the chat widget channel
Opening the Add channel menu
A channel is added from the Add channel menu, which can be reached in two ways:
-
If you arrived here from the previous Getting Started step, you are already in the right place: clicking Save agent at the last stage of the Add agent wizard created the agent and opened the Add a channel stage.
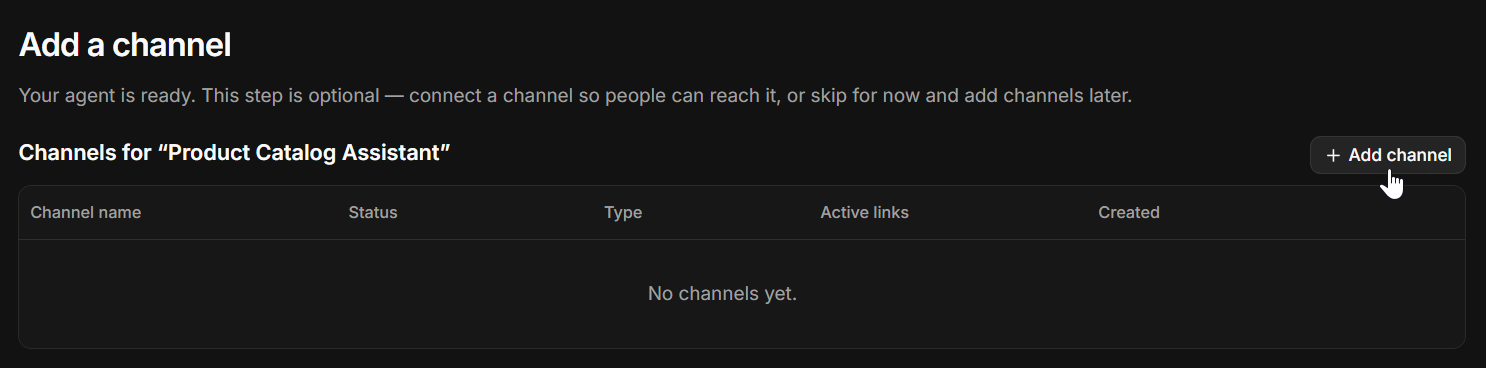
Click Add channel to open the menu of channel types.
-
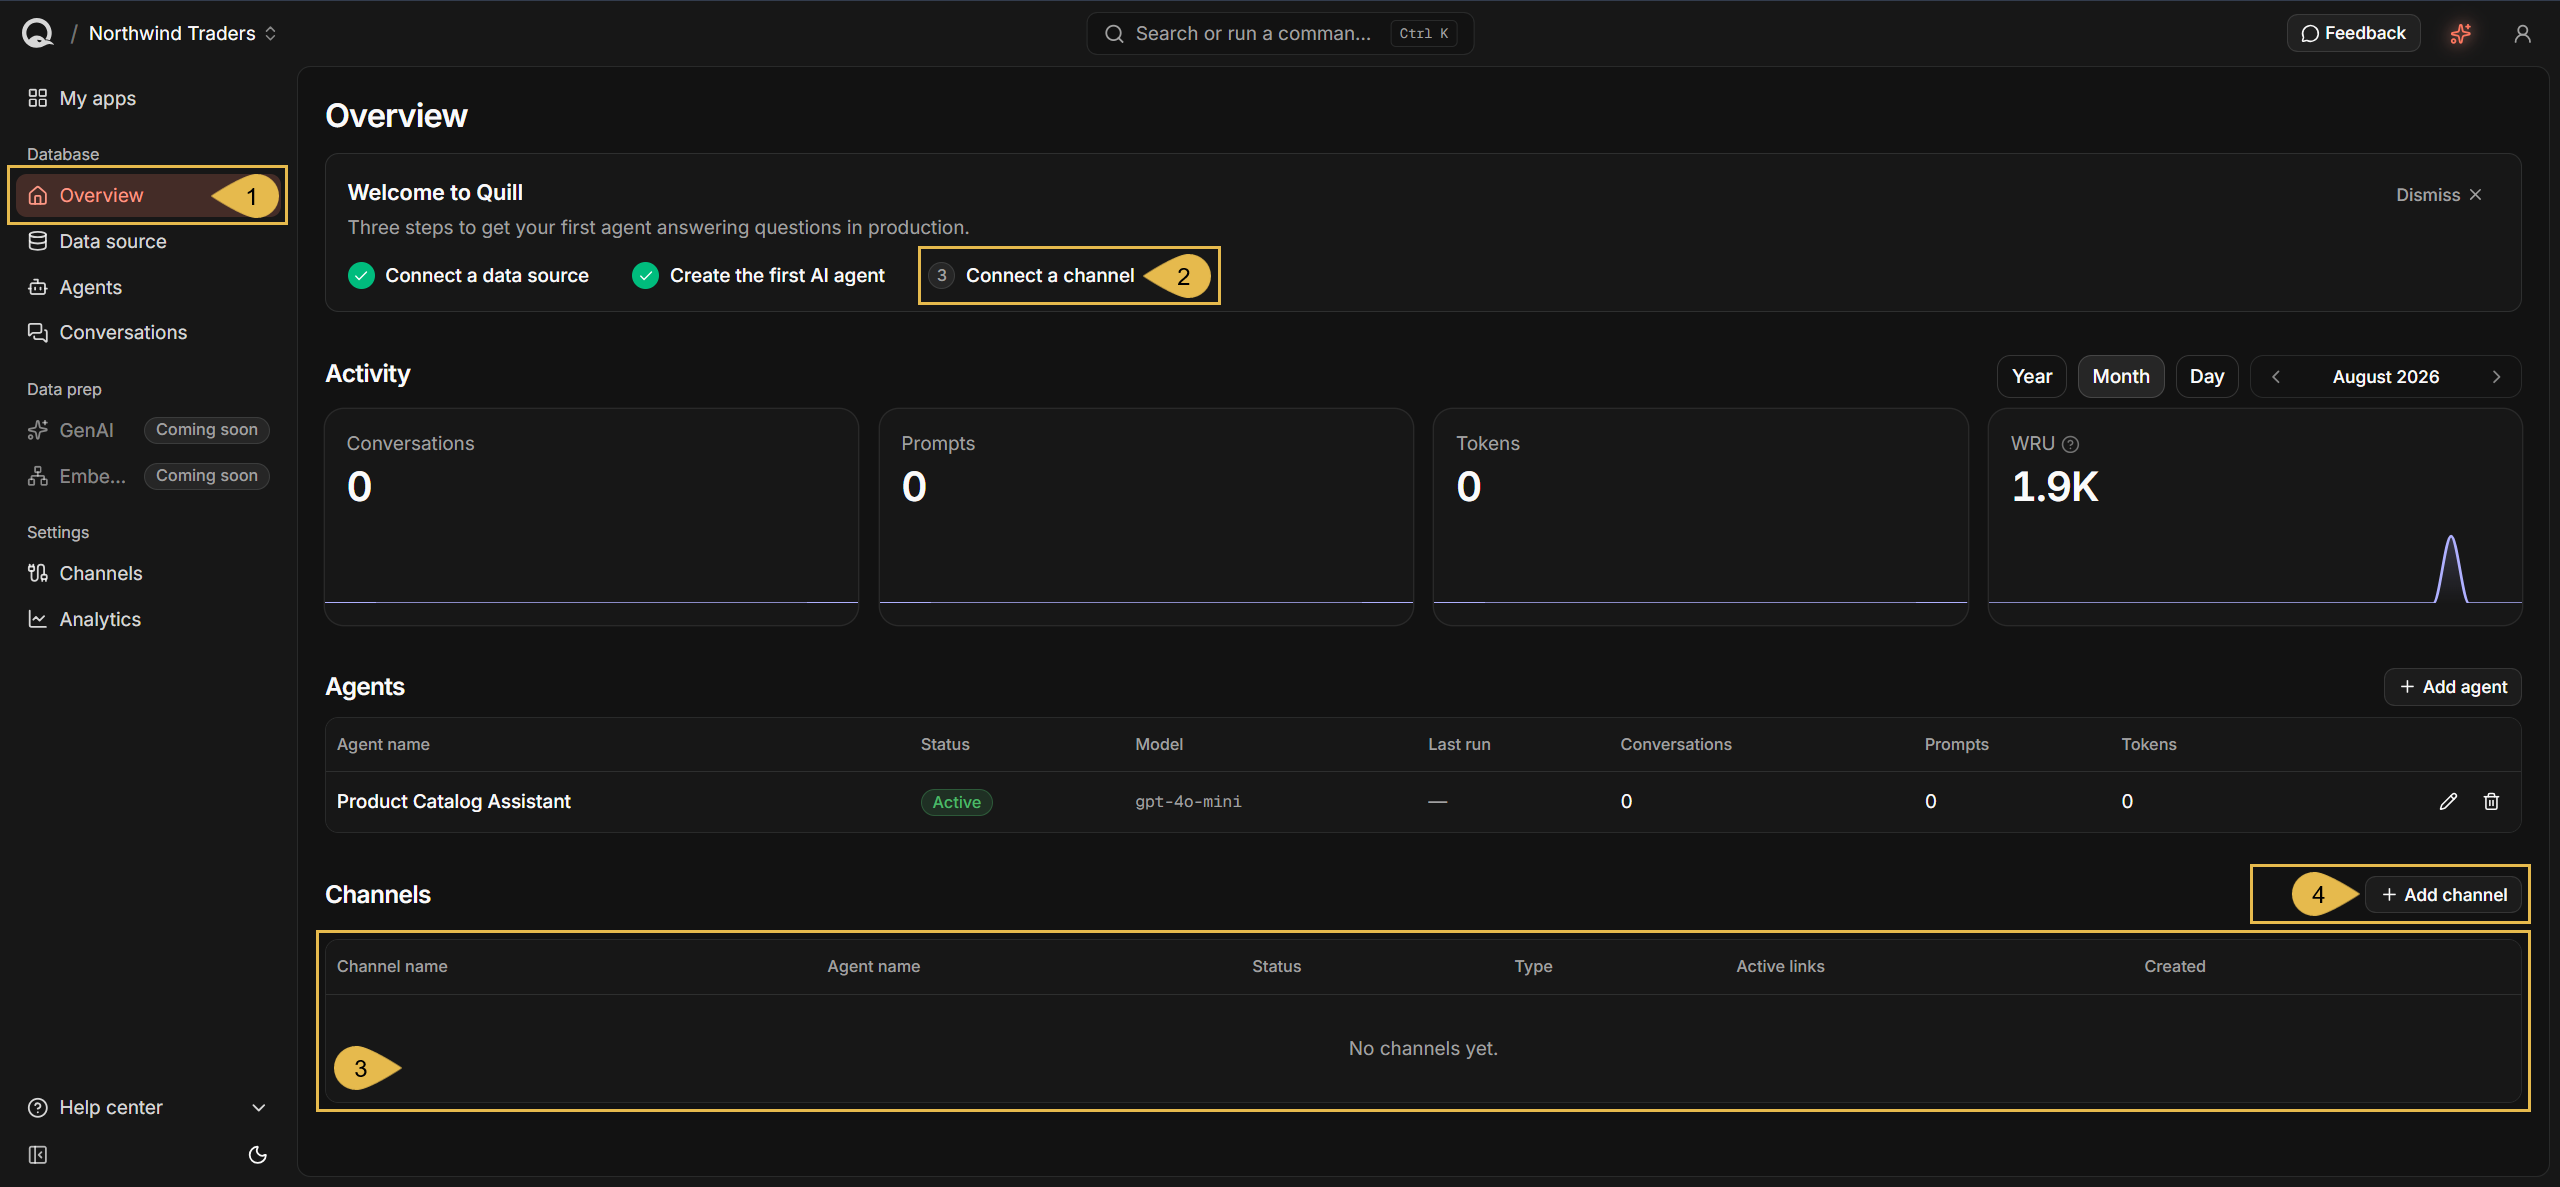
If you didn't arrive through the Getting Started path, open Quill's management dashboard and click the app you want to add a channel to, on the My apps list.
-
Overview
The app opens on this view, where your agents and channels are listed. -
Connect a channel
The last of the three setup steps the welcome banner tracks, and a link to the app's Channels view.
The banner is shown until all three steps are done, and can be dismissed at any time. -
The channels table
Lists the channels the app already has. Yours has none yet. -
Add channel
Click to open the menu of channel types.
-
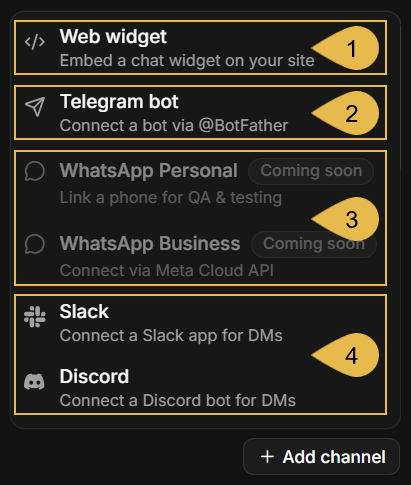
Both routes reach the same menu:
-
Web widget
Click to add a chat widget channel, the channel this page walks you through. -
Telegram bot
Carries the conversations through a Telegram bot that you create with Telegram's own@BotFather. -
WhatsApp Personal and WhatsApp Business
Not available yet; Coming soon. -
Slack and Discord
Carry the conversations through a Slack app or a Discord bot, in private chats between your users and the bot.
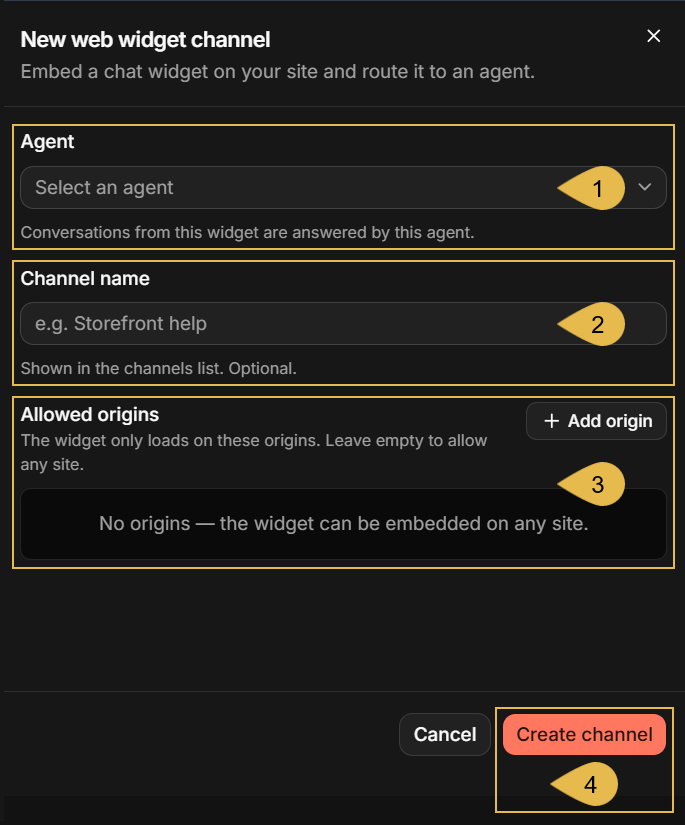
Naming the channel and setting its allowed origins
-
Agent
Select the agent that will answer the conversations this widget carries.
When you reach this form from the Add agent wizard, the agent you just created is already set and this field is not shown. -
Channel name
Enter a name for the channel.
The name is shown in the app's channels list.
e.g., Catalog chat
This field is optional. If you leave it empty, Quill names the channel for you. -
Allowed origins
Enter the addresses of the sites that may hold this widget, one entry per site.
While the list is empty, the widget can be placed on any site. -
Create channel
Click to create the channel and add it to the app.
Generating an embed link
The channel now exists, but there is no way to connect with its widget yet.
An embed link is such a way: you generate a link for the channel, embed it in your site, and your users
can use it to approach the widget.
Opening the Generate embed link dialog

-
The new channel
The new channel's entry under Channels shows the agent that answers its conversations, and its type, Web widget. -
Active links
The number of links generated for this channel. Yours has none yet.
Only links that haven't expired yet are counted. -
Generate link
Click to generate an embed link for this channel.
Setting the link limits
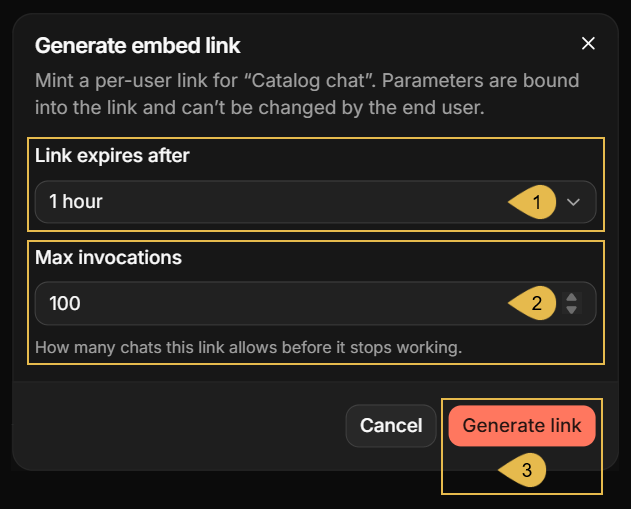
-
Link expires after
Select how long the link will last: 1 hour, 4 hours, 24 hours, 7 days, or Custom for a duration of your own, entered in seconds and ranging from one minute to thirty days. -
Max invocations
Enter the number of chats that the link allows, up to 1,000,000. -
Generate link
Click to generate the link.
The limits' exact behavior, including the message your users will see once a link expires or its chats are used up, is covered in Lifetime, usage cap, and revocation.
When the agent takes parameters, the dialog opens a field for each parameter.
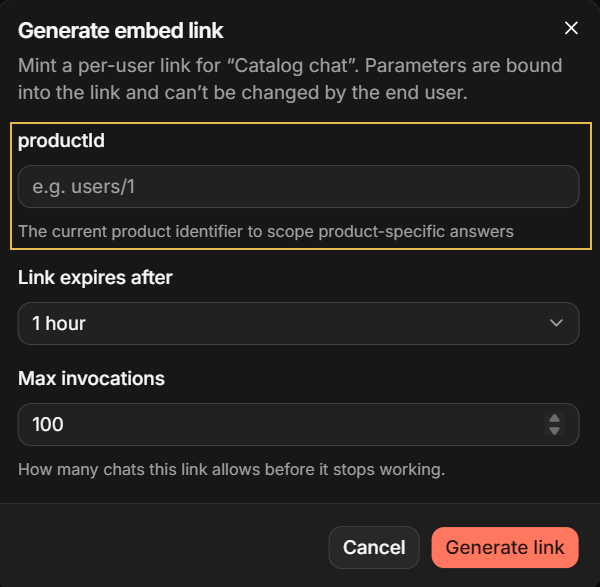
The field's name and the text under it are the parameter's name and description, taken from the agent's
configuration.
Every parameter the agent has must be given a value before the link can be generated.
The values you enter for these parameters are bound into the link and cannot be changed by users.
You can, for example, generate an embed link for a specific product, with the product's ID already bound into
the link, so the agent's queries and answers will relate only to this product.
Copying the link and trying it out
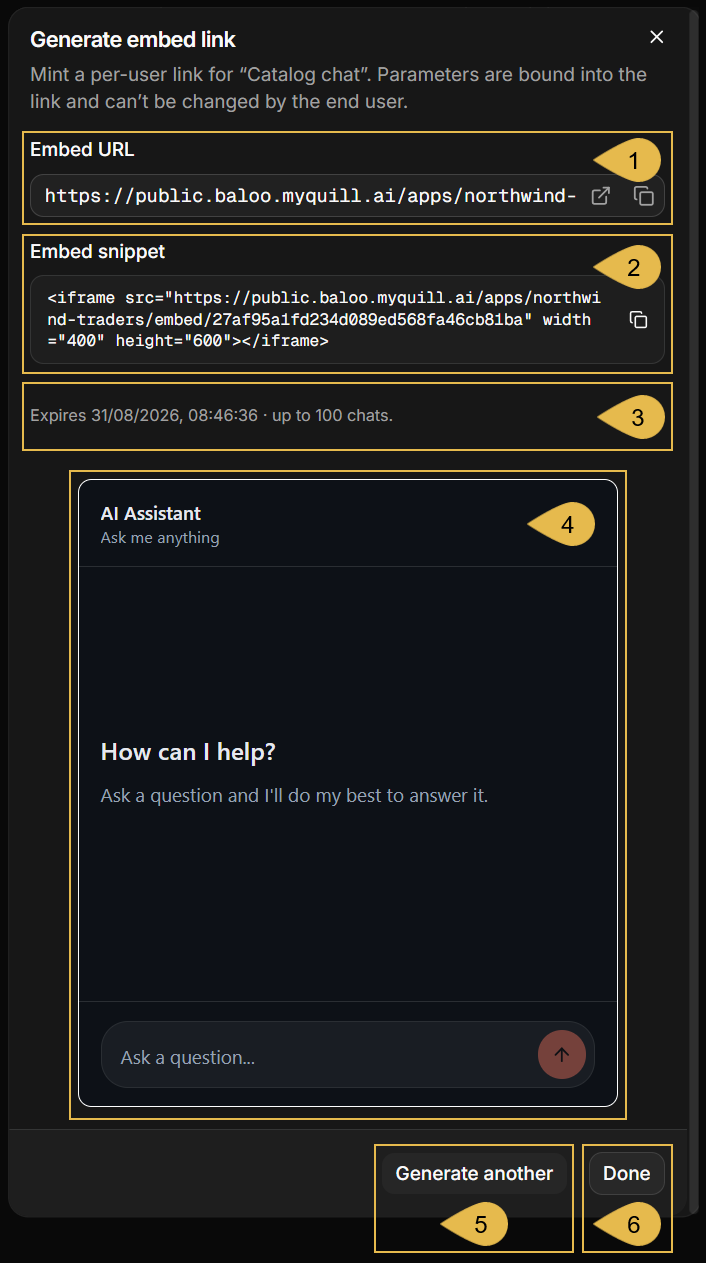
-
Embed URL
The address that opens the widget.
Copy the address, or open it in a browser to see the widget on a page of its own. -
Embed snippet
The same address, wrapped in an<iframe>element that you can place on your page (see Placing the widget on your page). -
The link's limits
The link's expiration time and number of allowed chats. -
The widget
A working chat widget, served by the link shown above it.
Ask the widget a question that can be answered from your app's data. The agent will reply here as it will on your site.
Chats initiated here are counted against the link's limit. -
Generate another
Click to return to the settings and generate an additional link for this channel.
The settings you used are kept in the form, and the link you just generated remains valid. -
Done
Click to close the dialog.
Placing the widget on your page
The Embed snippet you copied is the whole integration. Paste it into the HTML of the page that will carry the widget:
<iframe src="https://public.<your-domain>/apps/<app-slug>/embed/<link-token>" width="400" height="600"></iframe>
The widget serves itself from your Quill deployment, so the page needs nothing else: no library to install, no
script to add, and no styling to write.
Set the width and height to suit your layout, and shape the element as you please: a title attribute,
a style, or any other addition that blends the widget into your site.
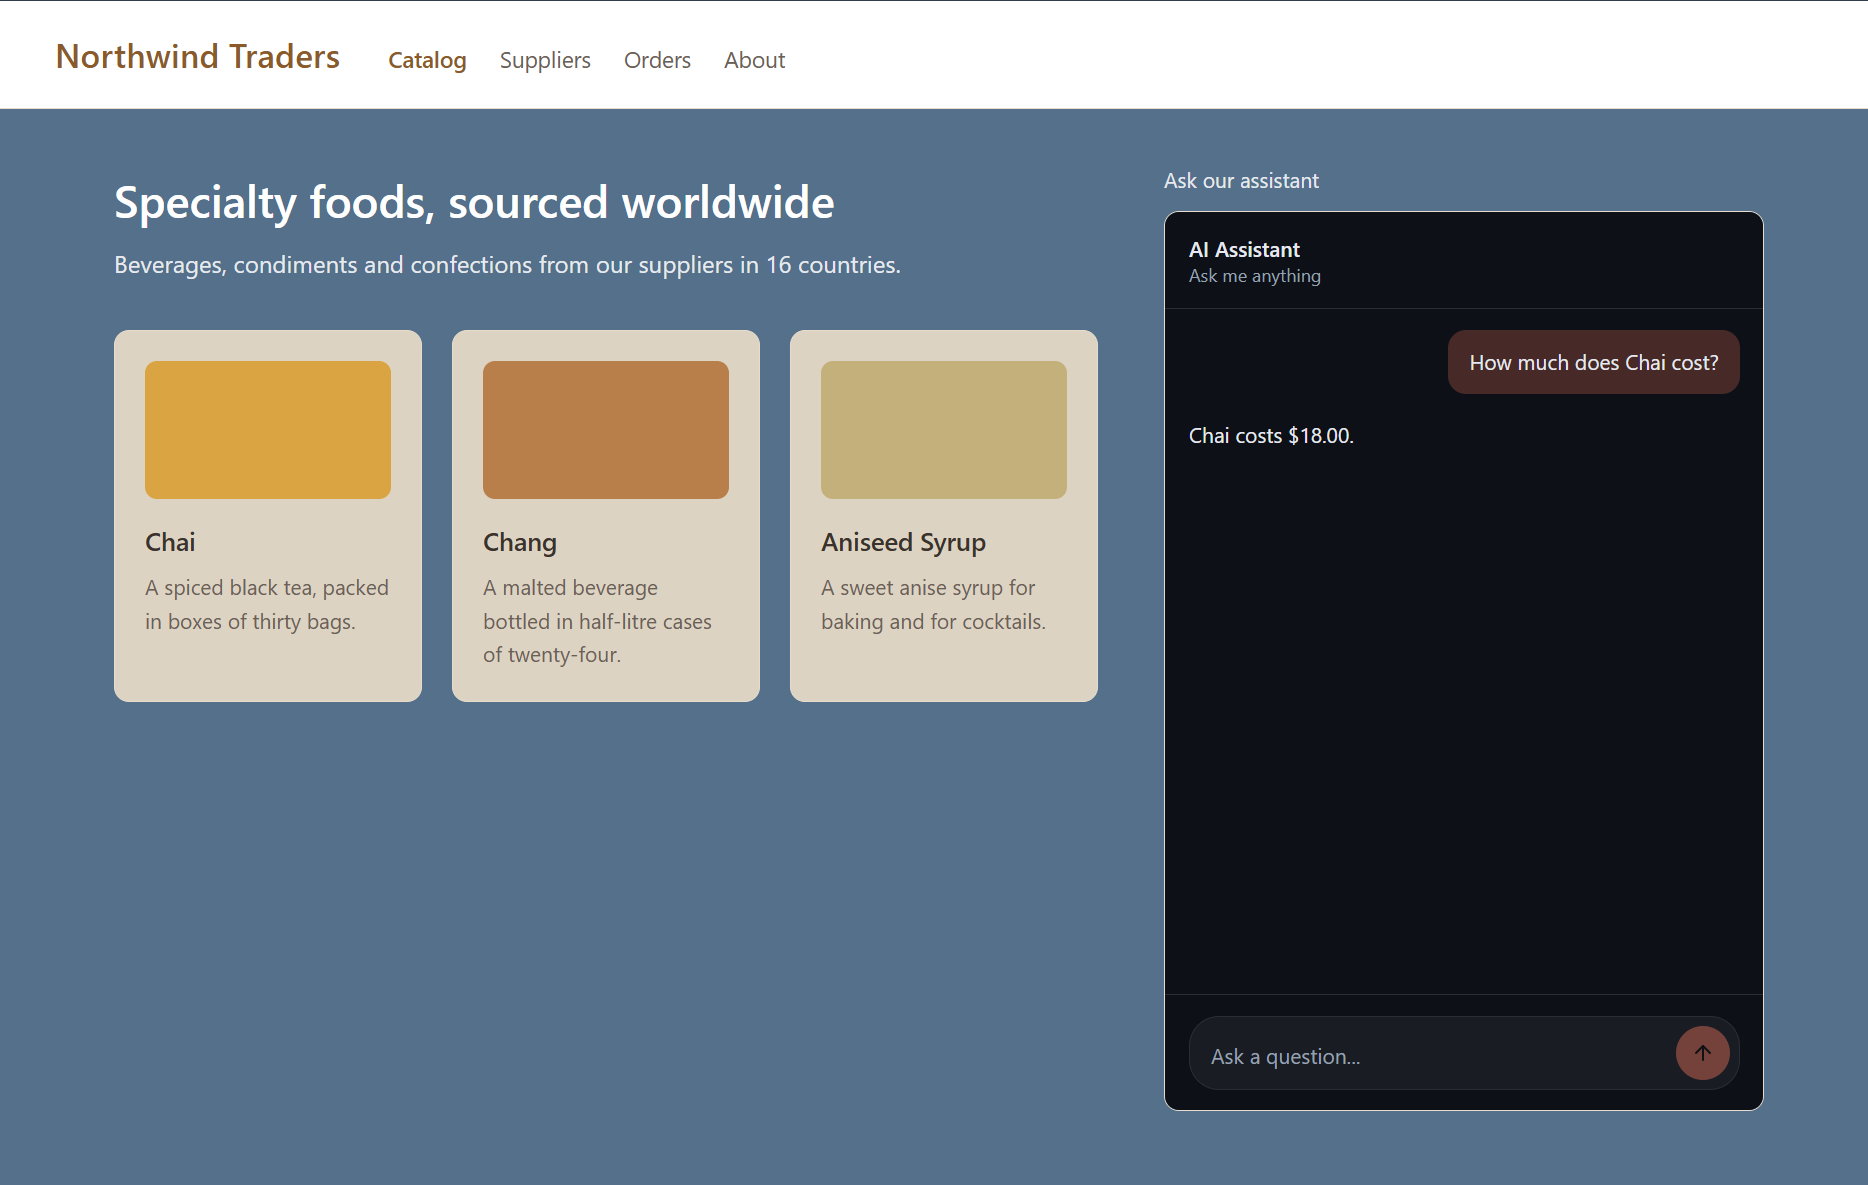
A visitor types a question into the widget and is answered from your app's data, without an account and without any dealings with Quill.
Two things are left to settle before a page like this faces real visitors:
-
The allowed origins of the channel.
While the allowed origins list is empty, your widget can be placed on any site.
Edit the channel and enter the addresses of your own pages if you want to keep the widget to them. -
A link for each visitor.
A link carries one conversation and one set of limits, so everybody visiting a page that holds an embed link will share the same conversation and limits.
A live site commonly generates a link per visitor, and places the link in the page as the page is served.
Both are covered in Embed the Chat Widget.
This concludes the Getting Started path:
Quill is deployed and you can access and manage it,
your source data is mirrored into your app's internal database,
an agent answers from this internal database,
and your users can reach the agent through a chat widget on your website.
There is much more to Quill than these pages cover, including other channels besides the chat
widget, and actions your agents may run.
The Overview page is a good starting point for more, and you can then navigate the
documentation and, above all, experiment in your own deployment.