Using Remote Attachments to cut storage costs

RavenDB's document attachments let you store any file with the corresponding document. No matter if it's a PDF, a video, an image, or something completely different, you can still keep it with the rest of the document, stored as bytes. The only problem is that some attachments can be large and numerous, while your storage space may be limited.
There's a simple solution - you might want to store binary files at some cloud object storage, but transporting your data with custom scripts creates operational risk and adds another point of failure, not to mention implementation and maintenance costs.
That's why remote attachments exist: an easy way to add and store attachments in the cloud storage service. In this guide, we will discuss how to add and utilize remote attachments. Let's dive into the topic and learn how to utilize them with maximum efficiency.
How does RavenDB store attachments locally?
RavenDB uses Voron, its own storage engine, to manage attachment data. When you store an attachment locally, Voron writes it as a single binary stream — the engine tracks only where the file starts and how long it is. This allows the database to store any attachment regardless of data type, with Voron's internal optimizations handling compression and I/O efficiency transparently.
Why should you use remote attachments instead of local storage?
Remote attachments let you store large attachment data in external cloud storage instead of inside the database. This keeps your database small and fast, even when working with heavy files. Attachments are stored in your own cloud account (Azure Blob Storage, Amazon S3, or S3-compatible storage such as MinIO, Wasabi, or Backblaze B2).
From the application's perspective, nothing changes. Attachments are accessed exactly the same way as before. The only difference is that the binary data lives outside the database. Existing attachments can be moved to remote storage without schema changes or application rewrites.
RavenDB handles the entire process for you: uploads, retries, consistency, and monitoring. There are no custom scripts, no fragile migrations, and no application changes required. Let's discover various destinations and describe how we can leverage them.
Remote attachments are not supported on sharded databases. If you are using sharding, attachments must remain local.
When should you use cold storage classes like Glacier?
Cold storage classes are the right choice for remote attachments that are written once and rarely read — such as invoices, medical documentation, or legal documents. For those cases, you typically don't need immediate access. Cost-effective storage options such as Glacier Instant Retrieval or Glacier Deep Archive for AWS S3 are ideal. Deep Archive can cost roughly 90% less per GB than Standard storage, but retrieval takes minutes to hours instead of milliseconds.
S3 storage class can be configured in Studio, but if you want to configure Azure Blob storage behaviour you will need to do it yourself in Azure settings.
Which S3 storage class is best for frequently accessed attachments?
If your attachments need fast retrieval — such as product images or PDFs used repeatedly — choose S3 Standard or Intelligent-Tiering. Standard provides millisecond-level access with higher per-GB costs. Intelligent-Tiering automatically moves objects between access tiers based on usage patterns, optimizing cost without sacrificing retrieval speed.
Currently (RavenDB 7.2), Azure Blob, Amazon S3, and any S3-compatible services (MinIO, Wasabi, Backblaze B2) are supported. In this guide, we assume you already have your S3 or Blob storage configured.
How do you set up remote attachments in Studio?
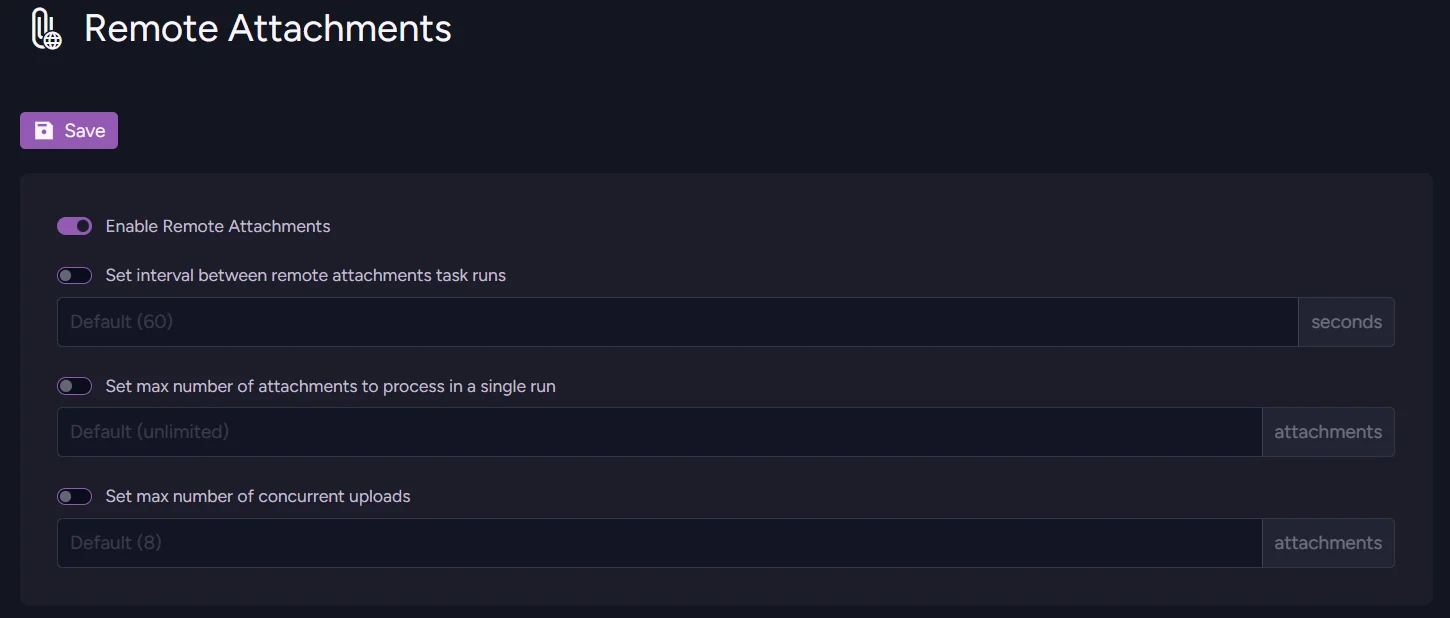
To pick a destination for your attachments, first prepare a connection string. Open your database, open the Settings tab, and then the Remote Attachments settings.
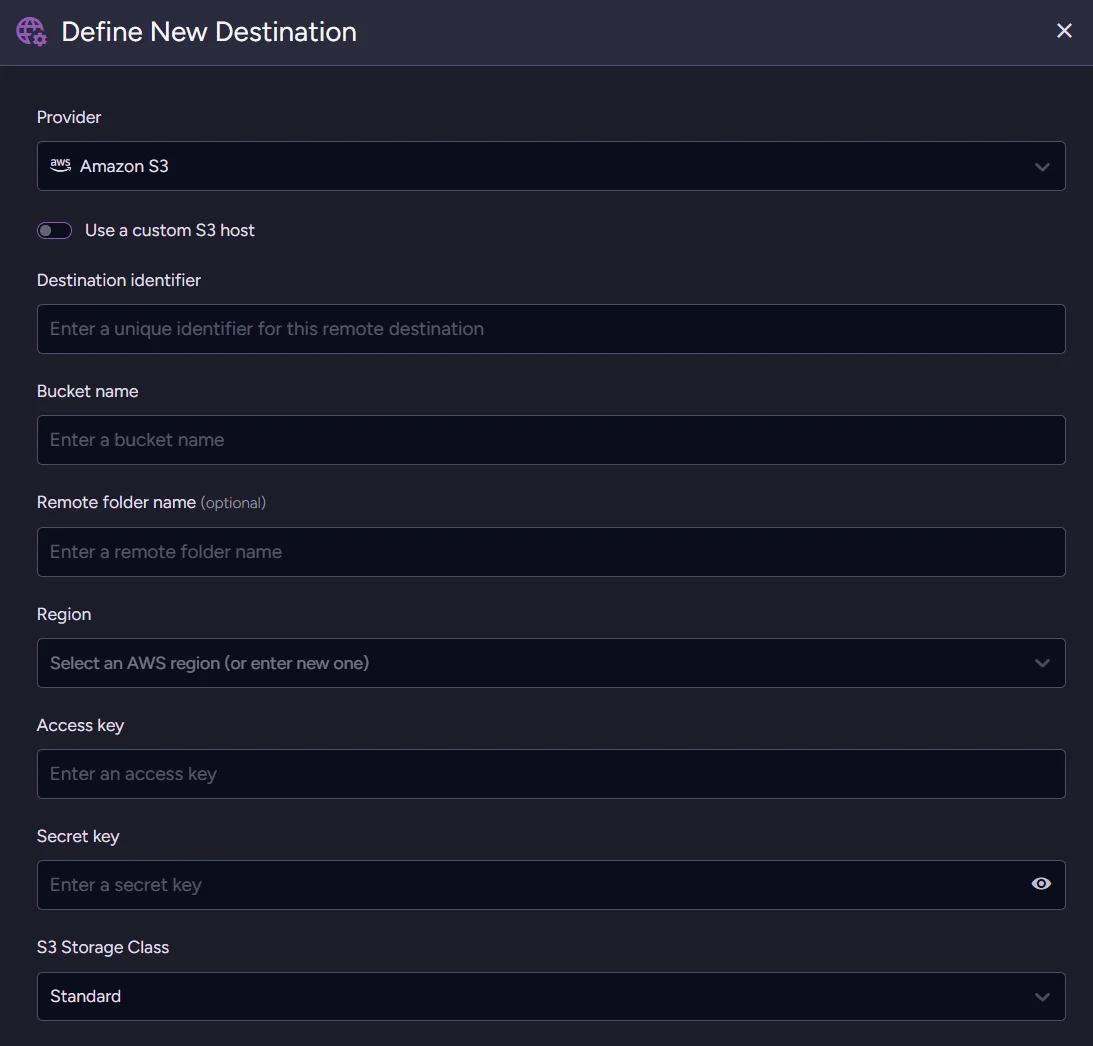
Amazon S3
Configuration is straightforward:
- Pick the provider and enter a Destination identifier (your new Destination's unique name).
- Enter the bucket name you selected when creating S3, then select the remote folder (if needed) and the region.
- Go to IAM and create or retrieve your role with access key and secret key. If you want to learn more about role creation in AWS's IAM please refer to the AWS IAM documentation.
- Choose an S3 Storage Class. Those classes affect how your S3 will behave and how storage services will be priced. Depending on your needs, you can choose from:
- For frequent access, e.g. S3 Standard
- For occasional access, e.g. S3 Standard-IA
- For rare access, e.g. S3 Glacier Instant Retrieval
- Unpredictable/auto e.g. S3 Intelligent-Tiering
If you want to learn more about S3 storage classes, see the AWS storage class documentation. After choosing a class, you can Test credentials and then Apply Configuration. Then switch on Remote Attachments and you are ready to add documents.
Azure Blob
Azure Blob Storage doesn't have a storage class selector in Studio, so the setup is simpler. You configure storage tiers (Hot, Cool, Archive) directly in the Azure portal; from RavenDB's side, you just connect and go.

To connect:
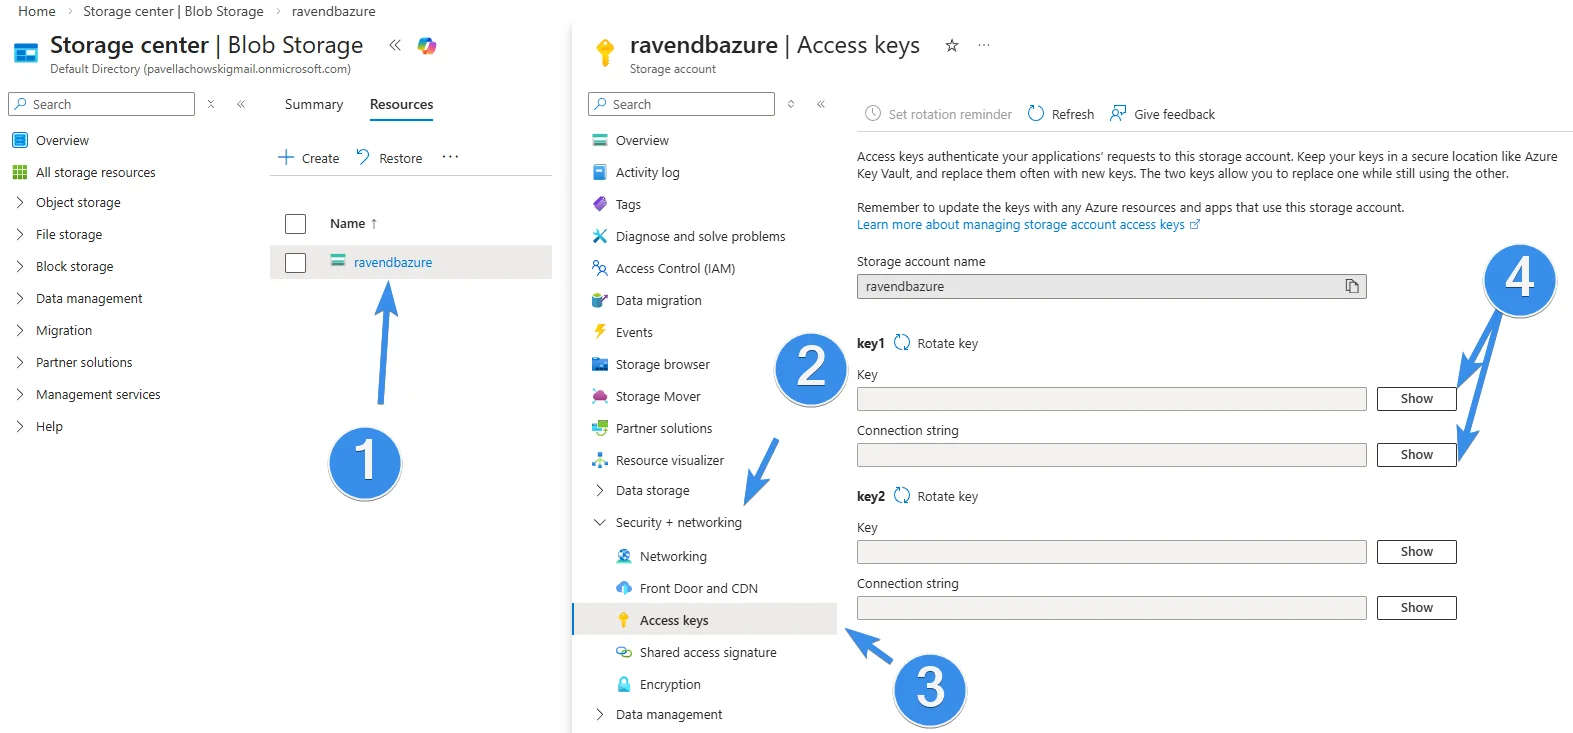
- In Azure, go to your Storage Account's Security settings and then Access keys. Copy both the Account name and Account key.
- Go to your Containers tab and create a new container (or use an existing one).
- In RavenDB Studio, enter the Account name, Account key, and storage container name. Then select a name for the destination and save.
- After enabling Remote Attachments, you are ready to add attachments.
How do you configure remote attachments from C# code?
Sending ConfigureRemoteAttachmentsOperation replaces the entire existing configuration. If you already have a destination configured and want to add a second one, first retrieve the current configuration, add your new destination to it, then send the updated configuration. Otherwise, the existing destination will be silently removed.
You can configure an Amazon S3 destination like this:
var s3Settings = new RemoteAttachmentsS3Settings
{
    BucketName = "your-bucket-name",
    AwsAccessKey = "your-amazon-access-key",
    AwsSecretKey = "your-amazon-secret-key",
    AwsRegionName = "eu-north-1",
    RemoteFolderName = "attachments" //optional
};

var configuration = new RemoteAttachmentsConfiguration
{
    Destinations = new Dictionary<string, RemoteAttachmentsDestinationConfiguration>
    {
        {
            "amazon-s3",
            new RemoteAttachmentsDestinationConfiguration
            {
                S3Settings = s3Settings,
                Disabled = false
            }
        }
    },

    Disabled = false,
    CheckFrequencyInSec = 600,
    MaxItemsToProcess = 25,
    ConcurrentUploads = 6
};

await store.Maintenance.SendAsync(
    new ConfigureRemoteAttachmentsOperation(configuration)
);
Or alternatively, for Azure Blob Storage:
var azureSettings = new RemoteAttachmentsAzureSettings
{
    StorageContainer = "your-container-name",
    AccountName = "your-account-name",
    AccountKey = "your-account-key",
    RemoteFolderName = "attachments" // Optional
};

var configuration = new RemoteAttachmentsConfiguration
{
    Destinations = new Dictionary<string, RemoteAttachmentsDestinationConfiguration>
    {
        {
            "azure-blob",
            new RemoteAttachmentsDestinationConfiguration
            {
                AzureSettings = azureSettings,
                Disabled = false
            }
        }
    },

    Disabled = false,
    CheckFrequencyInSec = 600,
    MaxItemsToProcess = 25,
    ConcurrentUploads = 6
};

await store.Maintenance.SendAsync(
    new ConfigureRemoteAttachmentsOperation(configuration)
);
For more details on all configuration options, see the remote attachments reference documentation.
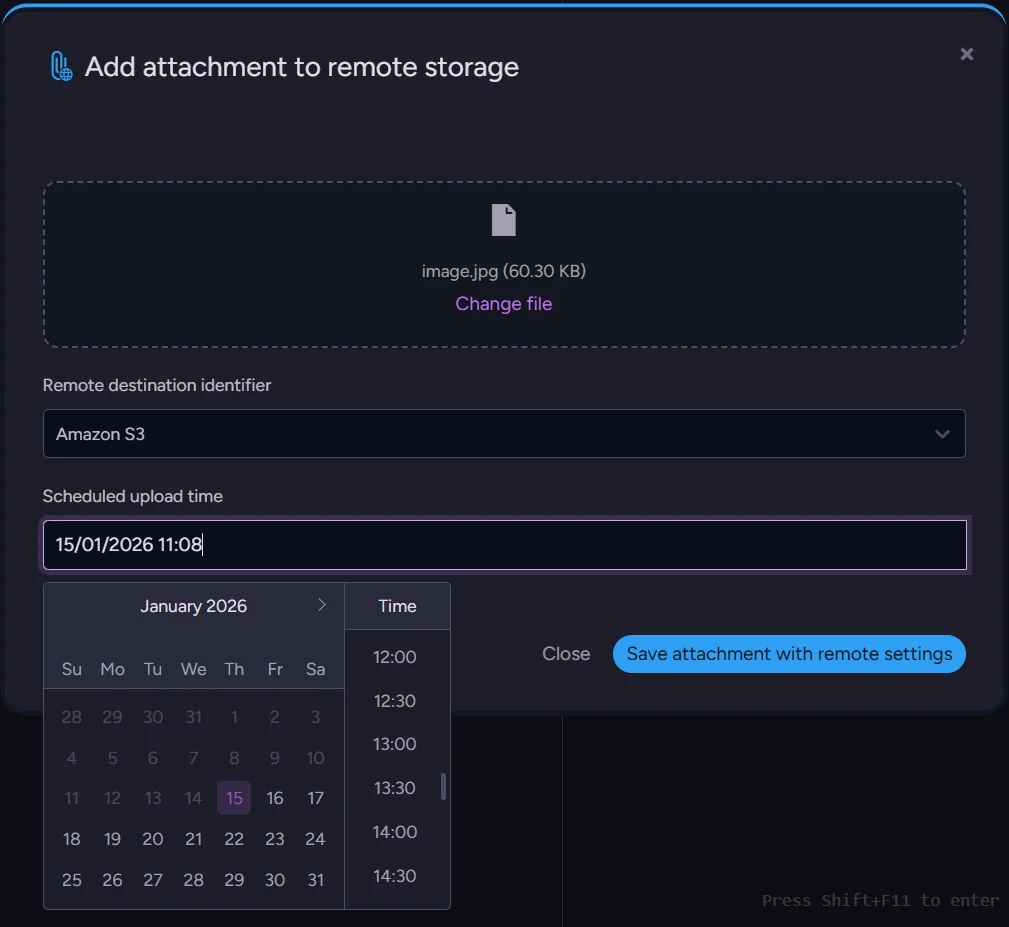
How do you add a remote attachment in Studio?
Once configured, you can add a new remote attachment to a document. Enter your document and select the attachments tab under the properties window. Click the arrow on the right to reveal 'Add attachment to remote storage'.
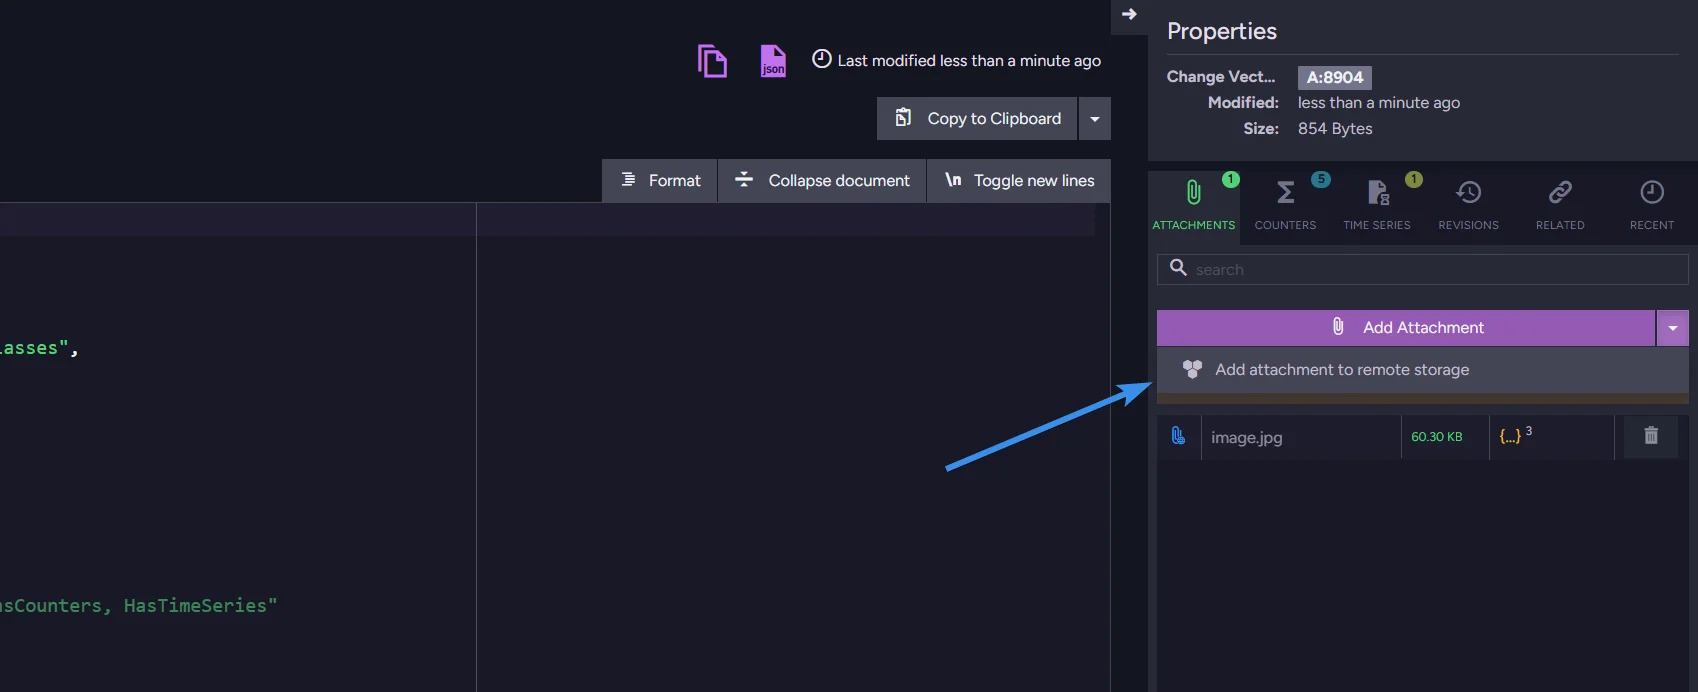
Add the file, select the destination you want to use, and set the time it is supposed to be moved to the destination. After saving, your attachment is added locally and will be transported to your remote storage when the scheduled time comes.
How do you add a remote attachment from C# code?
Adding remote attachments from code is nearly as easy as adding regular attachments:
using (var asyncSession = store.OpenAsyncSession())
{
    var product = new Product
    {
        Name = "Nord-Ost Matjeshering",
        Supplier = "suppliers/13-A",
        Category = "categories/8-A",
        QuantityPerUnit = "10 - 200 g glasses",
        PricePerUnit = 25.89m,
        UnitsInStock = 13,
        UnitsOnOrder = 10
    };

    await asyncSession.StoreAsync(product, "products/1999");

    var attachmentPath = @"C:\temp\image1.png";
    var attachmentName = "image1.png";

    var remoteParameters = new RemoteAttachmentParameters(
        identifier: "amazon-s3",
        at: DateTime.UtcNow.AddMinutes(1));

    using (var stream = File.Open(attachmentPath, FileMode.Open, FileAccess.Read))
    {
        var storeParameters = new StoreAttachmentParameters(attachmentName, stream)
        {
            RemoteParameters = remoteParameters,
            ContentType = "image/png"
        };

        asyncSession.Advanced.Attachments.Store("products/1999", storeParameters);

        await asyncSession.SaveChangesAsync();
    }
}
Or alternatively you can do it using a PutAttachmentOperation operation:
var attachmentPath = @"C:\temp\image1.png";

await using (var stream = new FileStream(
    attachmentPath, FileMode.Open, FileAccess.Read, FileShare.Read, bufferSize: 4096, useAsync: true))
{
    var documentId = "products/999";
    var attachmentName = "image1.png";

    var remoteParameters = new RemoteAttachmentParameters(
        identifier: "my-amazon-storage",
        at: DateTime.UtcNow.AddMinutes(1));

    var storeParams = new StoreAttachmentParameters(attachmentName, stream)
    {
        RemoteParameters = remoteParameters,
        ContentType = "image/png"
    };

    var operation = new PutAttachmentOperation(documentId, storeParams);

    var result = await store.Operations.SendAsync(operation);
}
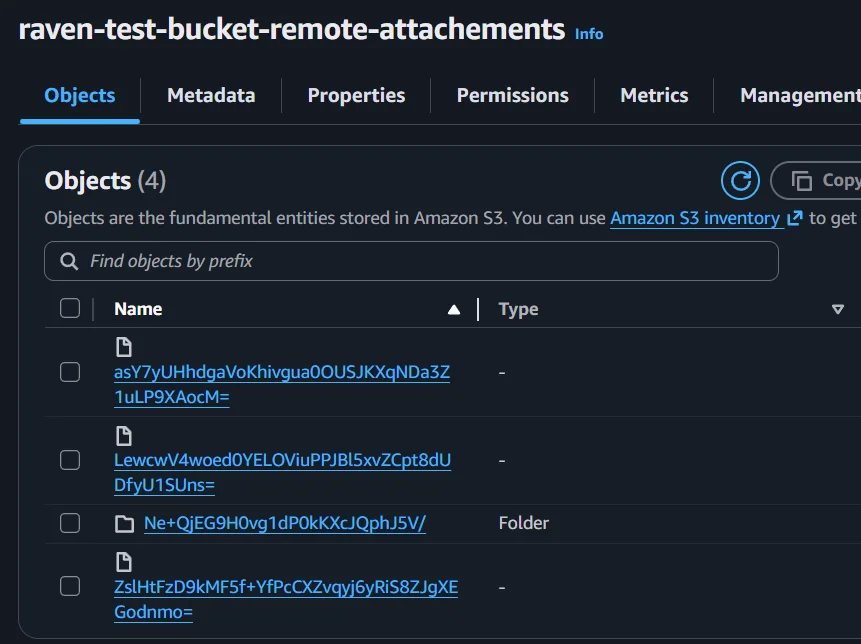
Then after one minute that has been requested with DateTime.UtcNow.AddMinutes(1), we can see the attachments were automatically offloaded to our S3 bucket:
How do you migrate existing local attachments to remote storage?
When moving to remote storage, you would probably also want to move old attachments. To do that we can use a set-based patch operation:
from @all_docs
update
{
    if (this["@metadata"]["@attachments"] == null)
        return;

    const now = new Date();
    const formattedDate = now
        .toISOString()
        .replace('Z', '0000');

    for (let attachment of this["@metadata"]["@attachments"]) {
        if (attachment.RemoteParameters != null)
            continue;

        attachments(this, attachment.Name)
            .remote('my-amazon-storage', formattedDate);
    }
}
After this script is executed, all attachments will be scheduled to be offloaded into the target destination.
Summary
Remote attachments in RavenDB let you offload binary data to Amazon S3, Azure Blob Storage, or any S3-compatible service while keeping the same API access patterns. Key takeaways:
- Cold storage (Glacier, Archive tiers) is ideal for rarely accessed compliance or archival data, reducing storage costs by up to 90%.
- Standard or Intelligent-Tiering is best for frequently accessed attachments like product images.
- Configuration is available through both Studio and C# code. The upload process is asynchronous — attachments are stored locally first, then transferred at the scheduled time.
- Existing local attachments can be bulk-migrated using a set-based patch operation.
- Remote attachments are not supported on sharded databases.
For the full API reference, see the remote attachments configuration documentation. To learn about storing remote attachments programmatically, see store remote attachments. For how remote attachments interact with replication, backups, and subscriptions, see attachments and other features.
Interested in RavenDB? Grab a free developer license for testing, or start a free RavenDB Cloud database. If you have questions about this feature, or want to hang out and talk with the RavenDB team, join the RavenDB Discord Community.