Using Azure Queue Storage ETL for Serverless Processing

What You’ll Learn
- How to configure ETL processes in RavenDB to transform and push data to Azure Queue Storage
- Creating Azure Functions, deploying them to the cloud, and setting up triggers from Azure Queue Storage. We’ll be writing in C# for this purpose.
Introduction
Building systems responsive to dynamic changes in data is an important aspect of modern development. Achieving seamless communication between databases, storage solutions, and processing units requires thoughtful planning and efficient tools. This process can involve complexity by configurations, custom scripts, and continuous monitoring. We also face complexities when facing the challenge of scaling systems as data volumes increase. When building a product, it typically diverts a lot of valuable time from core development to maintenance:
- Complex Setup: Establishing robust data pipelines often requires extensive configuration and testing phases.
- Maintenance Overhead: Continuous monitoring, updates, and troubleshooting are essential but can consume significant resources.
- Scalability Issues: Traditional systems may struggle to scale effectively with growing data loads, requiring manual intervention and optimization.
RavenDB's ETL feature with Azure Queue Storage and Azure Functions can ease those problems, offering a simple solution at the same time. Rather than a complete overhaul, see this integration as a practical way to simplify your workflow.
Benefits
Simplified Setup
RavenDB’s ETL feature enables you to define processes that directly push documents upon data changes to Azure Queue Storage. Azure Functions are then triggered by these queue messages, facilitating real-time processing with minimal configuration overhead. This setup reduces the need for extensive custom scripting and configuration management, allowing developers to allocate more time to productive coding tasks.
Because this is a core part of RavenDB, you don’t need to build your own monitoring and management solutions, it is all built-in.
Enhanced Scaling
Azure Functions are inherently scalable, automatically adjusting resources based on incoming workload. This serverless architecture eliminates the management need for infrastructure scaling manually. As data volumes increase, the system scales seamlessly, ensuring optimal performance and cost efficiency without developer intervention.
Simple Event-Driven Architecture
You can achieve a simple and responsive event-driven architecture using Azure Queue Storage as an intermediate layer and Azure Functions to process queued messages. This setup enables real-time responses to business events or user actions by processing data changes captured by RavenDB's ETL. If you need the database write and the queue publish to succeed or fail as one unit, the Transactional Outbox with RavenDB Queue ETL guide covers that pattern in depth.
Step-by-Step Guide
What you’ll need
- Azure Storage Account to create queues
- Connection String or EntraID credentials to your Storage Account
- RavenDB with license for Queue ETL (we provide a free Developer license with this capability)
If Queue ETL is new to you, the Queue ETL overview covers the concepts shared by every queue destination, and the Azure Queue Storage ETL reference documents the task itself.
1. Set up an ETL
Let’s define an ETL process in RavenDB Studio to push data changes to Azure Queue Storage. It will be a much easier way to set it up in the Studio. Open your browser and type your server URL. Select your database, and go to Tasks > Ongoing Tasks. Let’s create a database task Azure Queue Storage ETL.
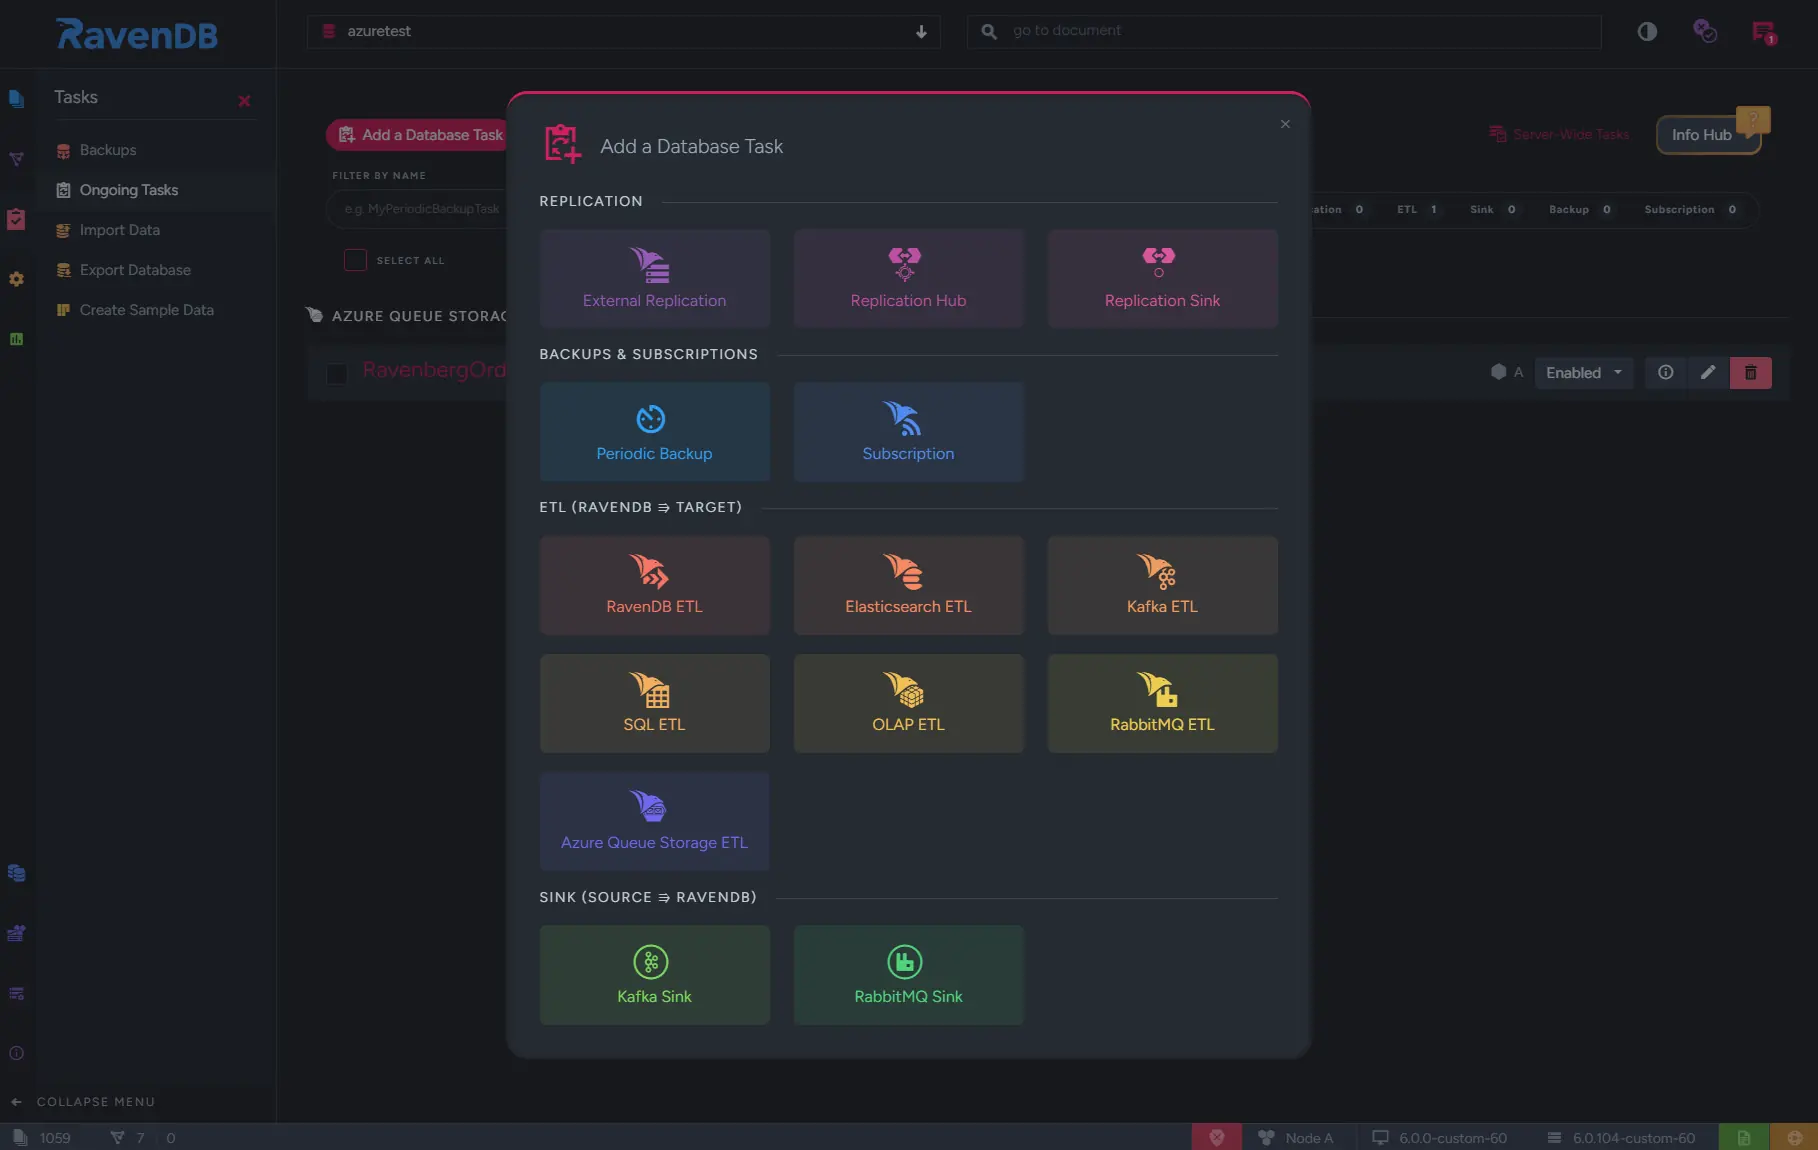
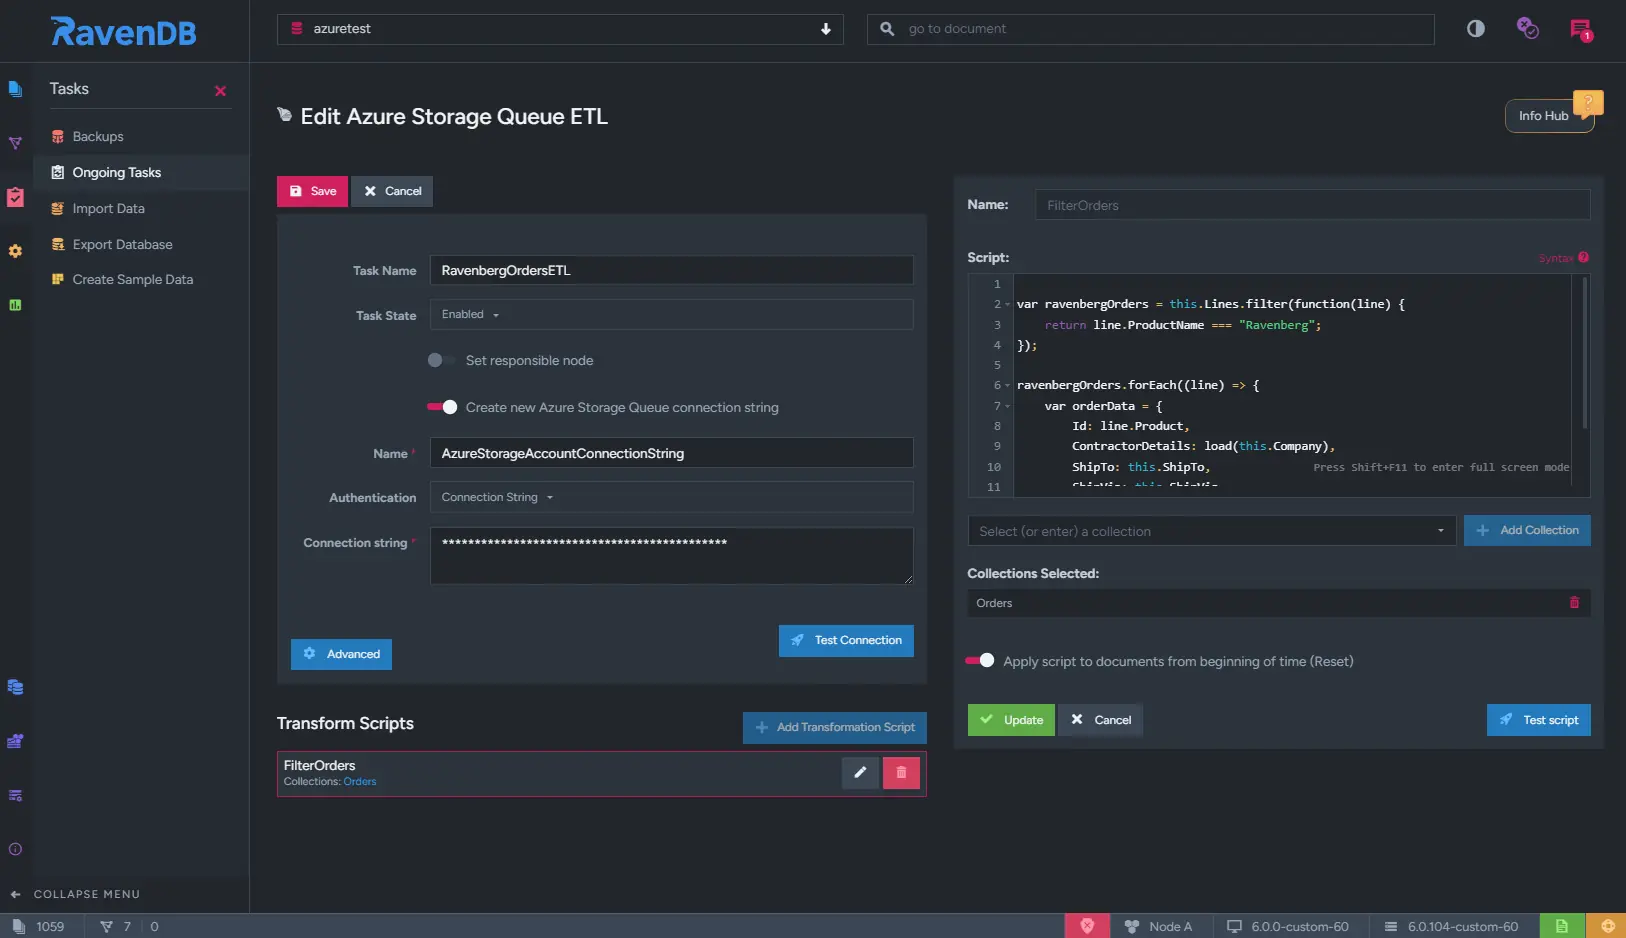
This opens the configuration panel where you can see all the details of your new ETL task. You can see the configuration on the left, and on the right, the transform script. For more details, visit this documentation page.
Let's write the transform script. It will transform incoming documents and load the data to your destination queues. You can check if it's correct by clicking Test Script.
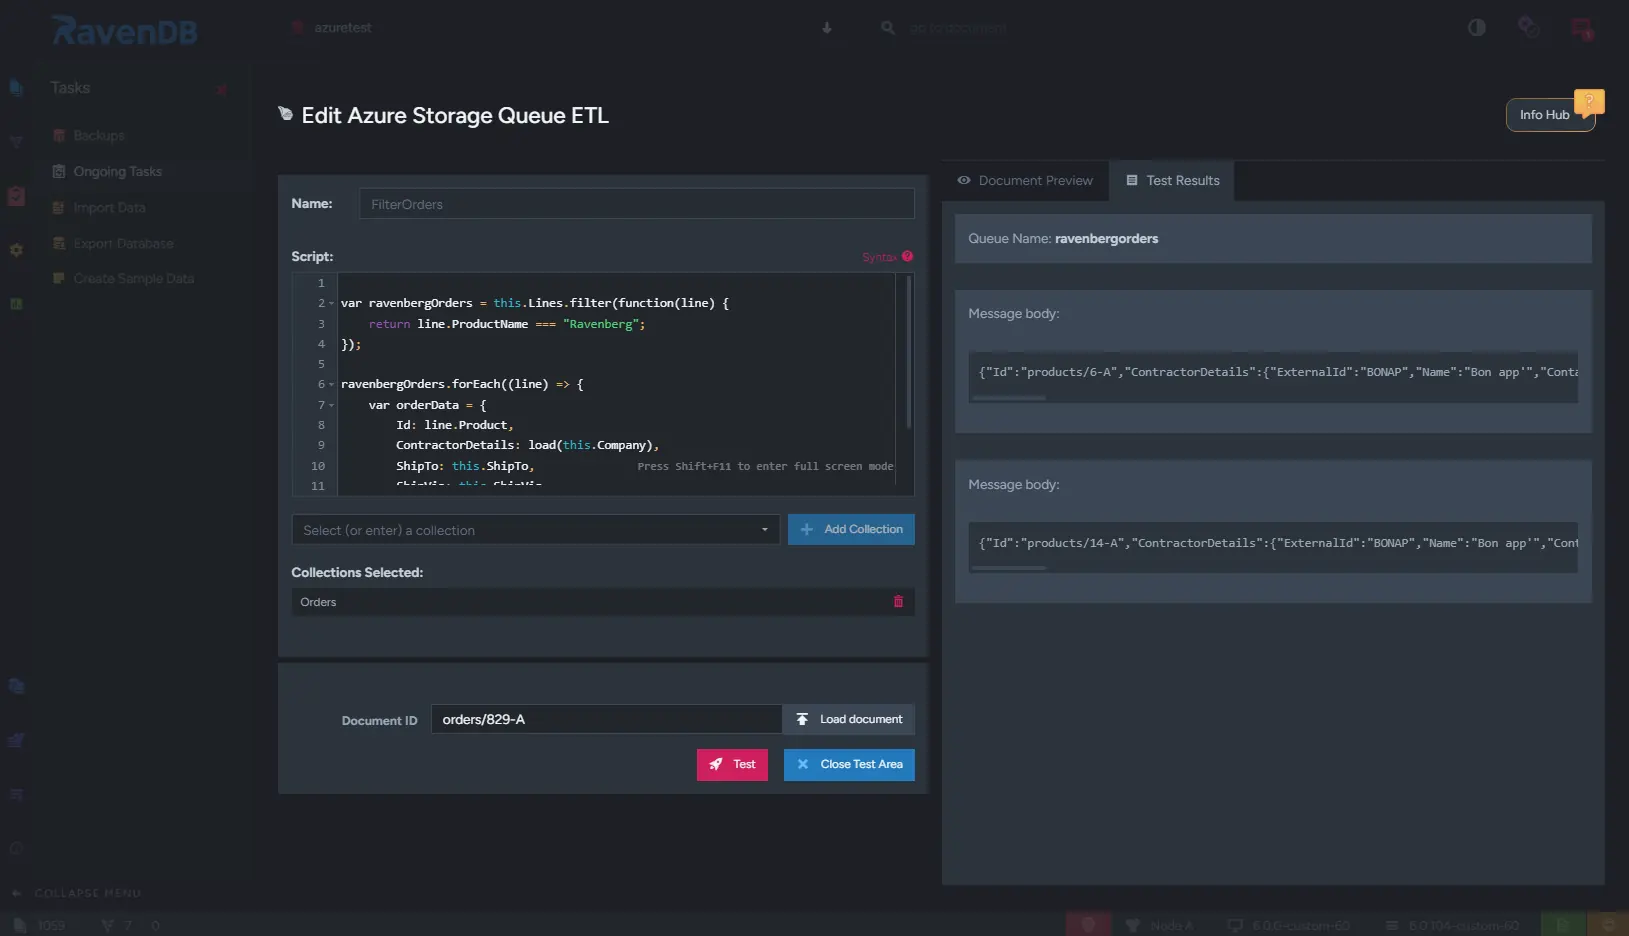
We've written a simple script that will only send the details of particular orders, that require to ship beer labeled as Ravenberg
var ravenbergOrders = this.Lines.filter(function(line) {
    return line.ProductName === "Ravenberg";
});

ravenbergOrders.forEach((line) => {
    var orderData = {
        Id: line.Product,
        ContractorDetails: load(this.Company),
        ShipTo: this.ShipTo,
        ShipVia: this.ShipVia
    };
    loadToRavenbergOrders(orderData);
});
Now we need to make sure that our documents will be sent to the right target - we need to configure the connection to the destination (Azure storage account).
There are a couple of ways to specify the destination. All require some particular credentials, which you’ll need to retrieve from your Azure Storage Account. ETL process needs them to be authorized to enqueue new messages for you.
Let’s take a look at the options we have:
By default, it's a connection string, which is a perfect solution for your app development, as it provides a simple way to get to your Azure Storage Account without any speed bumps.

But be careful, it’s too dangerous to use further on production - a simple string may grant full access to your system, which is a no-go.
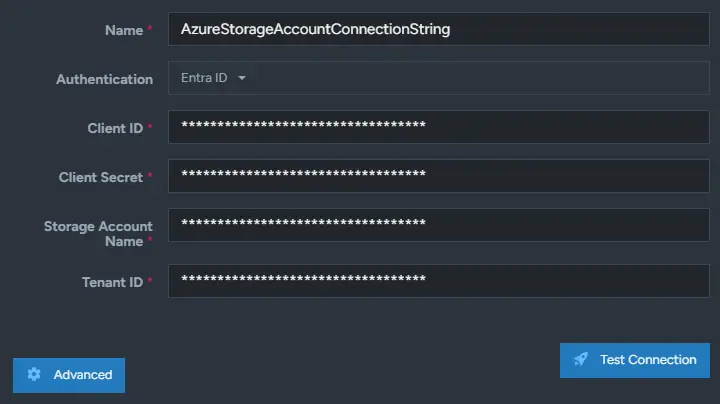
For more robust security needed at the production, select either Entra ID or Passwordless, which is the recommended authentication option by Microsoft.
The Entra ID method allows for much more granular access than the connection string, which can be controlled from the Azure level.
The last one is a passwordless option, which is a way to authorize recommended by Microsoft. Although it requires a few extra steps to authorize the machine that hosts the RavenDB server, it provides you robust security.
This option authorizes a dedicated machine and can only be used in self-hosted mode. You can log in to Azure through the terminal on the server-hosting machine. Passwordless authorization works only if the account on the machine has the Storage Account Queue Data Contributor role assigned. The Contributor role will be insufficient.

It’s important to know that all queues that will be created through the ETL process, follow defined rules about their naming. But if you have already created the queue in the Azure Storage Account, the ETL won’t overwrite your existing configuration. It will use it, leaving the configuration untouched.
We’ve successfully configured the ETL, specifying how documents should be transformed and where they should be loaded. As we’re here, let’s talk a bit about advanced settings.
In the Advanced section, you can configure the ETL process to delete the documents from RavenDB that have already been sent to the queues. It’s an interesting option that you may consider in your solution. To enable it, you will need to enter the Azure queue names. If the document is loaded to one of these queues, it’s deleted from RavenDB.
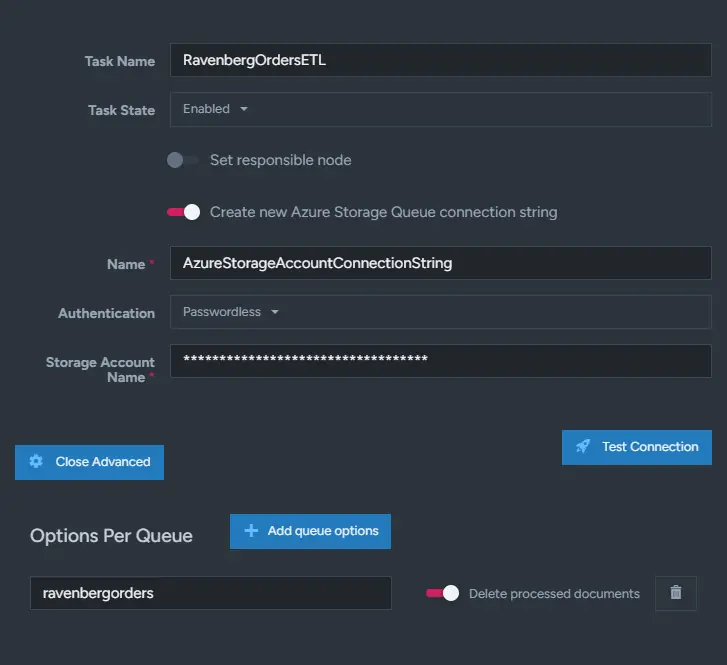
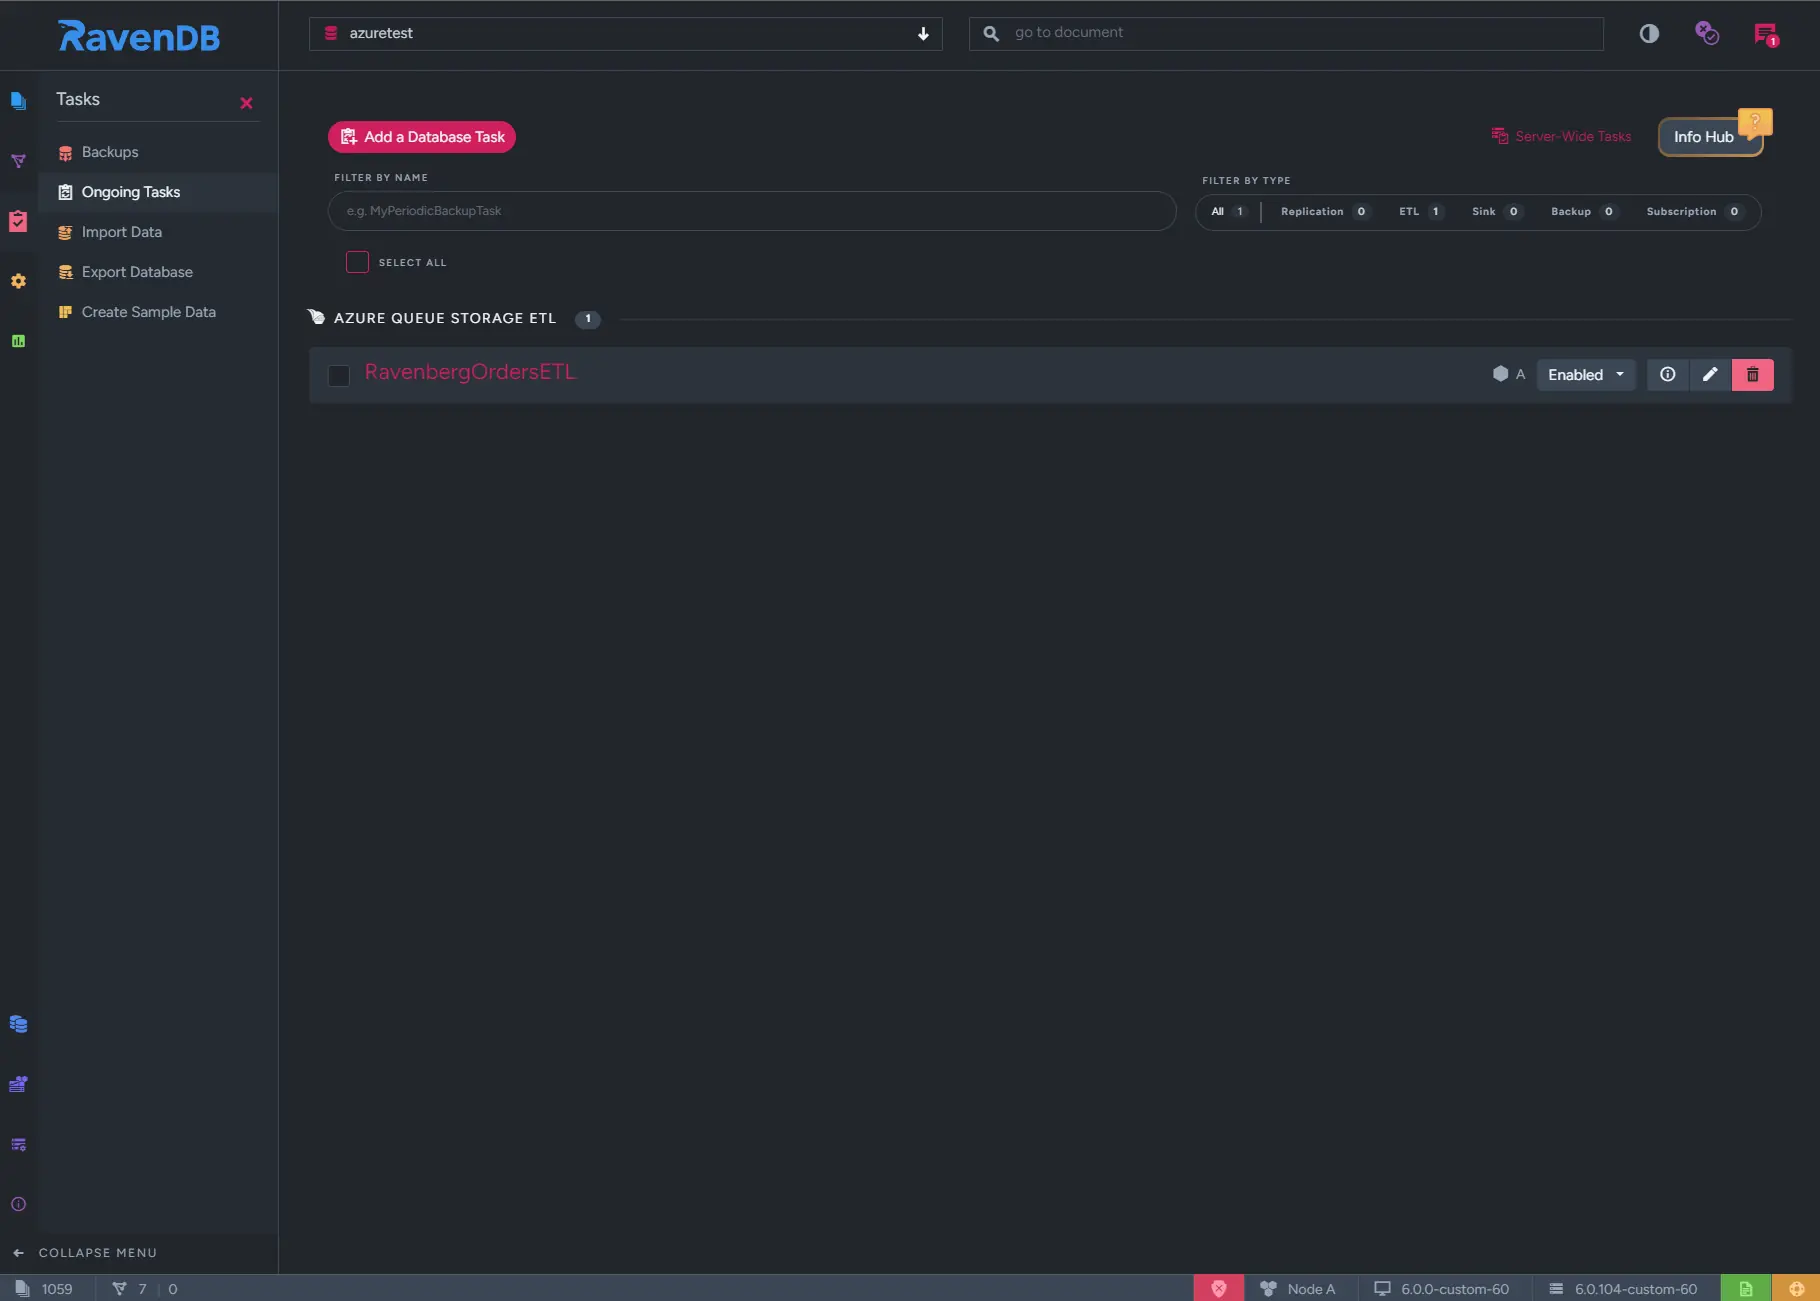
Let’s save the task. You'll automatically return to the tasks view to see your task status.
(For more details about this view visit this page.) If the task starts reporting errors later, Troubleshooting ETL with the RavenDB ETL Errors View shows how to read and clear them.
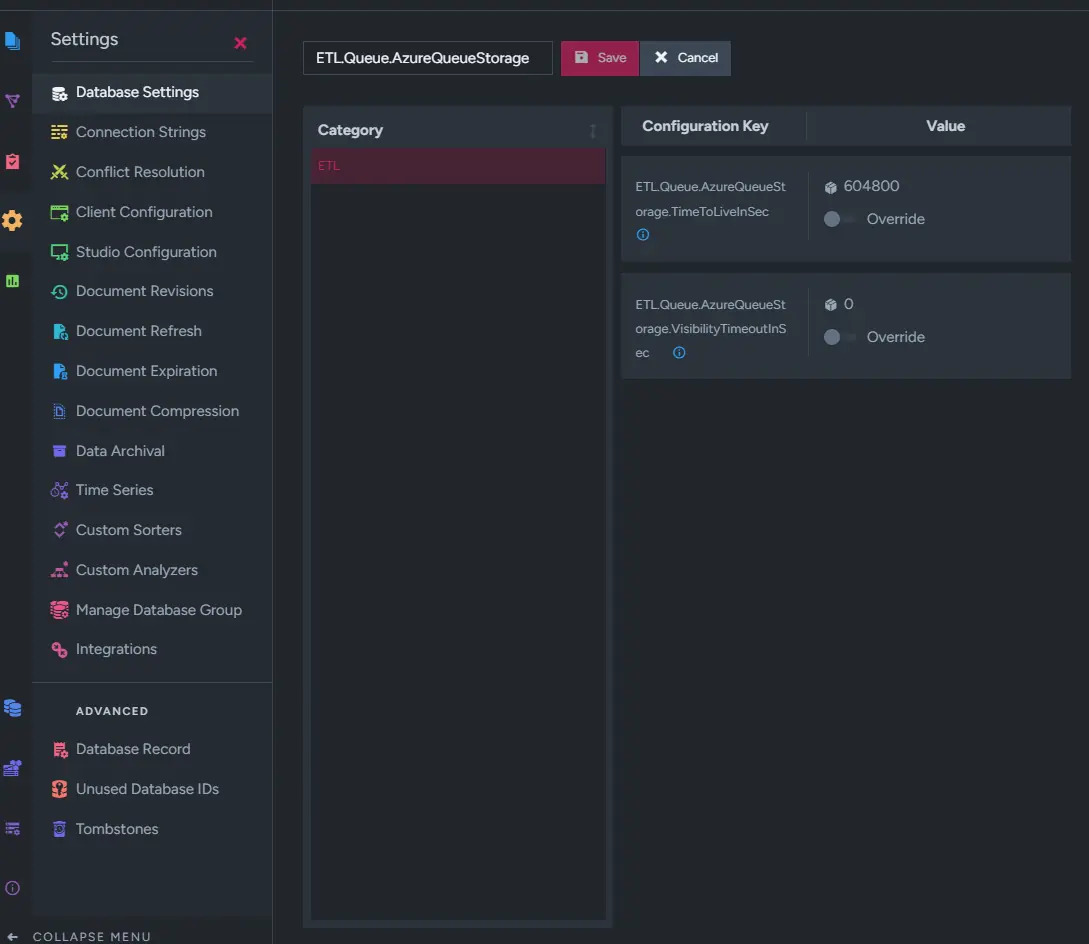
Finally, let’s describe the database-level configuration options for the AQS ETL. We can configure a specific time to live and a visibility timeout of messages.
- VisibilityTimeout - The period a message will be invisible after being dequeued before it becomes visible again.
- MessageTTL - The time-to-live for messages in the queue.
To configure these options, you can go to Settings > Database Settings. And search for ETL.Queue.AzureQueueStorage options.
- All messages sent by Azure Queue Storage ETL follow the CloudEvent format, and are BASE64 encoded.
- The maximum message size in Azure Queue Storage is 64KB, documents larger than this won’t be loaded.
- There’s no need to decode the message from BASE64 at the Function level, as it’s converted to a string automatically.
Sample message:
{
  "specversion": "1.0",
  "id": "A:8885-ElIMXdAFykKJZxdovyx0xg",
  "type": "ravendb.etl.put",
  "source": "http://127.0.0.1:8080/azuretest/RavenbergOrdersETL/FilterOrders",
  "data": {
    "Id": "products/6-A",
    "ContractorDetails": {
      "ExternalId": "BONAP",
      "Name": "Bon app'",
      "Contact": {
        "Name": "Laurence Lebihan",
        "Title": "Owner"
      },
      "Address": {
        "Line1": "12, rue des Bouchers",
        "Line2": null,
        "City": "Marseille",
        "Region": null,
        "PostalCode": "13008",
        "Country": "France",
        "Location": {
          "Latitude": 43.2611295,
          "Longitude": 5.3886613
        }
      },
      "Phone": "91.24.45.40",
      "Fax": "91.24.45.41",
      "@metadata": {
        "@collection": "Companies",
        "@timeseries": [
          "StockPrices"
        ],
        "@id": "companies/9-A"
      }
    },
    "ShipTo": {
      "City": "Marseille",
      "Country": "France",
      "Line1": "12, rue des Bouchers",
      "Line2": null,
      "Location": {
        "Latitude": 43.2611295,
        "Longitude": 5.3886613
      },
      "PostalCode": "13008",
      "Region": null
    },
    "ShipVia": "shippers/2-A"
  }
}
Now, let’s head to the Azure portal. We’ll write serverless functions.
2. Write Azure Function, and connect it to the queue with a Trigger
Azure Function should be called over the queue messages from Azure Queue Storage. We need to configure the Azure Function Trigger that passes the queue messages to our function.
The portal workflow below produces an in-process C# script function (run.csx), which is what the Azure Queue Storage trigger template creates. Microsoft ends support for the in-process model on 10 November 2026. Apps built this way keep running past that date but stop receiving security and feature updates. For production work, build the same function on the isolated worker model instead. The logic is identical; the difference is that the isolated model cannot be edited in the portal, so you need a local project and a deployment step.
We can do it all at once in the Create Function panel. Select the template Azure Queue Storage trigger. This template creates a function with a trigger already set up. For more information about Azure Portal and creating Functions you can visit this page.
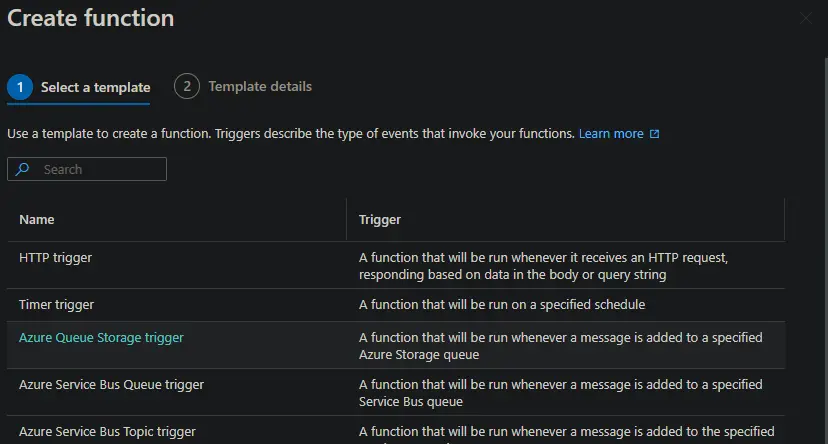
Configure function and queue name. The function will retrieve messages from this queue.
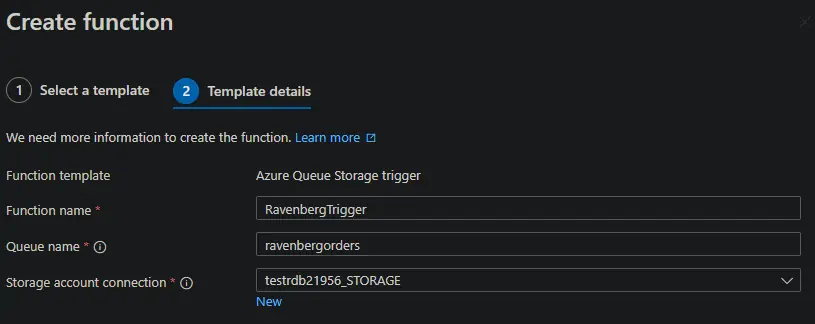
Now let's write a function that will handle Ravenberg orders and schedule them to be shipped. For this example, we'll just make a quick call to a different, fake API, for demonstration purposes, but your logic here can be as wide as you need.
The full function is below. (The gist mirrors it; the listing here is the one to copy.)
#r "Newtonsoft.Json"

using System;
using System.Net.Http;
using System.Net.Http.Json;
using System.Threading.Tasks;
using Microsoft.Extensions.Logging;
using Newtonsoft.Json.Linq;

private static readonly HttpClient client = new HttpClient();

public static async Task Run(string myQueueItem, ILogger log)
{
    log.LogInformation($"C# Queue trigger function processed: {myQueueItem}");

    try
    {
        // The ETL delivers a CloudEvent. The document payload sits under "data".
        var cloudEvent = JObject.Parse(myQueueItem);
        var orderData = cloudEvent["data"]?.ToObject<OrderData>();

        if (orderData is null)
        {
            log.LogError("Failed to deserialize the order data.");
            return;
        }

        var response = await client.PostAsJsonAsync("https://shippingapi.example.com/ship", orderData);
        response.EnsureSuccessStatusCode();
        log.LogInformation($"Order {orderData.Id} successfully shipped.");
    }
    catch (Exception ex)
    {
        log.LogError($"An error occurred: {ex.Message}");
    }
}

public class OrderData
{
    public string Id { get; set; }
    public ContractorDetails ContractorDetails { get; set; }
    public ShipToDetails ShipTo { get; set; }
    public string ShipVia { get; set; }
}

public class ContractorDetails
{
    public string ExternalId { get; set; }
    public string Name { get; set; }
    public ContactDetails Contact { get; set; }
    public AddressDetails Address { get; set; }
    public string Phone { get; set; }
    public string Fax { get; set; }
}

public class ContactDetails
{
    public string Name { get; set; }
    public string Title { get; set; }
}

public class AddressDetails
{
    public string Line1 { get; set; }
    public string Line2 { get; set; }
    public string City { get; set; }
    public string Region { get; set; }
    public string PostalCode { get; set; }
    public string Country { get; set; }
    public Location Location { get; set; }
}

public class ShipToDetails
{
    public string City { get; set; }
    public string Country { get; set; }
    public string Line1 { get; set; }
    public string Line2 { get; set; }
    public Location Location { get; set; }
    public string PostalCode { get; set; }
    public string Region { get; set; }
}

public class Location
{
    public double Latitude { get; set; }
    public double Longitude { get; set; }
}
Finally, you can test your script by pressing Test/Run. After that, press Save to deploy your function.
And we’re all set. ETL loads documents to the queue as messages. The Function is triggered when a new message pops up in the queue.
3. Handle duplicate messages
RavenDB is an idempotent producer, so it does not normally send the same message twice. It can still happen. The broker treats each node of a RavenDB cluster as a separate producer, so if the node running the ETL task fails partway through a batch, the node that takes over may resend messages the broker already accepted. Azure Queue Storage contributes its own at-least-once behaviour on the consuming side: any message whose visibility timeout expires before your function finishes is delivered again. As the Queue ETL overview states, verifying the uniqueness of each consumed message is the consumer's responsibility.
That matters for the function we just wrote, because it calls a shipping API. Processing one message twice ships the same order twice.
Every message already carries an identifier you can deduplicate on. The CloudEvent id attribute defaults to the document's change vector, and it is the "id": "A:8885-ElIMXdAFykKJZxdovyx0xg" field in the sample message above. Record it before performing the side effect, and skip anything you have seen before:
var eventId = cloudEvent["id"]?.ToString();

// AlreadyProcessedAsync and MarkProcessedAsync are yours to implement.
// Back them with any store that offers an atomic insert.
if (await AlreadyProcessedAsync(eventId))
{
    log.LogInformation($"Skipping duplicate delivery of {eventId}.");
    return;
}

var response = await client.PostAsJsonAsync("https://shippingapi.example.com/ship", orderData);
response.EnsureSuccessStatusCode();

await MarkProcessedAsync(eventId);
RavenDB compare-exchange values work well for this, as does a table with a unique constraint or a Redis SETNX. The important part is that the check and the record are atomic, so two concurrent deliveries of the same message cannot both pass the check.
The queue trigger also exposes the message's dequeue count as binding metadata. Logging it turns redelivery into something you can see rather than something you discover from a duplicate shipment.
Conclusion
We've successfully integrated RavenDB with Azure Queue Storage and Azure Functions cutting time spent on maintenance to a minimum, which can be used to write code instead. This approach reduces the complexity and overhead associated with traditional integration methods, offering scalability and simplicity at the same time. It's also a handy solution for implementing an event-driven architecture.
Embrace these tools to experience enhanced efficiency and flexibility in processing data in a serverless environment, allowing more time and resources to be dedicated to core development.
If you need traffic flowing the other way, turning incoming broker messages into RavenDB documents, Setting Up an Azure Service Bus Sink in RavenDB covers the same authentication options in the inbound direction.