Transactional Outbox with RavenDB Queue ETL

Distributed systems and their quirks
Sometimes, database-level transactions' atomicity isn’t enough to prevent inconsistencies. Consider a distributed system with microservices, a database, and a queue, all connected up to each other. The database stores invoices, and messages are published to different microservices. In systems like this, partial failure can be as bad or even worse than full failure - it causes a discrepancy that can be deadly for business.
Effectively, what you want to be ensured about, is that EVERY single invoice will have a corresponding message published. And this is non-trivial to implement. This requirement creates a whole new set of possible problems. If changes in data and message publishing are not treated with proper caution, the system can drift into chaos.
In this article, we will dive into the world of atomic transactions, queues, and transactional outboxes. Let’s see how to handle this problem and how RavenDB can help you avoid this problem.
Gap between database and queue
Publishing events based on data changes and hoping everything works out is only good until the first failure. We have fallacies of distributed computing to remind us of the basic problems of distributed systems. The database might be ACID-compliant, but those guarantees end at the database. If the data is saved in the database but the event is not sent due to a crash, network issue, or power outage, we just lose the data.
When it happens, we can end up with situations where the invoice exists, but no microservice responds to it. For example, in an e-commerce system, this can mean that payment is accepted, but no realization process is started. The order is never prepared or shipped, and from the user’s perspective, it simply disappears. This is how technical problems turn into lost trust.
At the same time, we can have the opposite situation: the queue receives our event, but the database doesn’t create an invoice. That’s how minor problems can change into real legal difficulties. We can’t have partial failure at all; it is worse than complete failure. Then how is it possible we have so many online services that work?
How the transactional outbox pattern works
The reason systems like this can work at all is that they stop treating event sending or document creation separately. The moment an invoice is created is also the exact moment an event must be captured. There is no acceptable state in which only one of those happens.
This is how the concept of the transactional outbox pattern was born. Instead of sending an event directly to the queue, the system first records the intent to publish that event together with the business data. The invoice and its corresponding event are stored in the database as part of the same transaction. If the transaction succeeds, both exist. If it fails, neither does. In practice, this usually means introducing an outbox as a separate collection and queuing its documents via a data subscription. We create documents simultaneously in both collections. In RavenDB, it would look like this:
using (var session = store.OpenAsyncSession())
{
    await session.StoreAsync(invoice);
    await session.StoreAsync(invoiceCreatedMessage);

    await session.SaveChangesAsync(); // single atomic commit
}
But in RavenDB particularly, there’s another way of achieving the same goal, using our Queue ETL feature. In the guide below, we’ll show how to achieve a transactional outbox pattern in RavenDB with ease, and then, we’ll show you how a transactional outbox pattern can be easily swapped with Queue ETL. Let’s dive into it!
Implementing the outbox with data subscriptions
We want to connect and save our documents to both collections as a single atomic transaction. To achieve that, we want to use the saveChanges() after storing both documents, to wrap both changes into a single transaction, as described in this article.
var invoice = new Invoice
{
    CustomerId = "customers/1-A",
    Amount = 199.99m,
    IssuedAt = DateTime.UtcNow
};

var outboxMessage = new InvoiceCreatedMessage
{
    CreatedAt = DateTime.UtcNow,
    Processed = false
};

using (var session = store.OpenAsyncSession())
{
    await session.StoreAsync(invoice);

    outboxMessage.InvoiceId = invoice.Id;

    await session.StoreAsync(outboxMessage);

    await session.SaveChangesAsync();
 }
Now, to actually queue up our message properly, we’ll use a data subscription. It will allow us to process all documents in a collection, as data subscriptions are durable, ongoing tasks.
First, we need a new subscription that will fetch the message documents for us. Let’s create it:
await store.Subscriptions.CreateAsync(new SubscriptionCreationOptions
{
    Name = "InvoiceOutbox",
    Query = "from InvoiceCreatedMessages"
});
Now, let’s handle the subscription to create and send events to the queue.
- RabbitMQ
- Kafka
We will connect to RabbitMQ, which we’ve set up on Docker. Let’s configure the channel, exchange, and bind them up with a routing key:
async Task SetupRabbitExchangeAndQueue(IChannel rabbitChannel)
{
    await rabbitChannel.ExchangeDeclareAsync("invoice-exchange", ExchangeType.Direct);

    await rabbitChannel.QueueDeclareAsync(
        queue: "invoice-created",
        durable: true,
        exclusive: false,
        autoDelete: false);

    await rabbitChannel.QueueBindAsync(
        queue: "invoice-created",
        exchange: "invoice-exchange",
        routingKey: "invoice.created");
}
Now, as we’re set up, we’ll need to prepare a piece of code that sends the message to the RabbitMQ exchange. We’ll use it later to build a subscription worker. See:
async Task PublishInvoiceCreatedToRabbit(IChannel channel, string payload)
{
    var body = Encoding.UTF8.GetBytes(payload);
    await channel.BasicPublishAsync(
        exchange: "invoice-exchange",
        routingKey: "invoice.created",
        body: body
     );
}
Now, let's write the main part of the code and start putting the pieces together.
First, we connect to RabbitMQ and create a channel:
var rabbitFactory = new ConnectionFactory { HostName = "localhost" };

await using (var rabbitConnection = await rabbitFactory.CreateConnectionAsync())
await using (var rabbitChannel = await rabbitConnection.CreateChannelAsync())
Now, we create a subscription worker that will handle batches of documents coming from our RavenDB data subscription. We explicitly define what happens with each document - we’re sending it to RabbitMQ exchange using the code we’ve written earlier:
var worker = store.Subscriptions.GetSubscriptionWorker<InvoiceCreatedMessage>("InvoiceOutbox");

await worker.Run(async batch =>
{
    foreach (var item in batch.Items) // iterate over batch of results
    {
        var message = item.Result; // get a single message document
        var payload = JsonSerializer.Serialize(message); // convert to string

        await PublishInvoiceCreatedToRabbit(rabbitChannel, payload); // send!
    }
});
Here is the complete code:
using (var store = new DocumentStore())
{
    store.Urls = ["http://localhost:8080"];
    store.Database = "Invoices";
    store.Initialize();
    await SeedDatabase(store);

    var rabbitFactory = new ConnectionFactory { HostName = "localhost" };

    await using (var rabbitConnection = await rabbitFactory.CreateConnectionAsync())
    await using (var rabbitChannel = await rabbitConnection.CreateChannelAsync())
    {
        await SetupRabbitExchangeAndQueue(rabbitChannel);

        var worker = store.Subscriptions
            .GetSubscriptionWorker<InvoiceCreatedMessage>("InvoiceOutbox");

        await worker.Run(async batch =>
        {
            foreach (var item in batch.Items)
            {
                var message = item.Result;
                var payload = JsonSerializer.Serialize(message);

                await PublishInvoiceCreatedToRabbit(rabbitChannel, payload);
            }
        });
    }
}
async Task SetupRabbitExchangeAndQueue(IChannel rabbitChannel)
{
    await rabbitChannel.ExchangeDeclareAsync("invoice-exchange", ExchangeType.Direct);
    await rabbitChannel.QueueDeclareAsync(
        queue: "invoice-created",
        durable: true,
        exclusive: false,
        autoDelete: false);

    await rabbitChannel.QueueBindAsync(
        queue: "invoice-created",
        exchange: "invoice-exchange",
        routingKey: "invoice.created");
}

async Task PublishInvoiceCreatedToRabbit(IChannel channel, string payload)
{
    var body = Encoding.UTF8.GetBytes(payload);
    await channel.BasicPublishAsync(
        exchange: "invoice-exchange",
        routingKey: "invoice.created",
        body: body
     );
}
We will connect to Kafka, which we’ve set up on Docker. Kafka is an event streaming platform and it can be used to publish some events. Let’s configure the Kafka producer:
IProducer<string, string> CreateKafkaProducer()
{
    return new ProducerBuilder<string, string>(
        new ProducerConfig
        {
            BootstrapServers = "localhost:9092"
        })
        .Build();
}
Now, as we’re set up, we’ll need to prepare a piece of code that sends the message to the Kafka topic. We’ll use it later to build a subscription worker. See:
async Task PublishInvoiceCreatedToKafka(IProducer<string, string> producer, InvoiceCreatedMessage message, string payload)
{
    await producer.ProduceAsync("invoice-created", new Message<string, string>
    {
        Key = message.InvoiceId,
        Value = payload
    });
}
Now, let's write the main part of the code and start putting the pieces together.
We need to create a subscription worker to handle batches of documents from our RavenDB data subscription. We explicitly define what happens with each document - we’re sending it to Kafka using the code we’ve written earlier:
await worker.Run(async batch =>
{
    foreach (var item in batch.Items)
    {
        var message = item.Result;
        var payload = JsonSerializer.Serialize(message);

        await PublishInvoiceCreatedToKafka(kafkaProducer, message, payload);
    }
});
Here is the complete code:
using (var store = new DocumentStore())
{
    store.Urls = ["http://localhost:8080"];
    store.Database = "Invoices";
    store.Initialize();
    await SeedDatabase(store);

    using (var kafkaProducer = CreateKafkaProducer())
    {
        var worker = store.Subscriptions
            .GetSubscriptionWorker<InvoiceCreatedMessage>("InvoiceOutbox");

        await worker.Run(async batch =>
        {
            foreach (var item in batch.Items)
            {
                var message = item.Result;
                var payload = JsonSerializer.Serialize(message);

                await PublishInvoiceCreatedToKafka(kafkaProducer, message, payload);
            }
        });

        kafkaProducer.Flush(TimeSpan.FromSeconds(5));
    }
}
IProducer<string, string> CreateKafkaProducer()
{
    return new ProducerBuilder<string, string>(
        new ProducerConfig
        {
            BootstrapServers = "localhost:9092"
        })
        .Build();
}

async Task PublishInvoiceCreatedToKafka(IProducer<string, string> producer, InvoiceCreatedMessage message, string payload)
{
    await producer.ProduceAsync("invoice-created", new Message<string, string>
    {
        Key = message.InvoiceId,
        Value = payload
    });
}
With our app running, we can enter our queue’s interface or console.
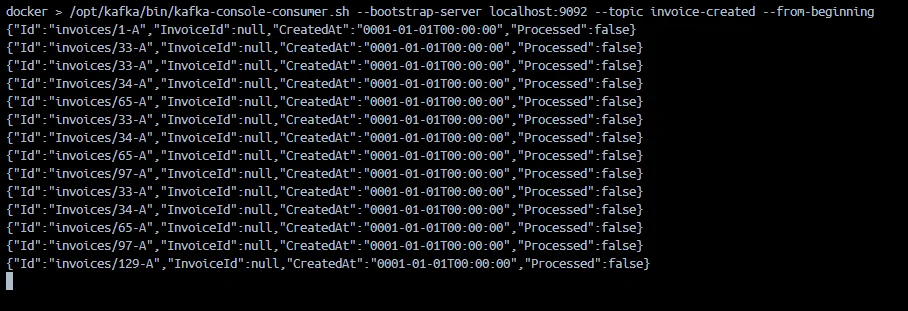
Both Kafka and RabbitMQ are receiving data. Kafka can be checked using a shell script:
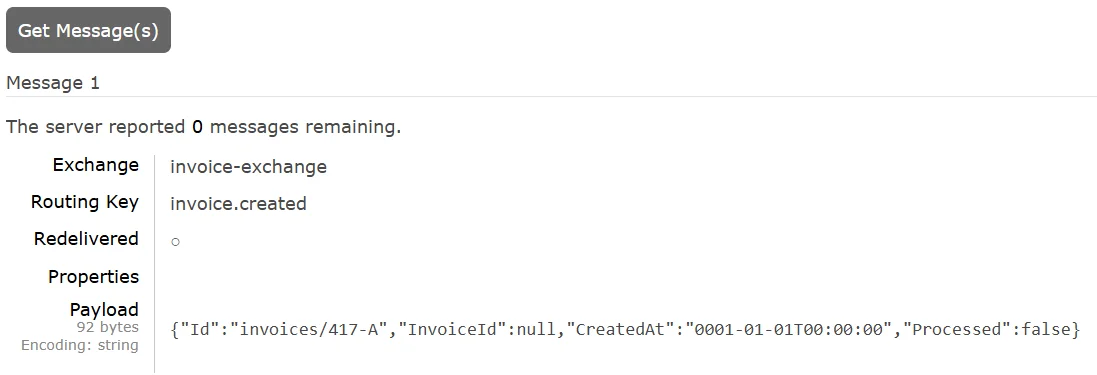
And RabbitMQ can be checked in the GUI.
So this works perfectly, we’ve used various features of RavenDB, like ACID for document operations, or data subscriptions, to implement transactional outbox in no time.
But RavenDB offers another way to help you achieve your goal. Instead of the Transactional Outbox pattern, we’ll use another durable ongoing task - RavenDB Queue ETL!
Simplifying the outbox with RavenDB Queue ETL
We can simplify this further by using RavenDB Queue ETLs, making it trivial. RavenDB can put different messages inside your queue each time an Invoice document is created, or updated.
Instead of saving events in a collection, we can use ETL to queues like RabbitMQ or Apache Kafka as our outbox. It’s a durable, highly available task with decent observability. The ETL task acts as the outbox infrastructure, removing the need to implement the pattern manually in application code.
RavenDB monitors database changes, and the transformation script creates events based on them. RavenDB’s ETL takes care of everything else, like retries and journaling, for data that has already been processed.
Simply create a document in the database, and the rest is handled by ETL. By relying on an out-of-the-box ETL task, you reduce your operational risk and cut development & maintenance costs.
Most importantly, we can do it without writing any application-level code!
Let’s show how to connect and configure this task:
Connecting RabbitMQ ETL
Let’s connect to RabbitMQ. We enter the ongoing tasks creation menu and select RabbitMQ ETL. First, we need to create a connection string, which we can do easily:
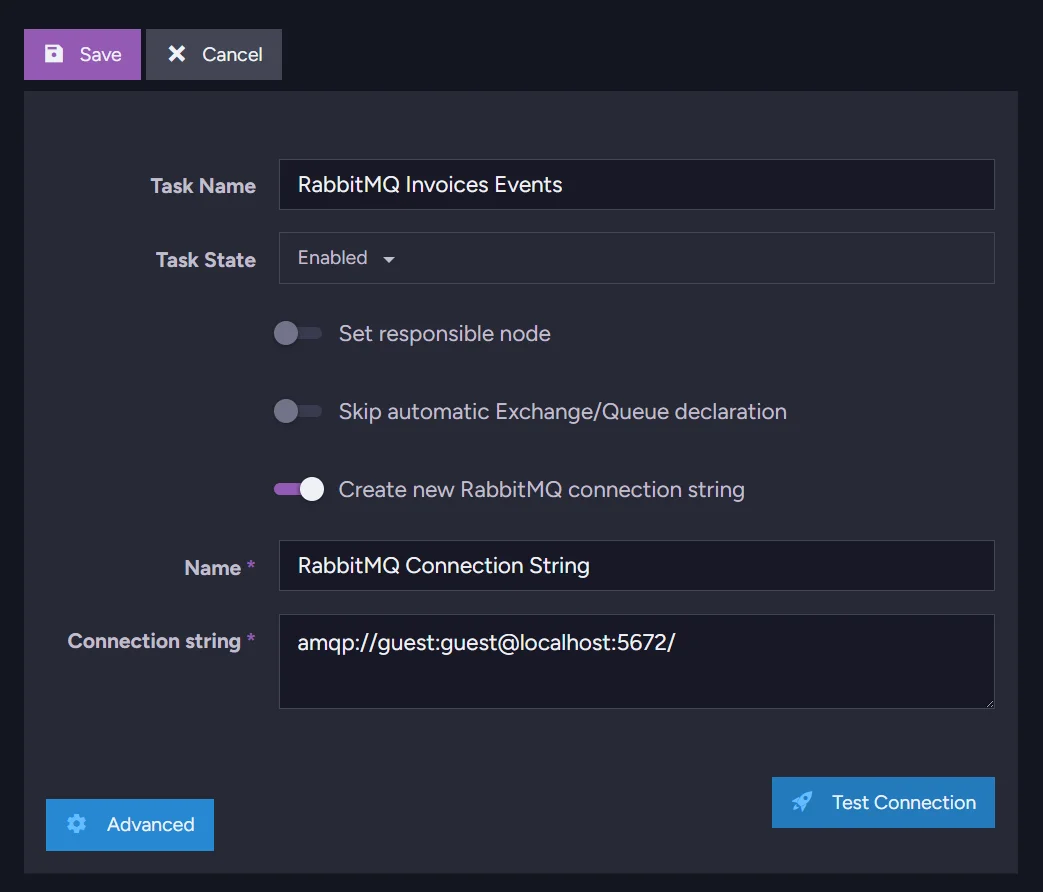
Select a name for the task, then proceed and select a name for the new connection string. Then you need to add the actual connection string that connects RavenDB to RabbitMQ. Use this format:
amqp://user:password@host:10000/
Connecting Apache Kafka ETL
You can also do the same using Kafka ETL. We open the ongoing tasks menu in your database, then select Kafka ETL. Then you select your ETL name and name for your connection string. Enter your bootstrap server address (we’re running Kafka locally on port 9092):
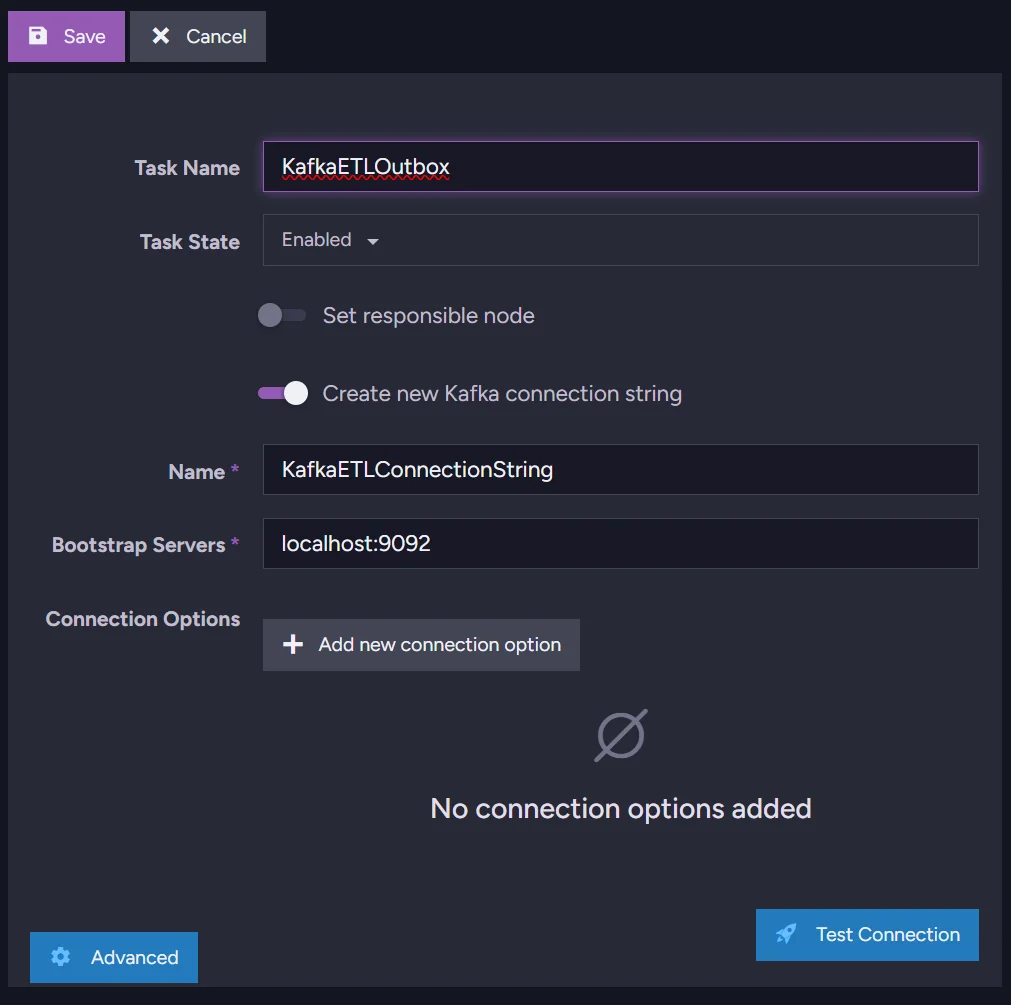
After that, we can move to the transformation script.
Transformation Script - “T” in the ETL
We’re generating a message UUID that will serve as our message identifier. Then, using the Invoice data, we fill the InvoiceCreated message with essential information. We use the loadTo method, which defines the target destination. The InvoiceCreated part of the method name specifies where the invoice should be loaded to.
function uuidV4() {
    return "xxxxxxxx-xxxx-4xxx-yxxx-xxxxxxxxxxxx".replace(/[xy]/g, function (c) {
        var r = Math.random() * 16 | 0;
        var v = c === "x" ? r : (r & 0x3 | 0x8);
        return v.toString(16);
    });
}

loadToInvoiceCreated({
    MessageId: uuidV4(),
    InvoiceId: id(this),
    Amount: this.Amount,
    CustomerId: this.CustomerId,
    IssuedAt: this.IssuedAt,
    CreatedAt: new Date()
});
Then you just select your collection from the list, in this example, collection Invoices, and it’s ready to be saved. Nothing more is needed for the connection between RavenDB and those queues.

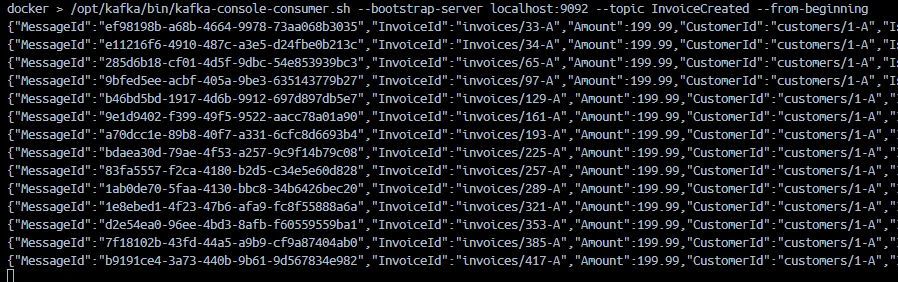
Let’s check if the data is stored properly. Kafka:
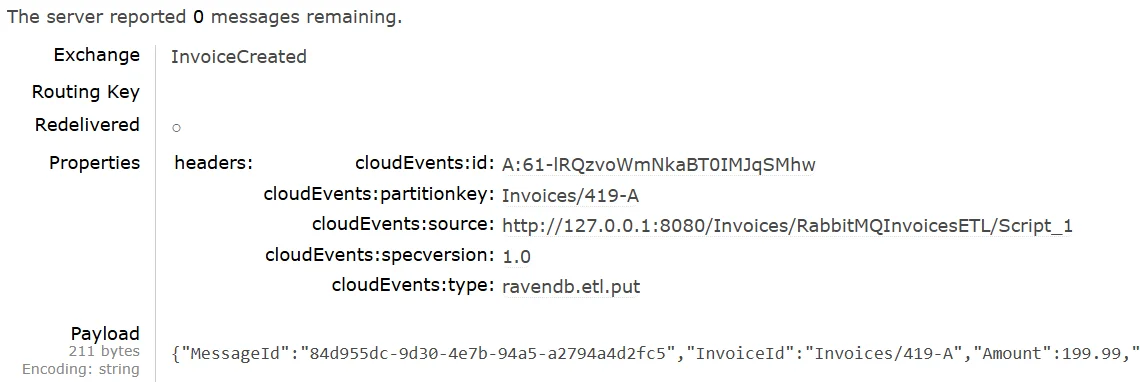
And for RabbitMQ we can just look into the GUI.
This way, with RavenDB, you can address the actual need of publishing an event after invoice creation in minutes.
Summary
- Treating the invoice and its outbox message as a single atomic commit eliminates a whole class of distributed system bugs. Partial failure (data saved, event not sent) is harder to recover from than total failure because it produces silent inconsistencies rather than visible errors.
- Data subscriptions track acknowledgment per worker, so if your application crashes mid-batch, RavenDB resumes from where processing stopped. You get at-least-once delivery guarantees without writing any retry logic yourself.
- Queue ETL moves the reliability boundary into the database server. Because RavenDB owns both the data and the delivery, it journals processed documents and skips re-sending them after a restart, removing a whole category of application-level state management.
- Queue ETL is the right default unless your messages need custom logic such as conditional publishing, payload enrichment, or fan-out to multiple queues. Starting with ETL and switching to data subscriptions only when needed keeps the codebase smaller and the failure surface narrower.
RavenDB ETLs can be used in many different ways. If you are interested in ETL to AWS SQS, read about RavenDB Amazon SQS ETL. You might also be interested in The Library of Ravens sample repository, which uses ETL to handle timeouts.
Get a free RavenDB developer license for testing, or start a free RavenDB Cloud database. If you have questions about this feature, or want to hang out and talk with the RavenDB team, join the RavenDB Discord community.