Simple CRUD Operations with RavenDB and ASP.NET Core 8


Introduction
Preparing basic CRUD operations can be a helpful base for your next steps when building an ASP.NET app that uses RavenDB as storage. This article will create a simple app connected to a database. It will be an app for managing movies. We'll provide you with a basic understanding of how ASP.NET and RavenDB can interact. So, let's see how to do that.
Prerequisites
Prerequisites are the same as in the article "How to setup RavenDB with ASP.NET Core 8 application":
- .NET SDK installed on your machine. This article uses 8.0.403
- Database in RavenDB
If you encounter any problems with prerequisites, please refer to the article linked here.
Setup
As mentioned in the prerequisites, for the sake of simplicity, we will use code from the previous article combined with boilerplate code.
Let's prepare the base of our code - add the generated part. First, install the scaffolding tool if you haven't already:
dotnet tool install -g dotnet-aspnet-codegenerator
Then add the required package:
dotnet add package Microsoft.VisualStudio.Web.CodeGeneration.Design
After the command finishes, create a new file called Movie.cs in your directory. This file will hold our new class, the template for our new documents in the RavenDB database. Add the following code to it:
namespace YourDirectoryName
{
    public class Movie
    {
        public required string Id { get; set; }
        public required string Title { get; set; }
    }
}
The code above gives us a class with two properties: an ID and the movie's title. Of course, you can add more - release dates or ratings from websites like IMDb.
Now, this allows us to use terminal commands to generate some code instead of writing it ourselves. We can now use the following command to generate code for us:
dotnet aspnet-codegenerator minimalapi -e MovieEndpoints -m YourDirectoryName.Movie -o
Now that our machine has done most of our work, let's clean this up. We will use this code differently than the previous article, so we must remove a few elements, unnecessary mapgets, and the employee class at the bottom (a sample entity copied from RavenDB's built-in sample data). After cleaning MapGet and class on the bottom, you should have something resembling this:
using System.Security.Cryptography.X509Certificates;
using Raven.Client;
using Raven.Client.Documents;
using Your_Directory_Name;

var builder = WebApplication.CreateBuilder(args);

builder.Services.AddEndpointsApiExplorer();
builder.Services.AddSwaggerGen();

var app = builder.Build();

if (app.Environment.IsDevelopment())
{
    app.UseSwagger();
    app.UseSwaggerUI();
}

string serverURL = "https://your_RavenDB_server_URL";
string databaseName = "your_database_name";
string certificatePath = @"C:\path_to_your_pfx_file\cert.pfx";

var x509Certificate = new X509Certificate2(certificatePath);

IDocumentStore documentStore = new DocumentStore
{
    Urls = new[] { serverURL },
    Database = databaseName,
    Certificate = x509Certificate
};
documentStore.Initialize();

app.MapMovieEndpoints();

app.Run();
Let's modify this code so it works with the rest of the template part. Let's start with DocumentStore. The exact part that you need to change is IDocumentStore documentStore = new DocumentStore and credentials input below. Remember that if you use a local server, you may want to delete the certificate depending on your configuration. We need to provide it as a dependency injection so we can use it in other parts of our code; let's change it to:
builder.Services.AddSingleton<IDocumentStore>(provider => {
    var store = new DocumentStore
    {
        Urls = new[] { serverURL },
        Database = databaseName,
        Certificate = x509Certificate
    };
To make it all work, you must add return store; with the builder at the end so that will work. We also need to lower the swagger part, so cut it or delete it from above and paste our code. It should look similar to that:
    return store;
});

var app = builder.Build();

if (app.Environment.IsDevelopment())
{
    app.UseSwagger();
    app.UseSwaggerUI();
}
All those parts are essential and can't be skipped; alternatively, you can copy the code below. In case of using our ready code, just remember to change:
using YourDirectoryNameserverURLdatabaseNamecertificatePath(if you are using it, unsecured local RavenDB doesn't need it)
using YourDirectoryName;
using System.Security.Cryptography.X509Certificates;
using Raven.Client;
using Raven.Client.Documents;

var builder = WebApplication.CreateBuilder(args);

builder.Services.AddEndpointsApiExplorer();
builder.Services.AddSwaggerGen();

string serverURL = "http://127.0.0.1:8080";
string databaseName = "XYZ";

builder.Services.AddSingleton<IDocumentStore>(provider => {
    var store = new DocumentStore
    {
        Urls = new[] { serverURL },
        Database = databaseName,
    };
    store.Initialize();
    return store;
});

var app = builder.Build();

if (app.Environment.IsDevelopment())
{
    app.UseSwagger();
    app.UseSwaggerUI();
}

app.MapMovieEndpoints();

app.Run();
With this ready, we can continue coding our operations. To code those, we will use our generated MovieEndpoints.cs file. Inside, you need to add using Raven.Client.Documents; to gain access to RavenDB functions in this file. Also, if you are using new files for it then you need to have the NuGet package installed before proceeding further.
dotnet add package RavenDB.Client
You can delete existing endpoints and add those presented below, or you can just edit existing ones.
Operations
We divided this text into sections so you can quickly find what you need in a moment. In all cases, we will be using DocumentStore. DocumentStore is the base for all RavenDB actions. It communicates with your cluster and can handle multiple databases. Having only a single instance of DocumentStore is essential to maintaining a single definition of connection to your database.
Create
With everything else ready, let's create some documents. To create a new document, we will use the following code:
group.MapPost("/", async (Movie model, IDocumentStore store) =>
{
    using var session = store.OpenAsyncSession();
    await session.StoreAsync(model);
    await session.SaveChangesAsync();
    return Results.Created($"/api/Movie/{model.Id}", model);
})
.WithName("CreateMovie")
.WithOpenApi();
Let's unravel this code. Let's start with global explanations that apply to all those examples. We must use map methods to specify the route for all those endpoints. Meanwhile, we inject our DocumentStore and add a document using a DocumentSession to our connected database. The following line immediately creates a movie object using our class as a template. Then, our object is saved and returned to us so we know it was made. We close the endpoint, and then we can continue testing this.
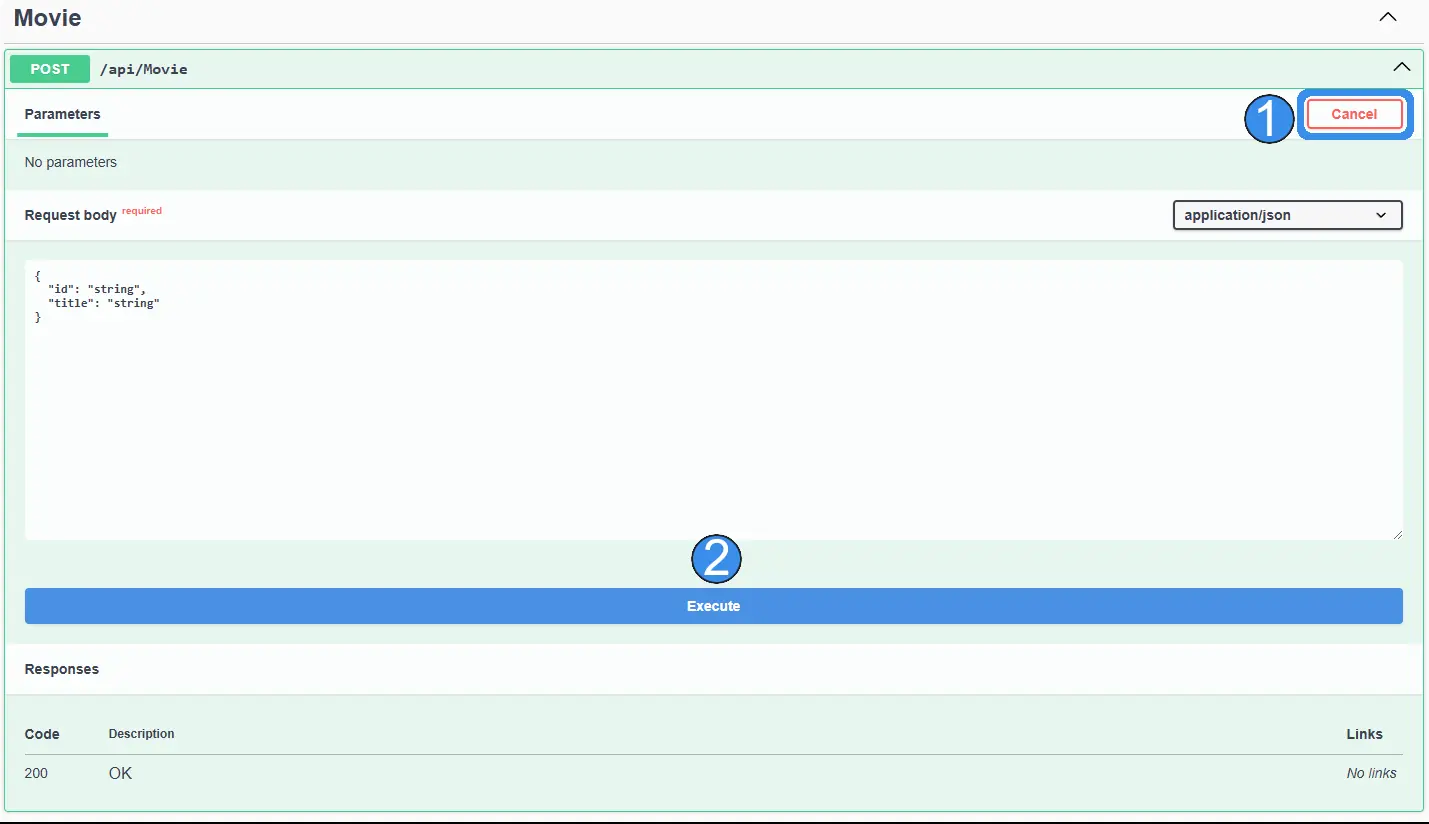
If you use dotnet run and open your local server with /swagger appended to the URL, expand the POST endpoint, click Try it out, then click Execute. You can modify the Id field to create documents with different IDs. Create a few movies before moving on.
Read
Now that you created your new document, we need to read it. To do that, you can use this code:
group.MapGet("/", async (IDocumentStore store) =>
{
    using var session = store.OpenAsyncSession();
    return Results.Ok(await session.Query<Movie>().ToListAsync());
})
.WithName("GetAllMovies")
.WithOpenApi();
As you can see above, we again use DocumentStore, but this time to get information from our database using the route we establish with MapGet. Next, we open the session and return all our movies. This allows us to see if our previously created movies were created correctly. As you can see, DocumentStore and Session repeat in each code example, so I will skip explaining those in future examples.
Update
Let's create a short function to update the document we just read. To update your document, you can use the following code:
group.MapPut("/{id}", async (string id, Movie input, IDocumentStore store) =>
{
    using var session = store.OpenAsyncSession();
    var movie = await session.LoadAsync<Movie>(id);
    if (movie == null)
    {
        return Results.NotFound(new { Message = "Movie not found" });
    }
    movie.Title = input.Title;
    await session.SaveChangesAsync();
    return Results.NoContent();
})
.WithName("UpdateMovie")
.WithOpenApi();
This endpoint loads the document by ID, replaces its title with the value from the request body, then calls SaveChangesAsync to flush the change and returns a 204 No Content response.
Read by ID
Now let's verify the document changed correctly, this time fetching it by ID. The following code does the job:
group.MapGet("/{id}", async (string id, IDocumentStore store) =>
{
    using var session = store.OpenAsyncSession();
    var movie = await session.LoadAsync<Movie>(id);
    return movie != null ? Results.Ok(movie) : Results.NotFound();
})
.WithName("GetMovieById")
.WithOpenApi();
This code uses LoadAsync<Movie> to load the document with the matching ID and return it as a Movie object. If no document with that ID exists, LoadAsync returns null and we respond with 404 Not Found.
Delete
After you successfully tested all other operations, it's time to test the delete option. To do this, you can use the following snippet:
group.MapDelete("/{id}", async (string id, IDocumentStore store) =>
{
    using var session = store.OpenAsyncSession();
    var movie = await session.LoadAsync<Movie>(id);
    if (movie == null)
    {
        return Results.NotFound(new { Message = "Movie not found" });
    }
    session.Delete(movie);
    await session.SaveChangesAsync();
    return Results.Ok(new { Message = "Movie deleted successfully" });
})
.WithName("DeleteMovie")
.WithOpenApi();
Once again, we load the document, check if it exists, and proceed with session.Delete(movie), which marks it for deletion. Calling SaveChangesAsync flushes that deletion to the server and we return a confirmation message.
Now, you can run your application and check those operations yourself. Remember to run RavenDB in the background because those will not work without it. This gives you a basic understanding of how to add CRUD to your application.
Summary
This guide walked through scaffolding a minimal ASP.NET Core 8 app and implementing full CRUD operations against a RavenDB database using DocumentStore and DocumentSession.
- Register
IDocumentStoreas a singleton so the application shares a single connection across all requests, which is required for correct cluster communication and connection pooling. - Each CRUD operation opens a short-lived session, performs its work, then calls
SaveChangesAsyncto flush changes as a single atomic batch to the server. LoadAsync<T>returns null when the document is not found, so always check for null before operating on the result to avoid null reference exceptions at runtime.