Setting Up an Azure Service Bus Sink in RavenDB

Azure Service Bus is where a lot of systems already put their work. An order gets placed, a service drops a message on a queue, and something downstream picks it up. Once a message is popped, it's gone. If you want that order sitting in a database you can search, index, and report on, you have to write the consumer that puts it there.
RavenDB can consume those messages out-of-the-box. A RavenDB sink connects to your existing Service Bus, reads each message, and turns it into a document you can search, index, and report on, no consumer code required. You point it at your orders queue, give it a few lines of transform script, and every message that lands turns into a document or multiple documents you can query.
This guide sets one up two ways: entirely in the browser through the Studio, or in a handful of lines of C# you can keep in source control. Both produce the identical task, so follow whichever fits you.
What we're working with
Before setting anything up in RavenDB, here's the Service Bus side we'll point it at.
The example uses a single namespace with one queue named orders. Whatever places orders in your system, a checkout service, an API, a background job, drops a message on that queue, and RavenDB is the one thing reading them off. That makes this a plain point-to-point setup: one queue in, one consumer out. Service Bus also supports topics with subscriptions for fanning the same messages out to several consumers, and the sink can read from those too, but a single queue is all this example needs.
Each message on the queue is a JSON order with three fields:
{
  "orderId": "ORD-1001",
  "customer": "Acme Corp",
  "total": 249.99
}
That's the raw message body a producer sends, with nothing wrapping it. It matters because the sink's transform script reads those fields straight off each message (this.orderId, this.customer, this.total) and turns them into an Orders document. This schema is the contract between what sits on the queue and what lands in RavenDB, so if your own orders carry more fields, picture them here and map the extras the same way.
If you don't have a namespace and queue yet, Azure's quickstart creates both in a few minutes. A Basic-tier namespace is enough for a single queue like this one; you only need Standard if you want the topic-subscription source. This guide picks up from there and focuses on the RavenDB side.
The click-together path
This approach is for evaluators, ops engineers, or developers who want to see the sink running before adding anything to a repository.
Before you start, you need:
- A RavenDB 7.2 instance with a database.
- An Azure Service Bus namespace with a queue named orders, or another queue name you use throughout the guide.
- Credentials for one of the three authentication methods covered below.
Where the sink lives
Every RavenDB ongoing task, including ETL, replication, backups, and sinks, is managed from Settings → Ongoing Tasks. Open your database, go to Ongoing Tasks, select Add Task, and choose Azure Service Bus Queue Sink.
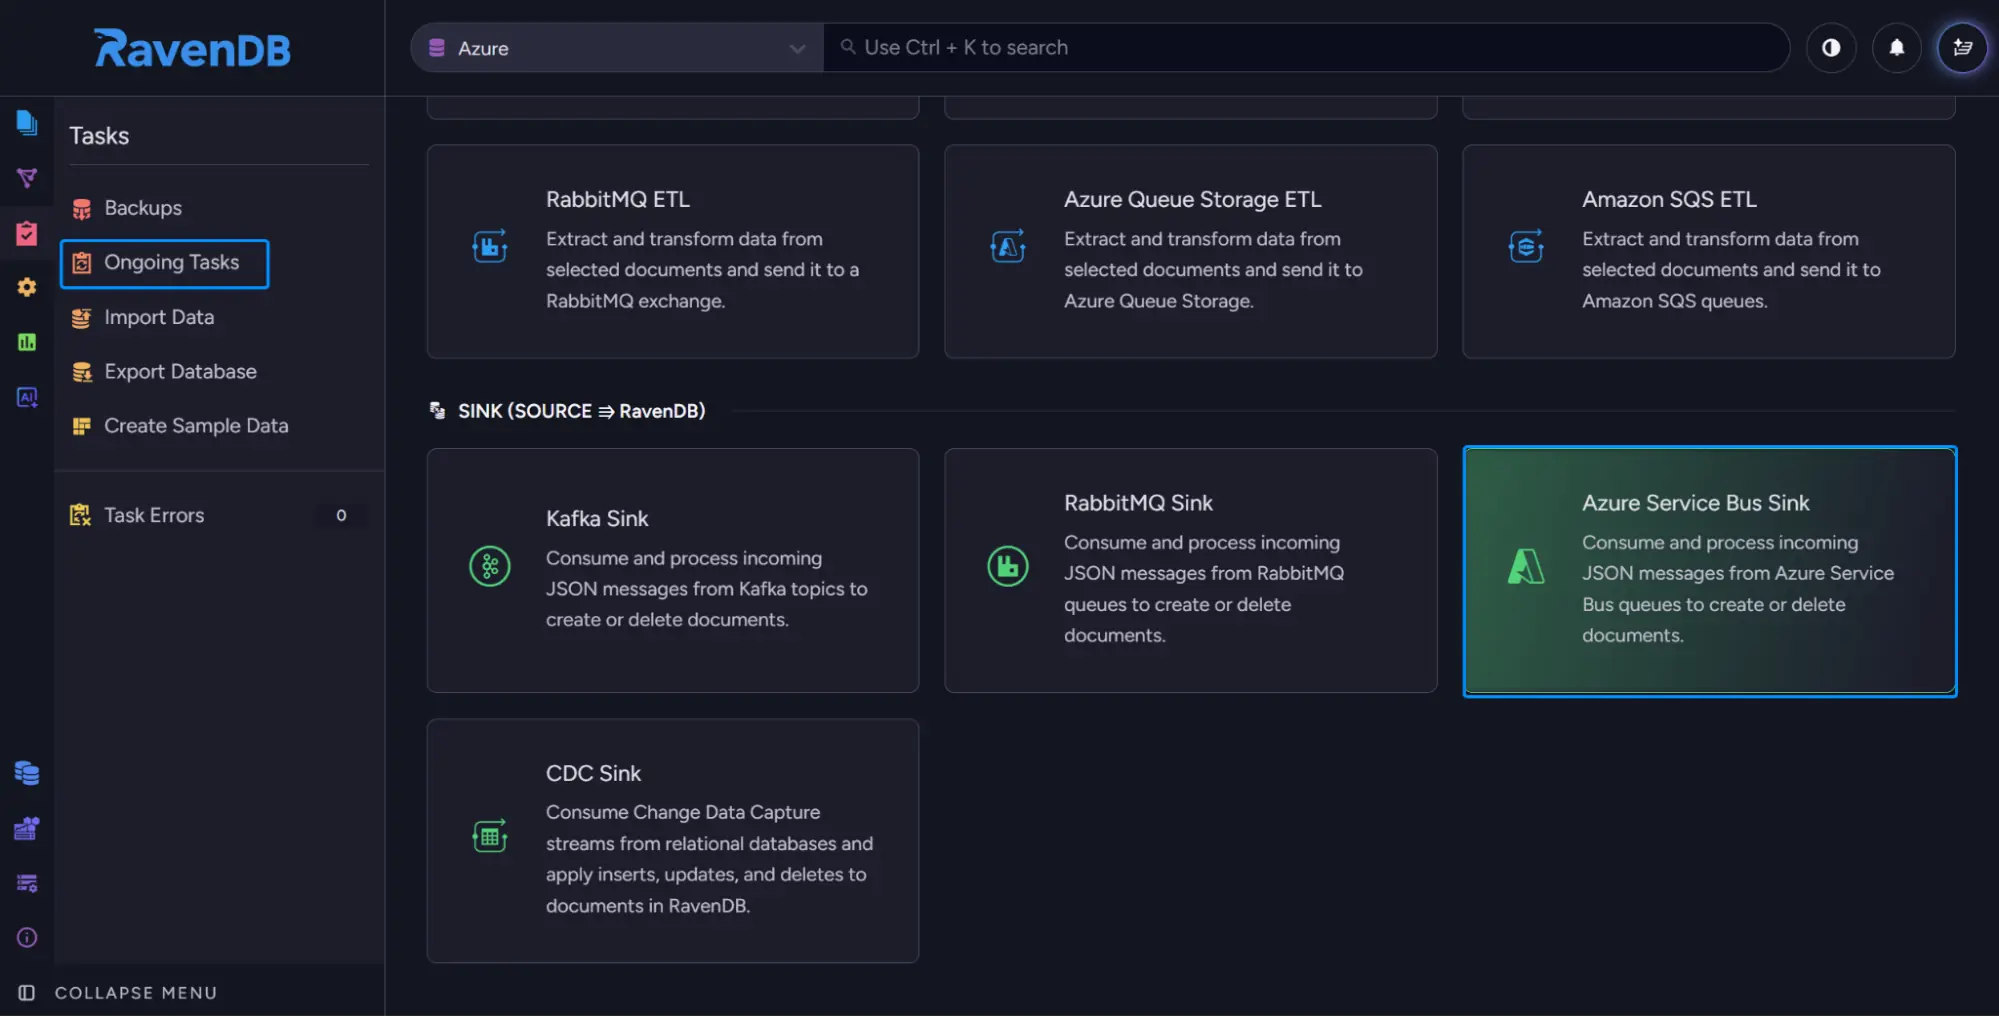
Existing ETL processes, subscriptions, and other background tasks appear in the same list with the same status indicators. Sinks use the same ongoing-task model rather than a separate management screen.
The connection string
This screen requires one important choice: how RavenDB authenticates with Azure Service Bus. Next to the connection string field, select Create new Connection String. The dialog offers three authentication methods:
| Mode | Best for |
|---|---|
| SAS | Quick setup, evaluation |
| Entra ID | App-to-app, registered applications |
| Passwordless | Production, no stored secret |
SAS (Shared Access Signature)
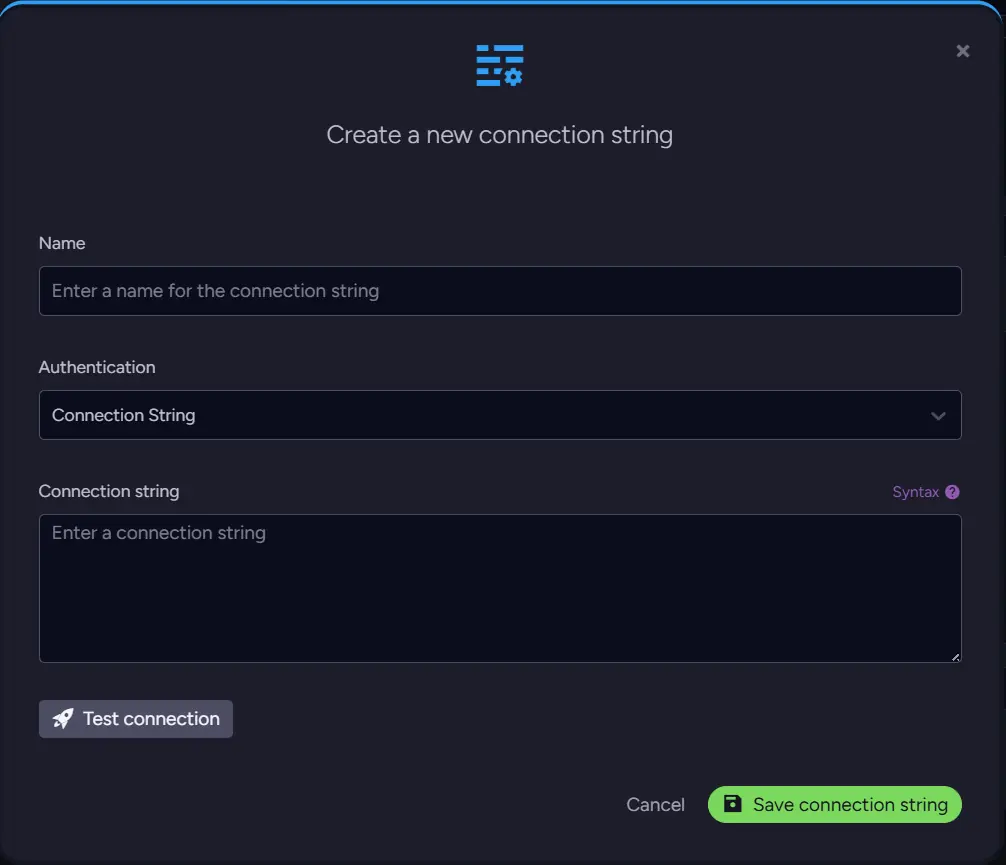
SAS authenticates with a connection string that carries a policy name and a cryptographic key. Every Service Bus namespace starts with a built-in policy called RootManageSharedAccessKey, and you can add narrower policies scoped to Listen, Send, or Manage rights at either the namespace or the individual queue/topic level.
To get the string: in the Azure portal, open your Service Bus namespace, select Shared access policies under Settings, pick a policy, and copy the Primary Connection String. It has the shape Endpoint=sb://<namespace>.servicebus.windows.net/;SharedAccessKeyName=<name>;SharedAccessKey=<key>. Paste that whole string into RavenDB's connection string field.
RootManageSharedAccessKey works for a quick start, but it grants full management rights, so treat it like a root password and prefer a Listen-scoped policy for a sink that only reads. Because the key lives in the configuration, SAS is the fastest method to set up and the easiest to leak, which makes it ideal for evaluation and local testing while the other two methods are preferable for production.
Entra ID (application / service principal)
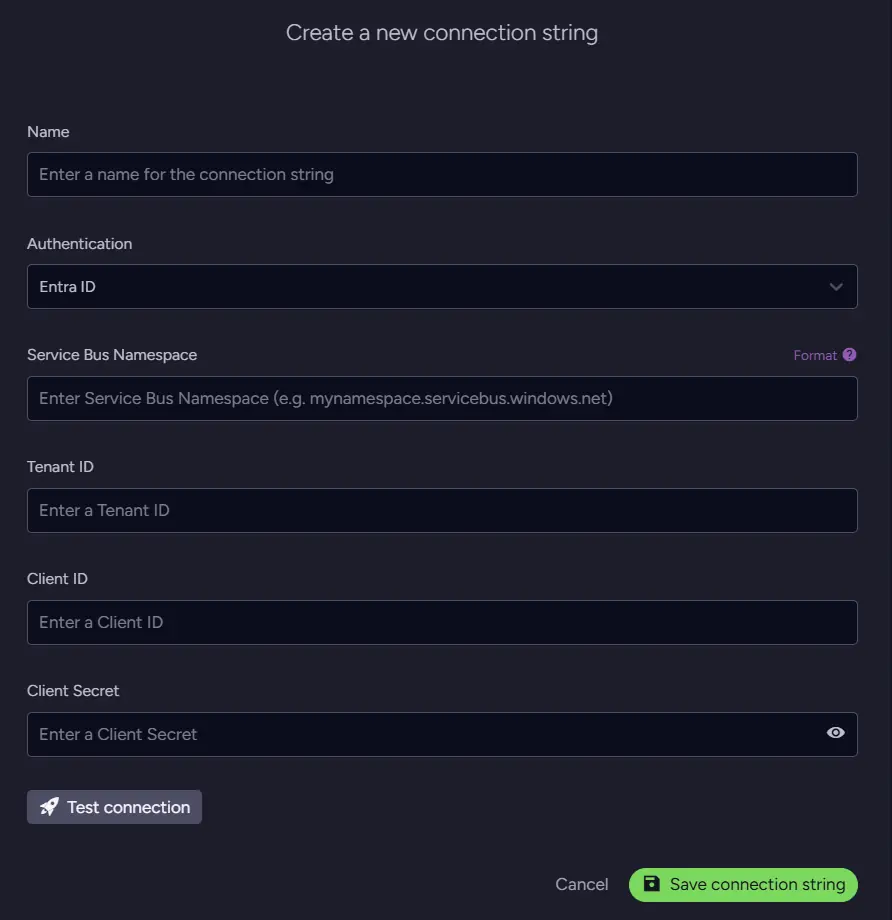
Entra ID authenticates RavenDB as a registered Azure application with its own identity, so access is auditable and can be revoked on its own without touching any shared key. This is the app-to-app model.
Setup has two halves. First, register the application: in the portal go to Microsoft Entra ID → App registrations → New registration, name it, and register. On the app's Overview, copy the Application (client) ID and Directory (tenant) ID. Then open Certificates & secrets, create a New client secret, and copy its Value immediately, since Azure hides it once you leave the page.
Second, grant that app permission on your Service Bus. On the namespace (or a single queue) go to Access control (IAM) → Add role assignment and assign Azure Service Bus Data Receiver so the sink can read messages. Data Owner also works but grants more than a sink needs.
Back in RavenDB, choose Entra ID and enter the fully qualified namespace (<namespace>.servicebus.windows.net), the tenant ID, the client ID, and the client secret you copied.
Passwordless (managed identity)
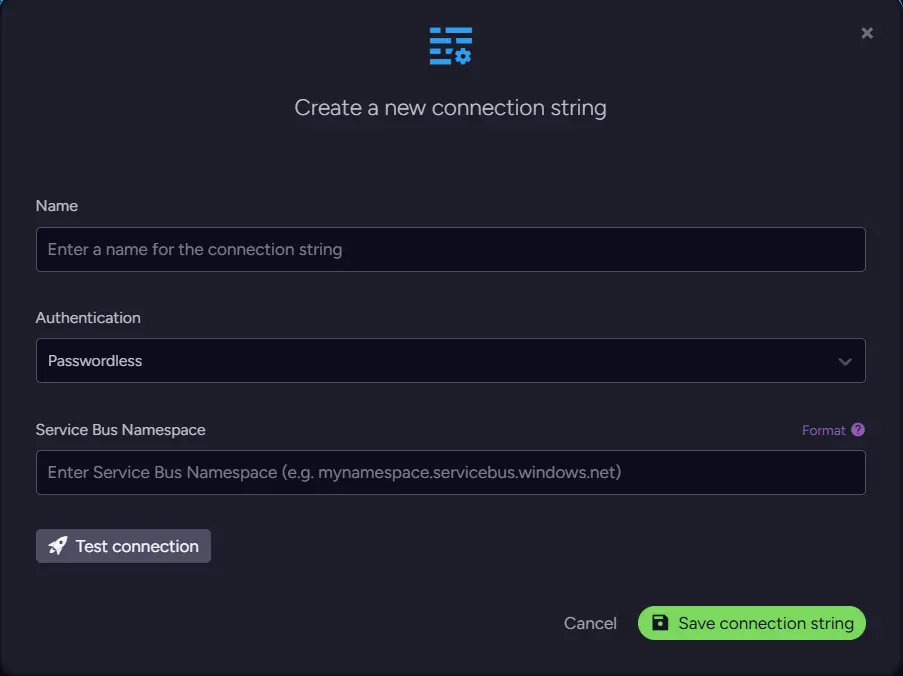
Passwordless uses the same Entra ID and RBAC model, but instead of an app registration with a stored secret, RavenDB authenticates as the managed identity of the Azure resource it runs on: a VM, App Service, container, and so on. Azure issues and rotates the credential behind the scenes, so nothing sensitive ever lives in the connection string. This is the recommended production option wherever RavenDB runs on Azure compute that supports managed identities.
Setup: enable a managed identity on the host (system-assigned is simplest), then on the Service Bus namespace go to Access control (IAM) → Add role assignment and give that identity the Azure Service Bus Data Receiver role, exactly as with the Entra ID app above.
In RavenDB, choose Passwordless and supply only the fully qualified namespace. The identity comes from the host, so there is nothing else to enter. One operational note: if you later remove the identity from the role, restart RavenDB (or wait for the token to expire, up to 24 hours by default) for the change to take effect.
Choose the appropriate method, enter the required details, give the connection string a recognizable name, and save it.
Choose the source
With the connection string selected, choose where RavenDB should read messages from. A sink can use either:
- A queue (point-to-point): one stream in, consumers compete to pull messages out, and each message goes to exactly one consumer. Use this when the sink is the sole or primary reader of the stream.
- A topic subscription (publish/subscribe): a producer sends to a topic, and each attached subscription gets its own copy of every message. Point RavenDB at one subscription and it reads that copy without affecting other consumers. Use this when the same messages already feed several consumers and you want RavenDB to observe the stream without competing for messages.
You are not limited to one or the other. A single script can list several sources, and a task can run several scripts, so one task can consume any mix of queues and subscriptions in the same namespace. Add each source to the list: a queue is just its name (orders), and a topic subscription is written as topic;subscription, for example orders-topic;ravendb-sub.
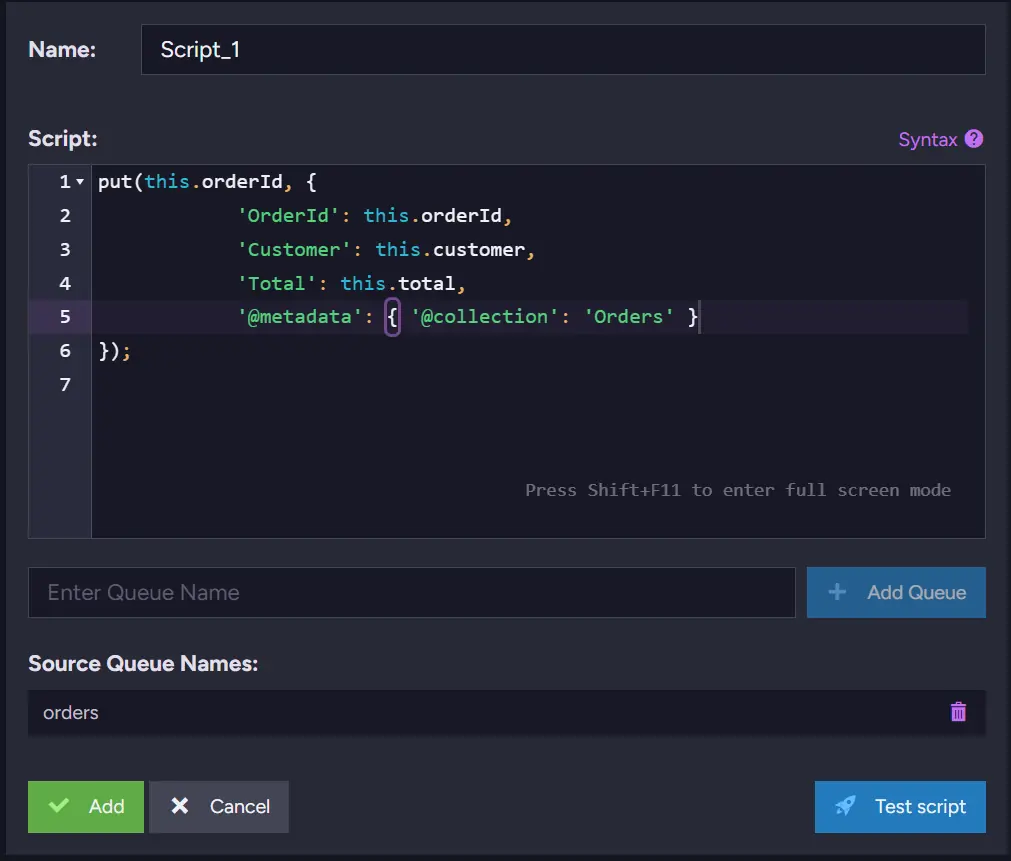
Add the transform script
Every sink uses a small JavaScript script to turn incoming messages into RavenDB documents. For the orders queue, use:
put(this.orderId, {
    "OrderId": this.orderId,
    "Customer": this.customer,
    "Total": this.total,
    "@metadata": {
        "@collection": "Orders"
    }
});
Paste the script into the editor. RavenDB parses the incoming message body and hands it to the script as this, so you read fields straight off it: this.orderId, this.customer, this.total. There is no JSON.parse and no this.Body; the body already is the object.
The script then creates a document in the Orders collection. The first argument passed to put() is the document ID. Here, the source system's orderId is used directly, which also protects you from duplicates: because Service Bus delivers at least once, a redelivered message overwrites its earlier document instead of creating a second one. Without an explicit ID, RavenDB generates one instead.
Test before you save
Before saving the task, select Test script at the bottom of the script panel. This opens a test area with a Message box.
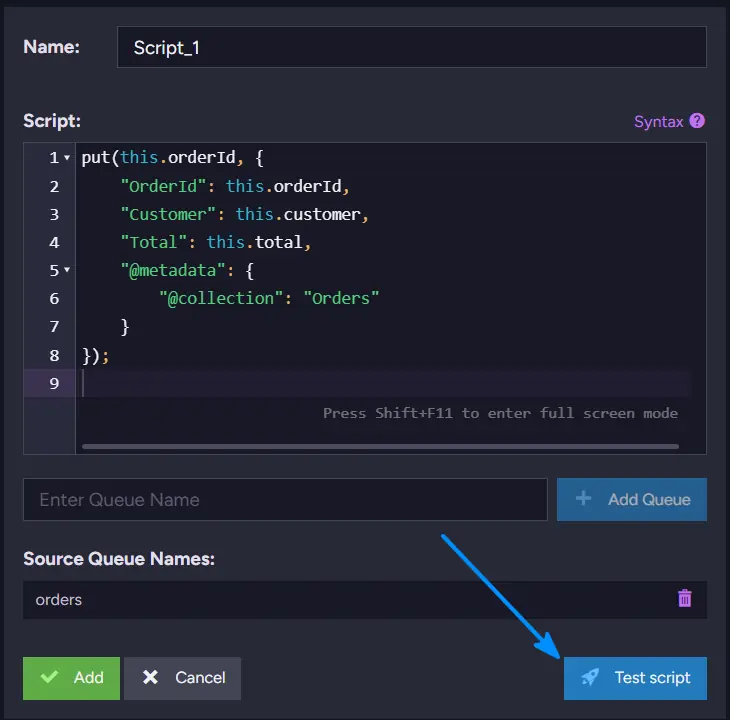
The test does not read from the queue, you supply a sample message yourself, and RavenDB runs your script against it, showing the document it would create in the panel on the right.
The message you paste is the raw message body itself, the same shape a producer sends, and RavenDB parses it into this:
{"orderId": "ORD-1001", "customer": "Acme Corp", "total": 249.99}
Paste that into the Message box and select Test. The resulting Orders document appears on the right. If you ever see the error Unexpected token 'u' in JSON at position 0, the script is calling JSON.parse on an undefined value, the signature of the old this.Body habit; read the fields off this directly instead.
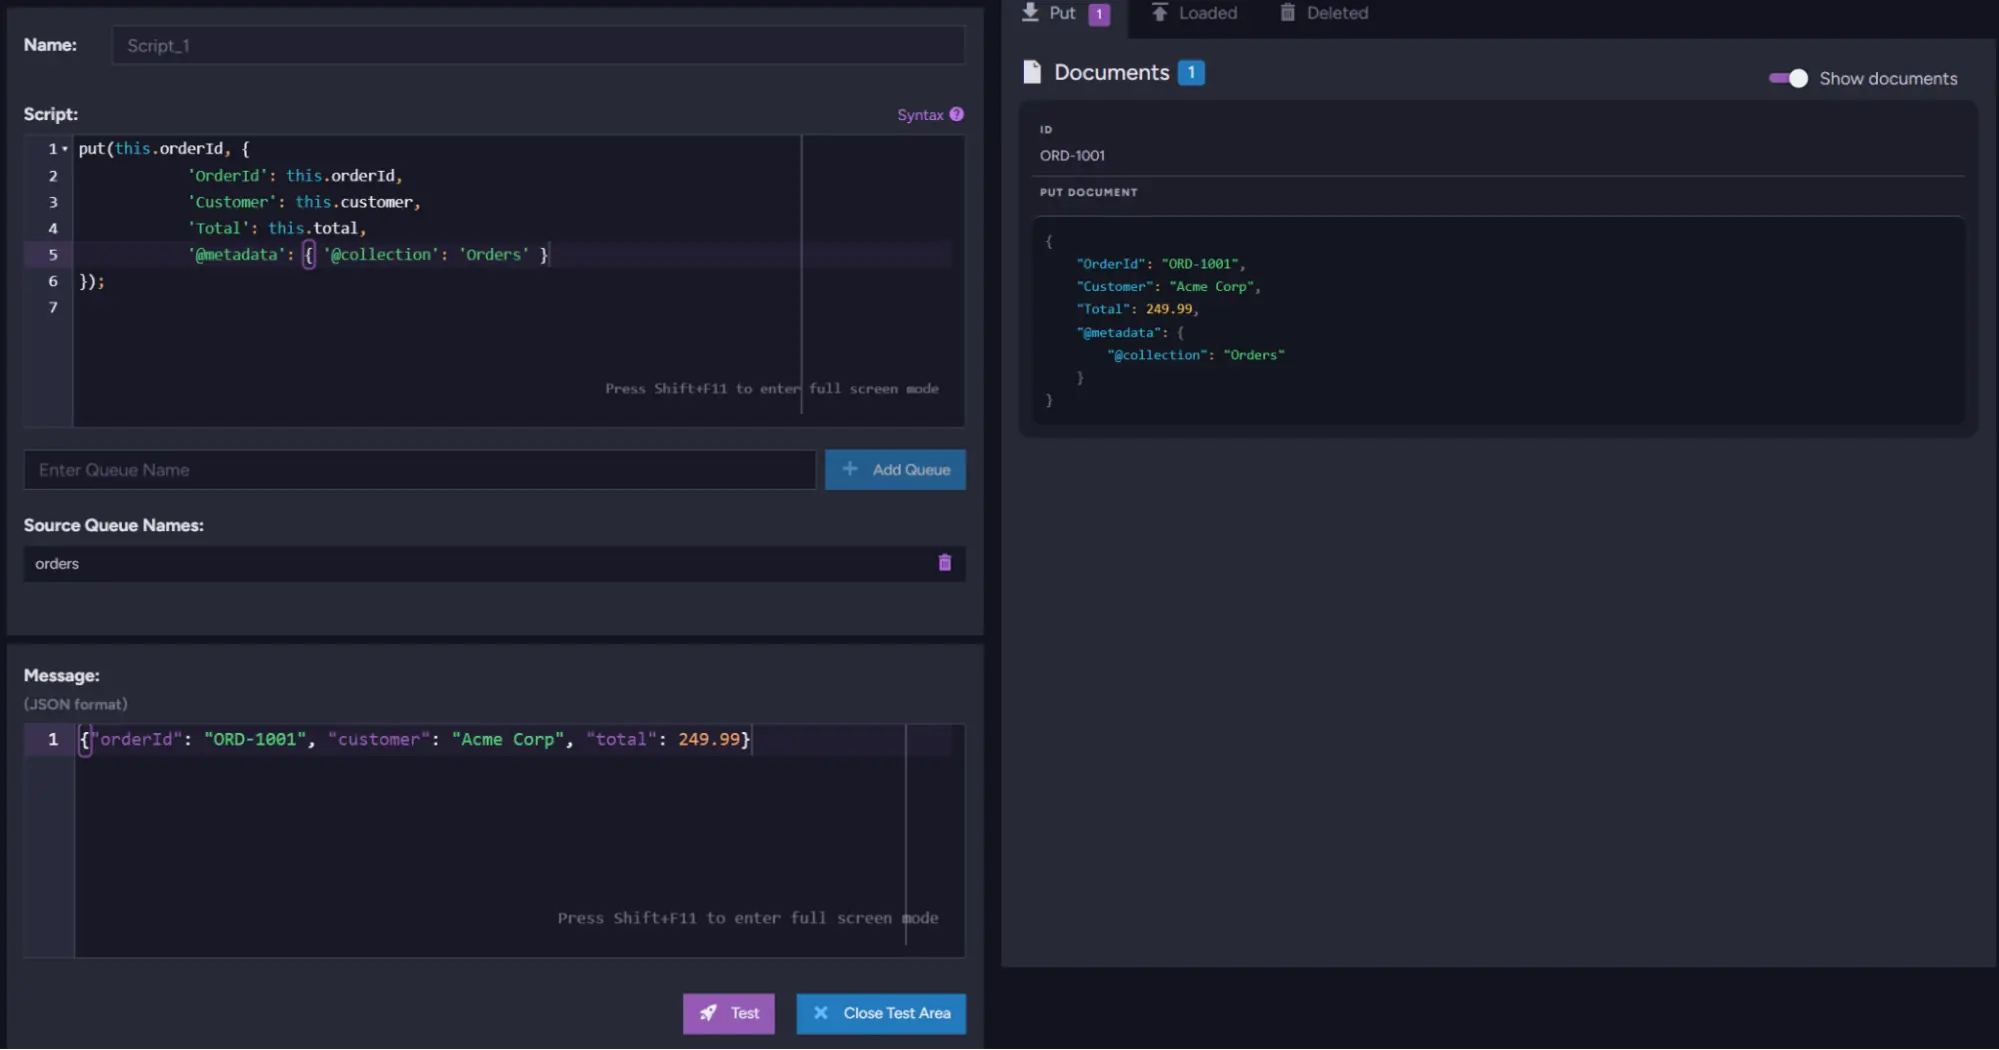
Use this preview to catch misspelled field names or scripts that expect a different message structure. It is much easier to fix the script here than to investigate an empty Orders collection after the task has been running.
Save and confirm
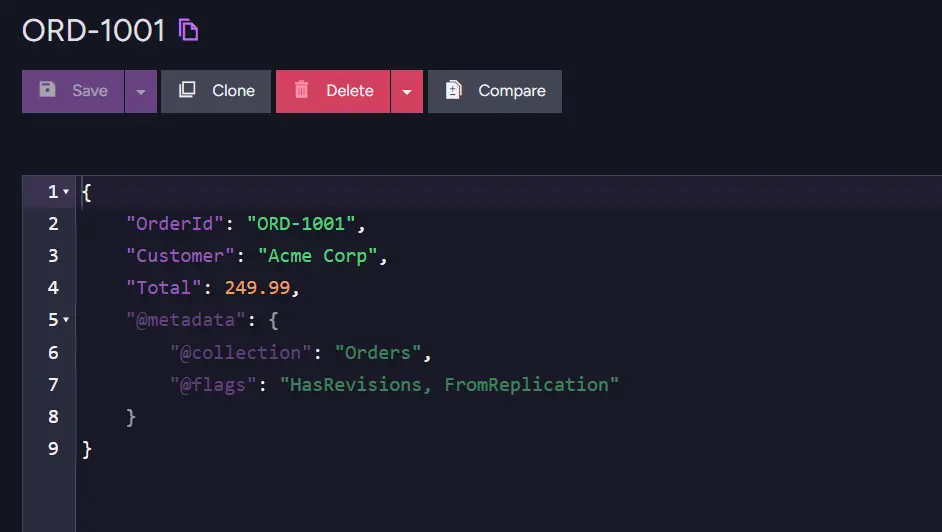
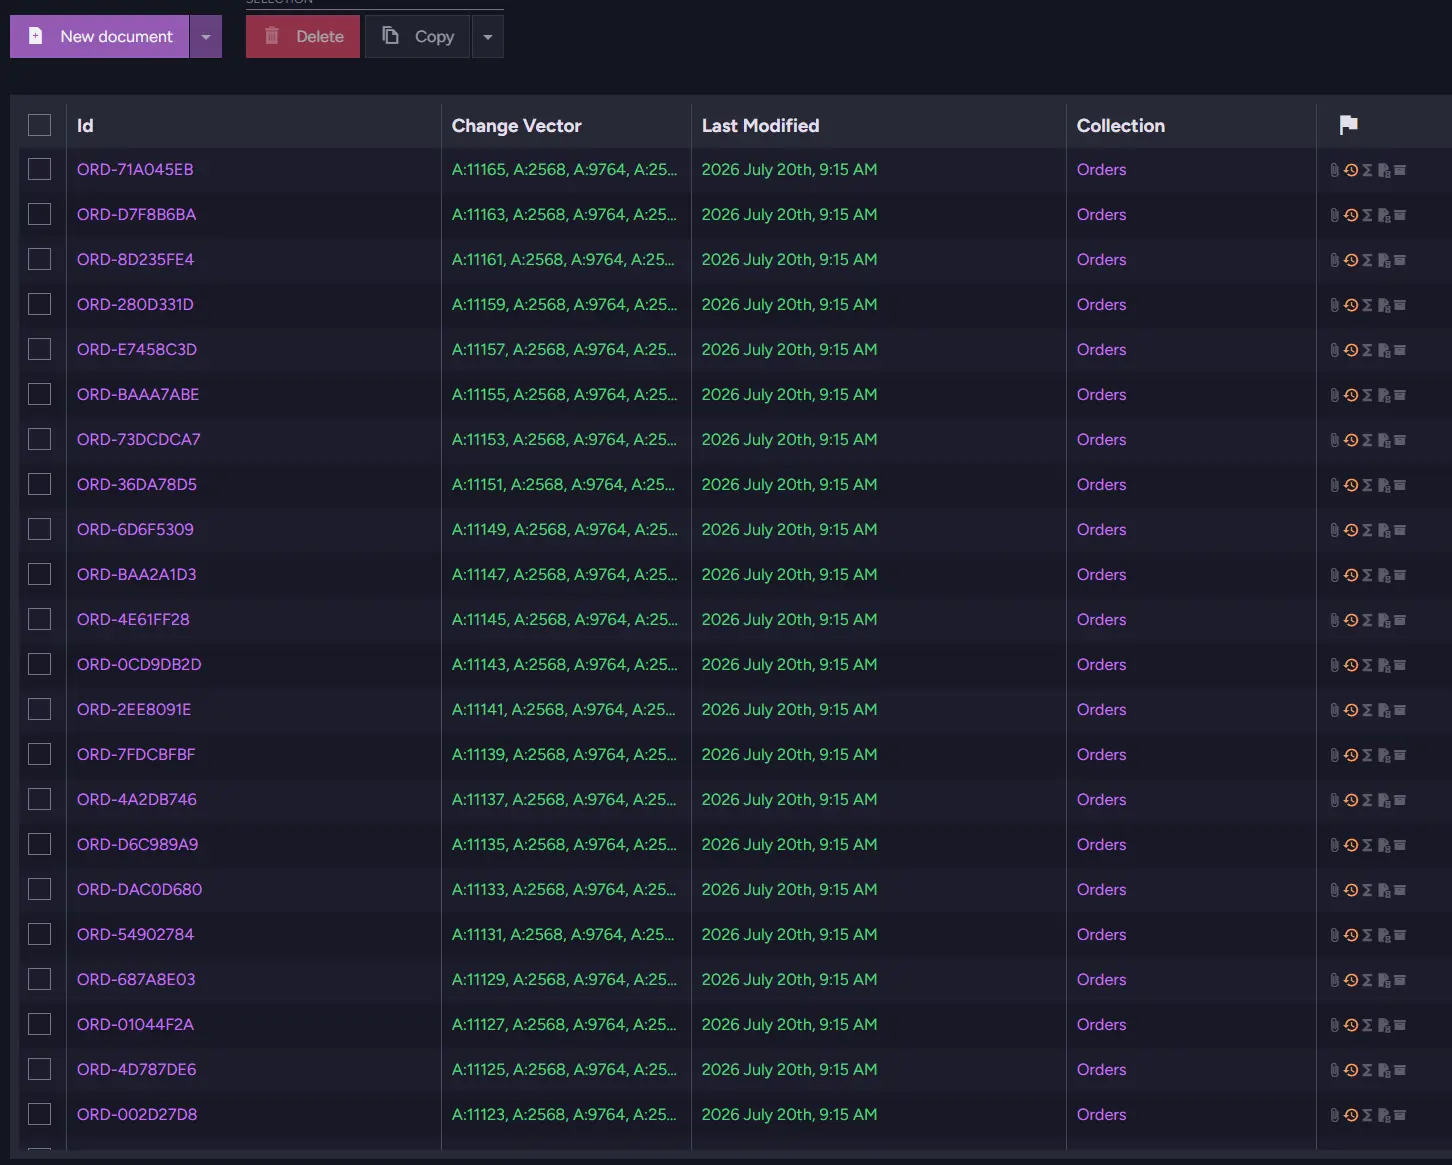
Once the test looks right, save the task. You'll land back on the Ongoing Tasks view, where the sink now appears in the list, enabled, assigned to a node, and showing the connection string it's using. Push a message onto the orders queue from the Azure portal, the emulator's tooling, or wherever you've got a producer and the document count in your Orders collection should start showing.
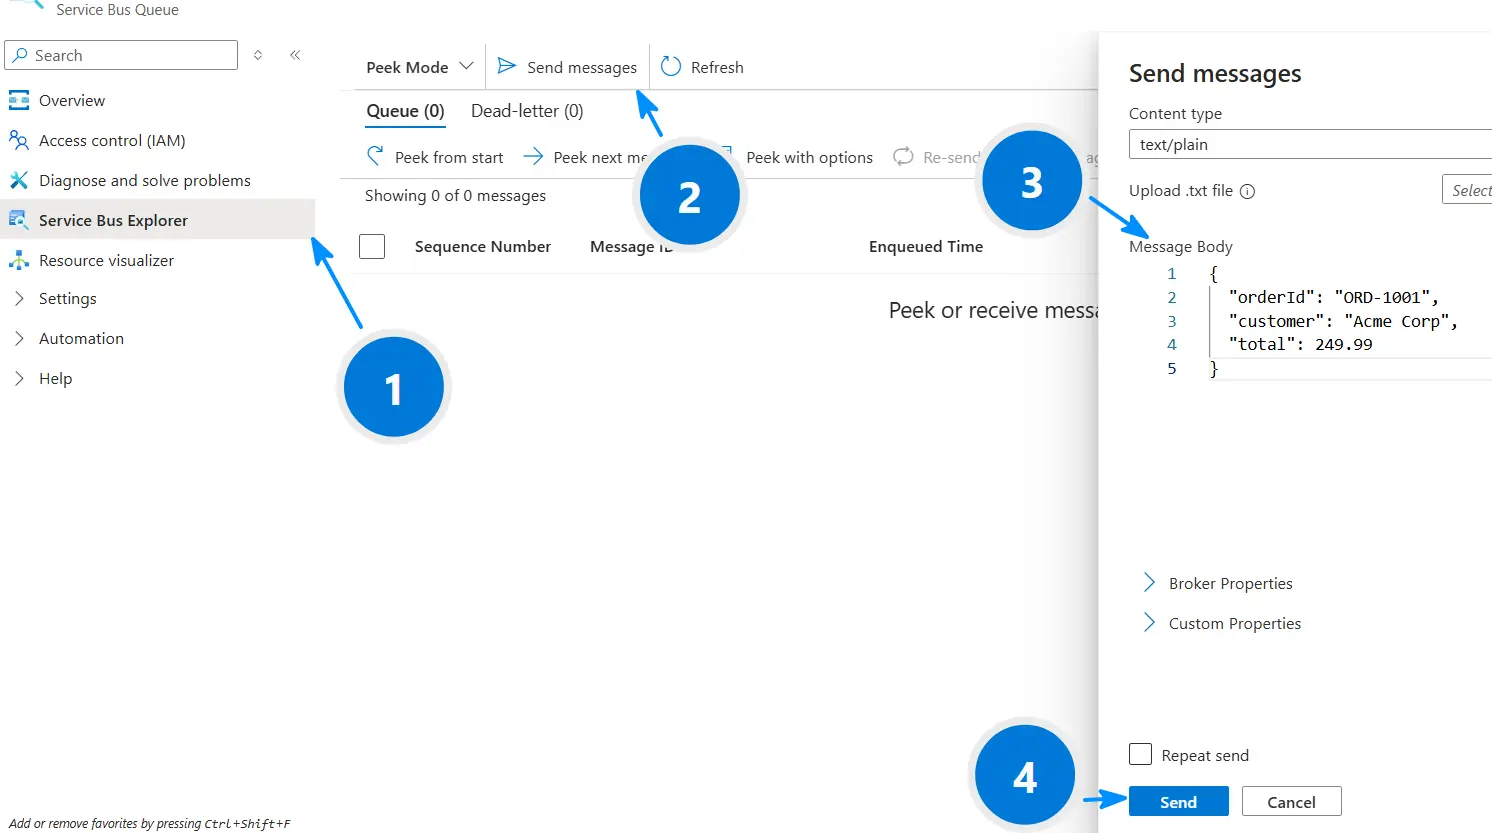
The same task, in code
Everything above is also a few lines of C#. The Studio walkthrough and the following code produce the identical task: same connection string, same source, same script, same runtime behavior. If you'd rather define the sink from a project and keep it in source control, this is the route. It assumes a configured DocumentStore in a variable named store.
First, register the connection string. Build a QueueConnectionString with BrokerType = QueueBrokerType.AzureServiceBus and set one of the three authentication methods on AzureServiceBusConnectionSettings. SAS is shown here, matching the quick-start path above:
var connectionString = new QueueConnectionString
{
    Name = "AzureServiceBusConStr",
    BrokerType = QueueBrokerType.AzureServiceBus,
    AzureServiceBusConnectionSettings = new AzureServiceBusConnectionSettings
    {
        // SAS: the Endpoint=sb://...;SharedAccessKeyName=...;SharedAccessKey=...
        // string from Shared Access Policies in the Azure portal.
        ConnectionString = "Endpoint=sb://<namespace>.servicebus.windows.net/;" +
                           "SharedAccessKeyName=<key-name>;SharedAccessKey=<key>"
    }
};

store.Maintenance.Send(
    new PutConnectionStringOperation<QueueConnectionString>(connectionString));
For Entra ID, leave ConnectionString unset and populate the EntraId settings instead (fully qualified namespace, tenant ID, client ID, and client secret). For passwordless, set the Passwordless settings with just the fully qualified namespace, since the identity comes from the host.
Then add the sink task. A QueueSinkConfiguration names the connection string, sets the broker type, and holds one or more QueueSinkScripts. The source goes in the script's Queues list. Build it with the AzureServiceBusSinkSource helper rather than typing the string by hand, so a malformed source can't slip through:
var script = new QueueSinkScript
{
    Name = "orders",
    Queues = new List<string>
    {
        AzureServiceBusSinkSource.Queue("orders")
    },
    // The same script as the Studio task above.
    Script = @"
        put(this.orderId, {
            'OrderId': this.orderId,
            'Customer': this.customer,
            'Total': this.total,
            '@metadata': { '@collection': 'Orders' }
        });"
};

var config = new QueueSinkConfiguration
{
    Name = "AzureServiceBusSink",
    ConnectionStringName = "AzureServiceBusConStr",   // matches the connection string
    BrokerType = QueueBrokerType.AzureServiceBus,     // matches the connection string
    Scripts = { script }
};

store.Maintenance.Send(
    new AddQueueSinkOperation<QueueConnectionString>(config));
Sending AddQueueSinkOperation is the save. Once it returns, the task exists and starts running, exactly as it would after clicking Save in the Studio: messages already on the queue are pulled in, and new ones are consumed as they arrive. To create the task but leave it idle, set Disabled = true on the configuration and enable it when you're ready.
Cheatsheet
Two forms you'll touch. You set both up before the task starts consuming: create the connection string first, then create the sink task, which references that connection string by name.
| Form | What it configures |
|---|---|
| Connection String | Namespace endpoint plus the authentication mode and its credentials. Created first. |
| Sink Task | Source(s) (a queue and/or a topic subscription), the transform script, and the task name. References the connection string by name. |
The credentials stored in the connection string depend on the auth mode: SAS holds the full connection string copied from Azure, Entra ID holds the namespace plus tenant, client, and secret, and Passwordless holds only the namespace.
Summary
- Open Ongoing Tasks and add an Azure Service Bus Queue Sink.
- Connect by creating a connection string: SAS to start fast, passwordless for production.
- Define the source (queue or topic subscription) and paste in a script.
- Test against a real message before saving anything.
- Save, confirm it's actually working.