Quill - Shipping Your AI Agent

What Quill is, and why you'd use it
Quill puts a conversational AI agent on top of a database you already have. You point it at your data, describe what the agent should be able to answer, and you get a chat interface that answers questions about that data in plain language. It's self-hosted: it runs on your own server, with no ML engineers or cloud dependency to operate it.
Quill doesn't give you a database, nor asks you to build one. You bring the app and its database, and Quill runs alongside it, adding the AI chat layer. If you already run something on Postgres, SQL Server, or MySQL/MariaDB, Quill can put a conversational agent on top of it.
One thing Quill does not include: the AI model itself. You need to bring it from a provider such as OpenAI API or Azure OpenAI.
What you'll need before you start
- Docker Desktop (Linux engine). On Windows, run everything from a WSL shell with Docker's WSL integration on.
- Your app's database, reachable from Docker.
- An AI model: an API key for a hosted provider (OpenAI or Azure OpenAI).
- Port 443 free on the host.
Get your license and keys
Quill requires a license. It's a 90-day trial, no card is required. To get one, sign up with your email and accept the terms-of-service and privacy terms.
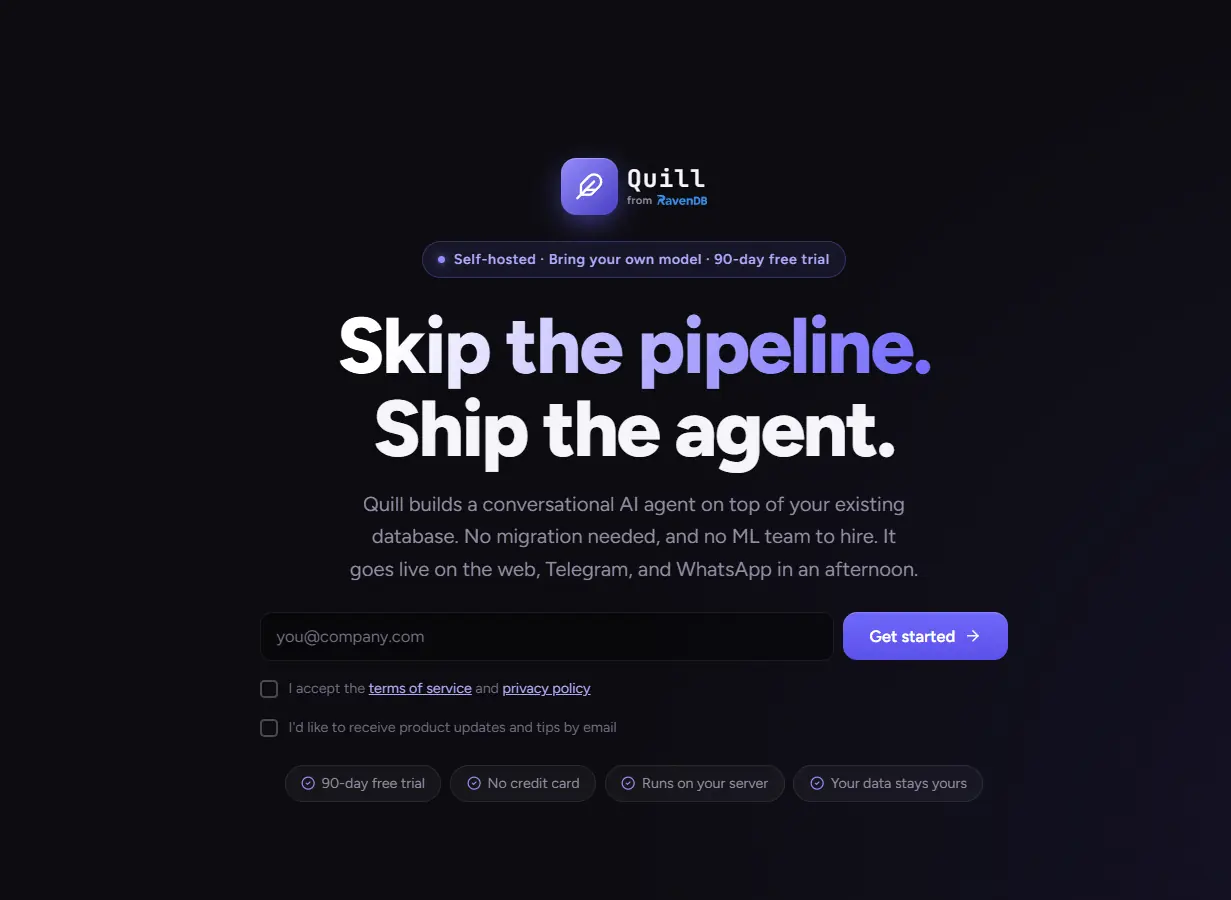
After clicking “Get started”, choose your domain (the .myquill.ai subdomain your Quill instance will be reachable from web) and the IP address that will have access to your Quill dashboard.
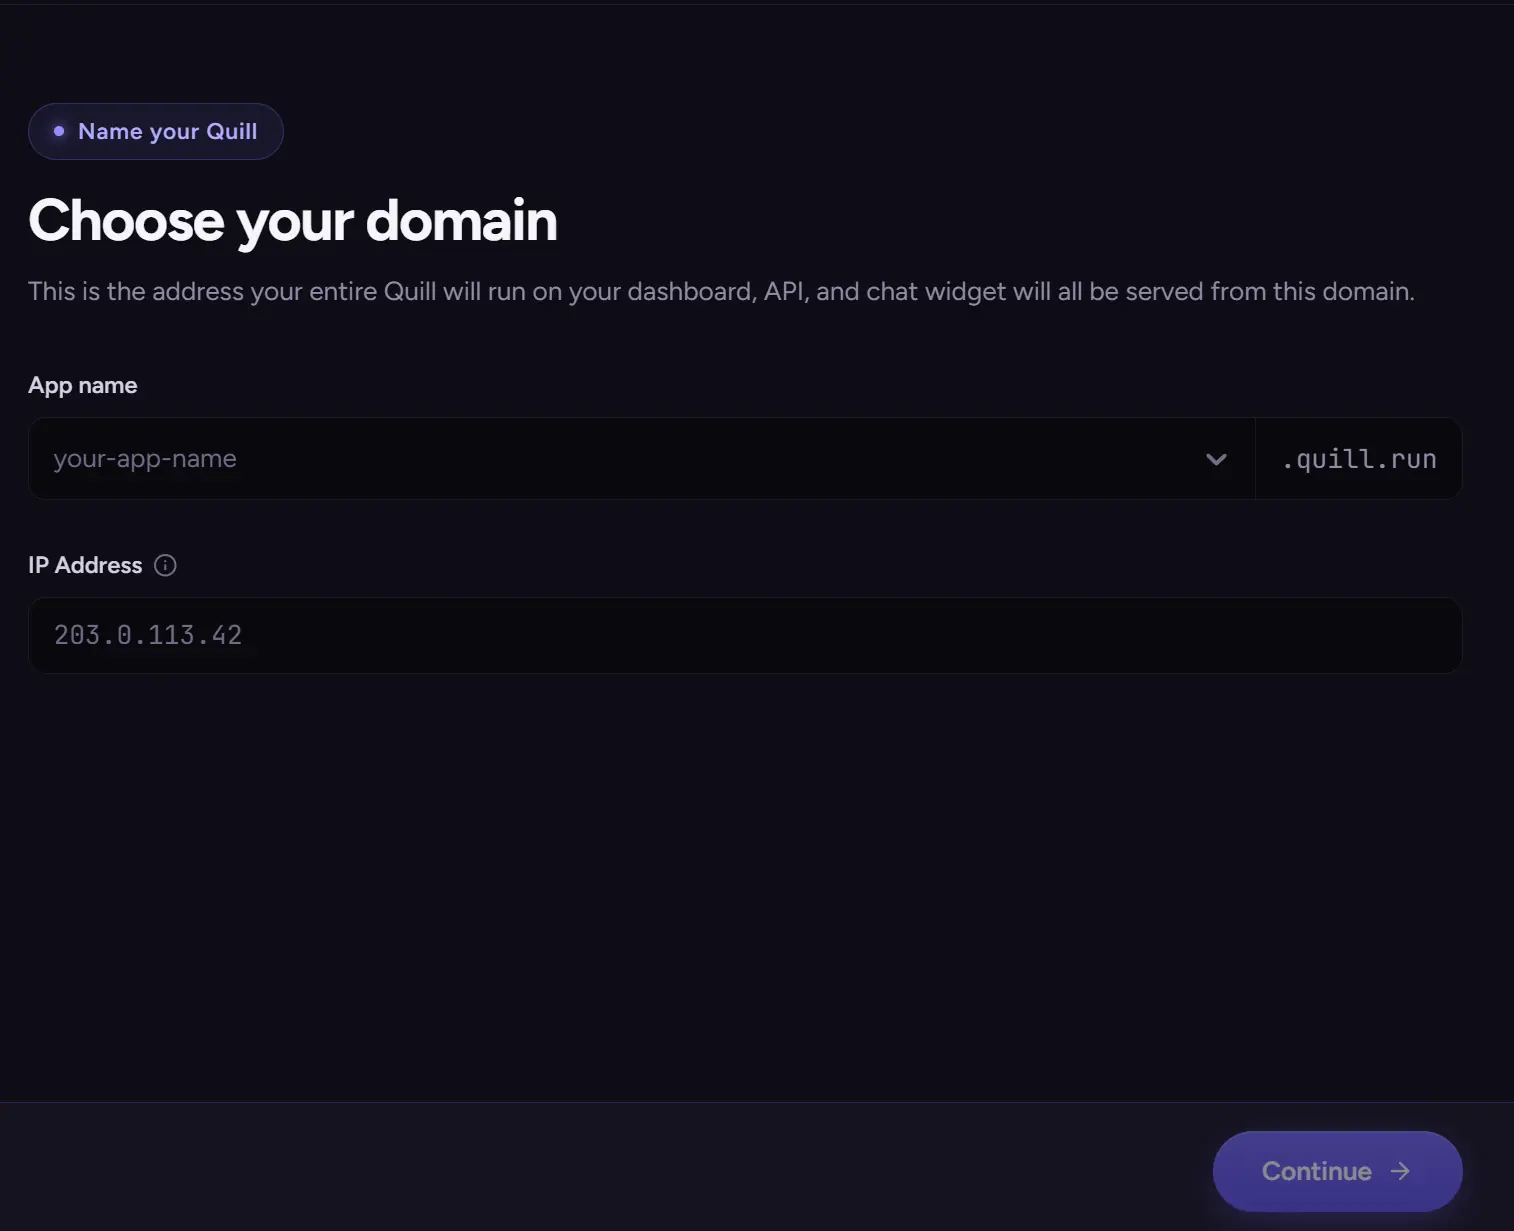
Provide the IP address of the machine your Quill instance will run on. This guide runs Quill locally, so we use 127.0.0.1 (the loopback address, meaning "this machine").
Fill in information about you, confirm your choice, and click Confirm and Generate to get your credentials.
Your license is then generated and emailed to you, so it won't appear on screen.
Receive your credentials
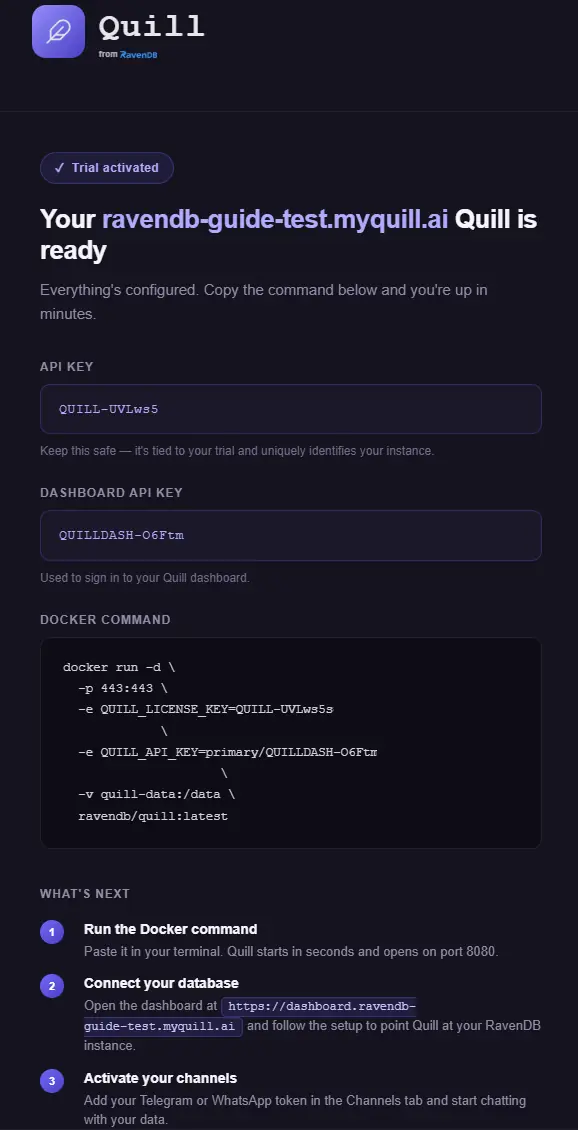
The email contains two keys. Treat these as secrets: they identify and unlock your instance, so don't share them or commit them anywhere public.
Use the keys as they appear in your email. The run command comes with them already filled in; the API key is also what you enter to log into the dashboard.
| Credential | Looks like | What it's for |
|---|---|---|
| API key | QUILLDASH-… | Logs you into the Quill dashboard |
| License key | QUILL-… | Activates the Quill |
The email also contains the docker command, which you can use to run your Quill instance immediately:
What's next
Your signup email ends with a short "What's next", three steps:
- run the Docker command,
- connect your database,
- and turn on the channels where people will chat.
That's the rest of this guide. You'll run the appliance, connect your database and build the agent, and put the chat in front of your user.
Run the Docker Image
Before you run
For this step, you will need Docker Desktop and free port 443.
Quill ships as a Docker image, a self-contained package with everything it needs to run. Docker is the tool that runs it, so the one command below is all it takes; you don't install Quill's pieces yourself. If you don't have Docker yet, install Docker Desktop (docker.com) and make sure it's running before you start.
On Windows, make sure you have WSL installed. WSL (Windows Subsystem for Linux) gives you a Linux kernel available aside/inside your Windows OS. If you don't have it yet, install it by following Microsoft's WSL install guide. It’s a dependency to run Linux-based Docker images, as these require a live Linux kernel to bind to. It will work there once you've turned on Settings → Resources → WSL Integration in Docker Desktop.
Run it
Your license email has this command with your keys already filled in. Copy it as-is and run it:
docker run -d \
  -p 443:443 \
  -e QUILL_LICENSE_KEY=QUILL-… \
  -e QUILL_API_KEY=primary/QUILLDASH-… \
  -v quill-data:/data \
  ravendb/quill:latest
It runs in the background and keeps its data in a volume so restarts don't wipe your setup.
Wait for it to be ready
Quill activates itself and is ready in about 30 to 60 seconds (status walks NeedsActivation → Redeeming → Restarting → Ready). Check when it's done:
docker exec $(docker ps -q -f ancestor=ravendb/quill:latest) \
  curl -s http://127.0.0.1:5000/api/bootstrap/status   # {"state":"Ready"}
When you see {"state":"Ready"}, you're up. If it stays stuck on NeedsActivation, the license key is usually wrong or the container can't reach the licensing API; check Docker logs.
--name quill to the run command if you'd rather use docker exec quill and docker logs quill directly. 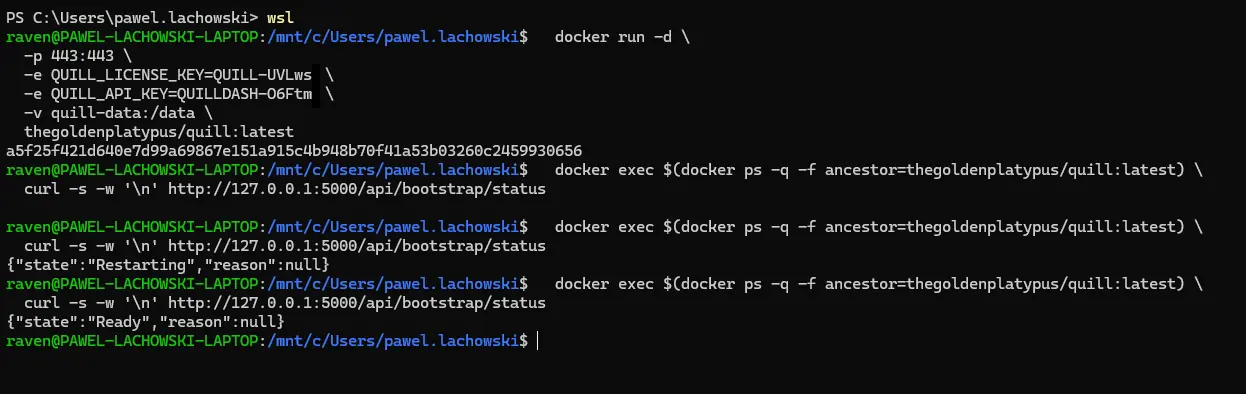
Where this leaves you
Quill is running and activated, but nothing is connected to it yet. Let’s connect it to your database and point it to an LLM of your choice.
Connect your database and build the agent
You'll log into the dashboard, point Quill at your database, connect an AI model, and build the agent that answers questions. By the end you'll have a working chat you can test.
We will prepare four things, in order:
- A connection to a data source, where Quill reads from - your database
- An AI connection which describes where location of LLM that works on top of it
- An agent, the system prompt plus the tools and queries it can run
- A channel, which connects your users with the backend of a chat
Log in
Open your dashboard at:
https://dashboard.<your-domain>.myquill.ai/
Your domain is the one you chose at signup. Connect to it, and you should be welcomed with the Quill dashboard login page. Log in with your API key from email, the QUILLDASH-… one.
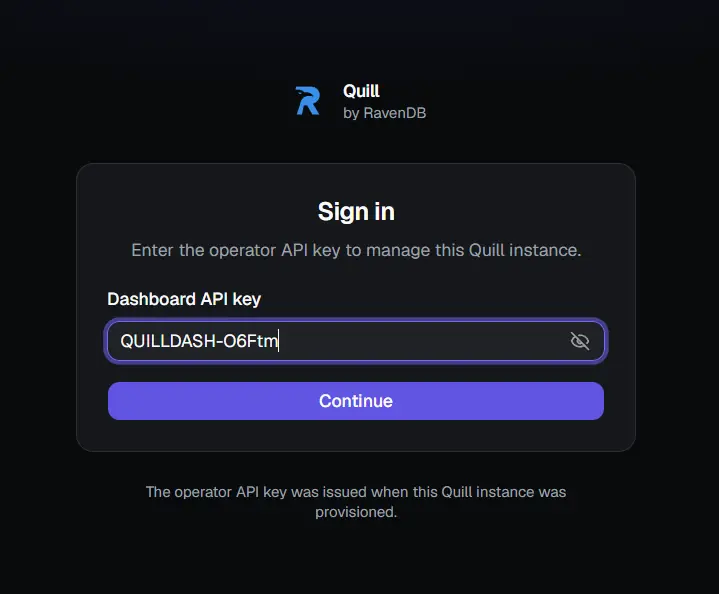
Connect your database
On the first run, you’ll be immediately taken to the “Connect to your source database” view. This points Quill at your database, decides how your tables become documents, and lets Quill to start mirroring the app data.
Throughout this guide, we’ll use the Postgres database loaded with Northwind, a small sample store dataset, so you'll see names like Categories, Products, and Orders. Read those as stand-ins for whatever your own database holds; you don't need Northwind to follow along.
Step 1: Connect to your source database.
Fill in the form:
- Application name: a readable name for the app for you to follow (e.g. RavenDBShop)
- Public URL slug: a short ID for the app (auto-generated after application name)
- Source SQL database: PostgreSQL, SQL Server, or MySQL.
- Connection string: the single line that tells where exactly your database is and how to reach it, e.g. Host=…;Port=…;Database=…;Username=…;Password=…
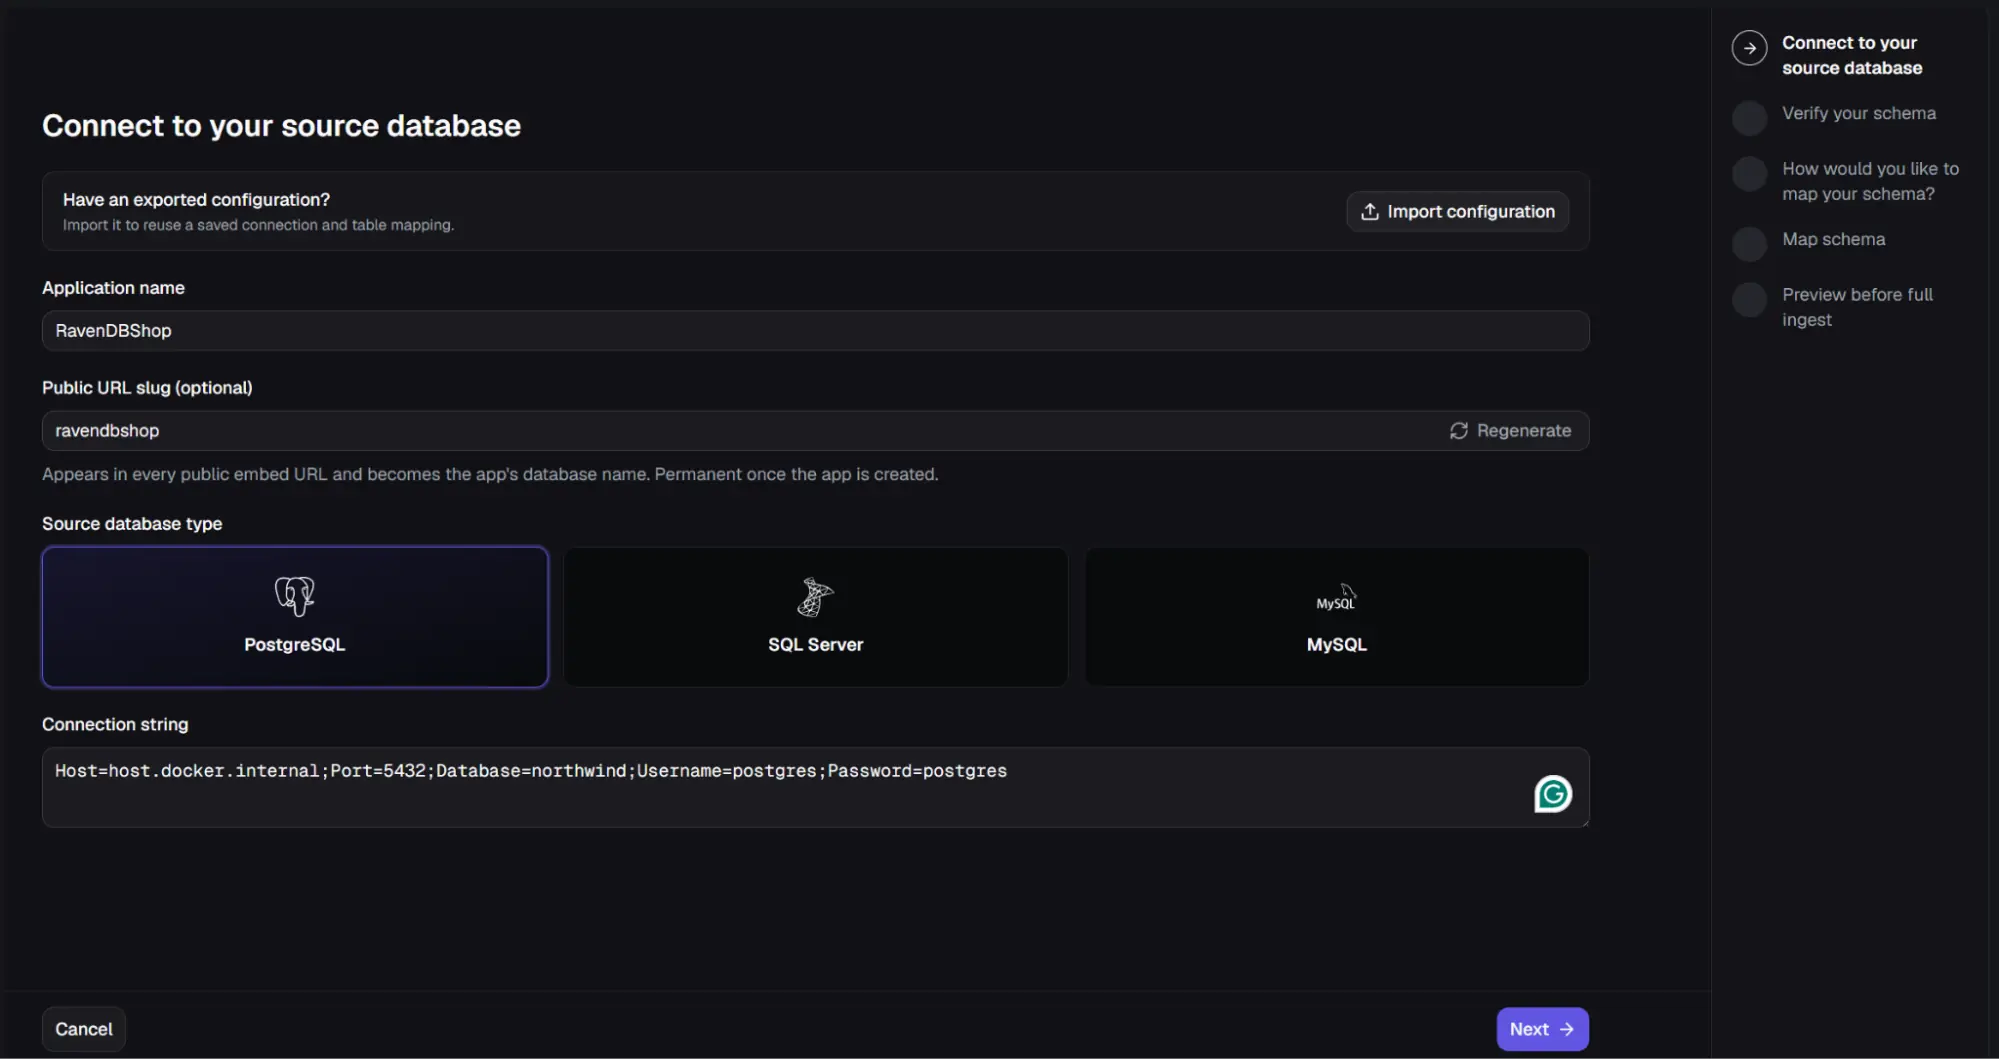
Quill reads changes from your source database as they happen, so change data capture (or logical replication) has to be enabled there first, and Quill's login needs permission to read the change stream. For PostgreSQL, set wal_level = logical and connect with a login that has the REPLICATION attribute.
For SQL Server, enable CDC on the database and each source table, and keep the SQL Server Agent running.
For MySQL, turn on row-based binary logging and grant the login REPLICATION SLAVE, REPLICATION CLIENT, and SELECT.
If the next step can't read your tables, this setting is almost always what's missing.
Step 2: Verify your schema.
Quill connects and lists the tables it found, each with its primary key and column count. Tick the ones you want to fetch, and continue.
One thing worth knowing here: Customize schemas (top right). By default Quill reads tables from the connection's default schema (public on Postgres, dbo on SQL Server). If your tables live in a different schema, or several, open this panel and add them so Quill knows where to look.
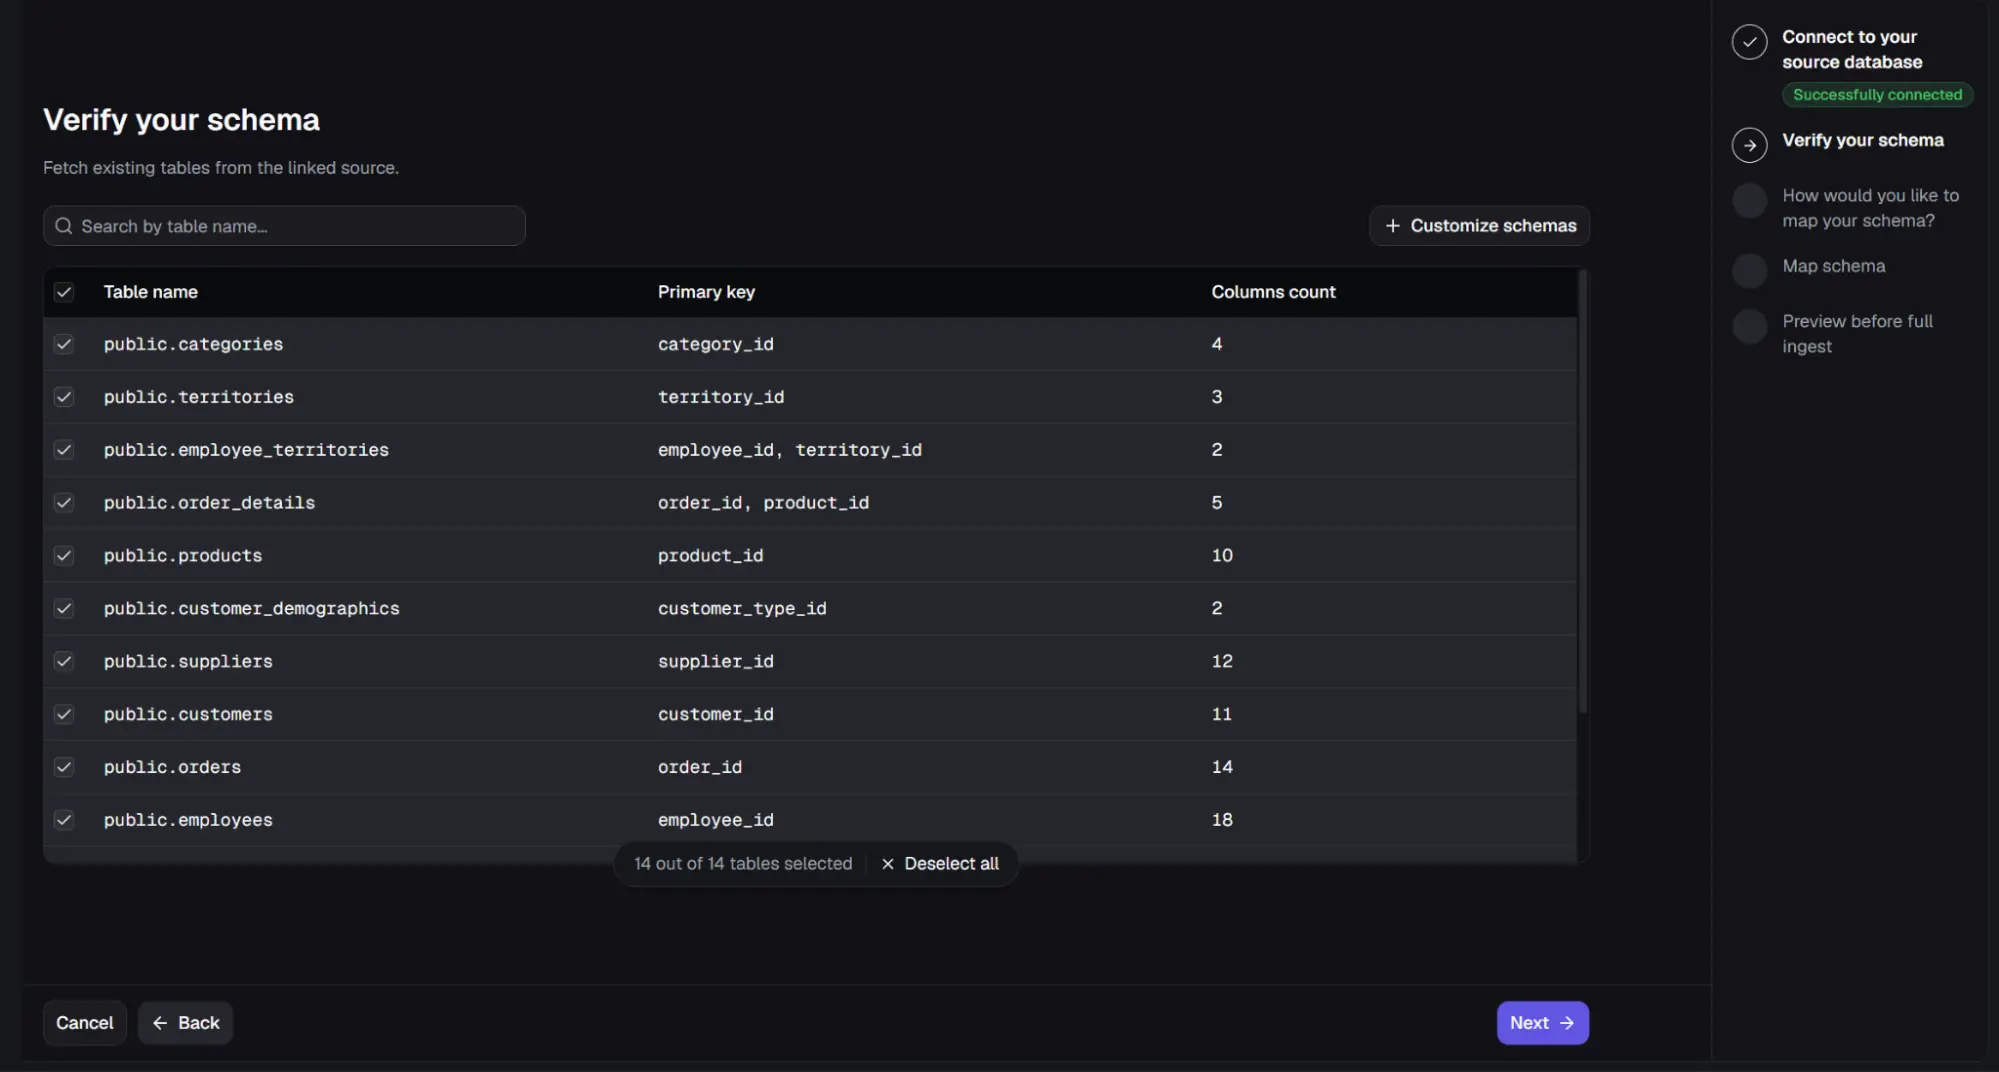
Step 3: Decide how your relational tables get turned into documents.
Two approaches:
- AI Suggest: this is the easiest and recommended way. The model drafts the mapping for you, with a space for optional instructions (e.g. "Embed line items in each order, link customers by id, keep addresses on the customer"). You can modify the created schema immediately after.
- Manual gives you the same tables laid out as collections and leaves the shaping to you. Treat it as an “advanced” option.
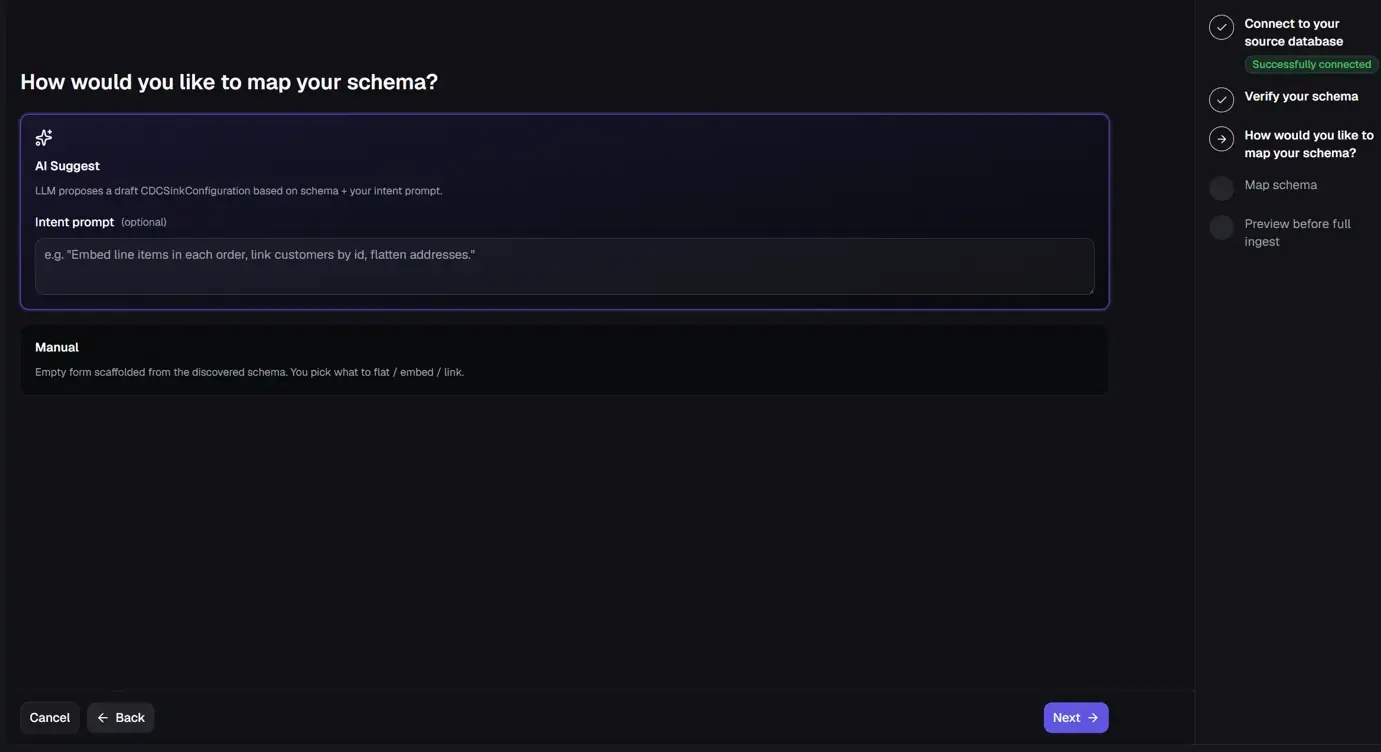
On mapping SQL relations - you can choose how the related tables come together, in one of two ways:
- Embed: store the related data inside the parent document. It goes in either as an array of objects (an order carrying its line items) or, for a one-to-one relation, as a single nested object under a named field (a customer's address stored on the customer). Good when you usually want the data together.
- Link: keep it as its own document and reference it by ID, an order pointing to a customer. Good when the related data is fetched separately.
You can inspect every table to verify or change how the data is mapped. A Raw JSON toggle lets you edit the config directly. If you used auto-mapping, this is where you check its work.
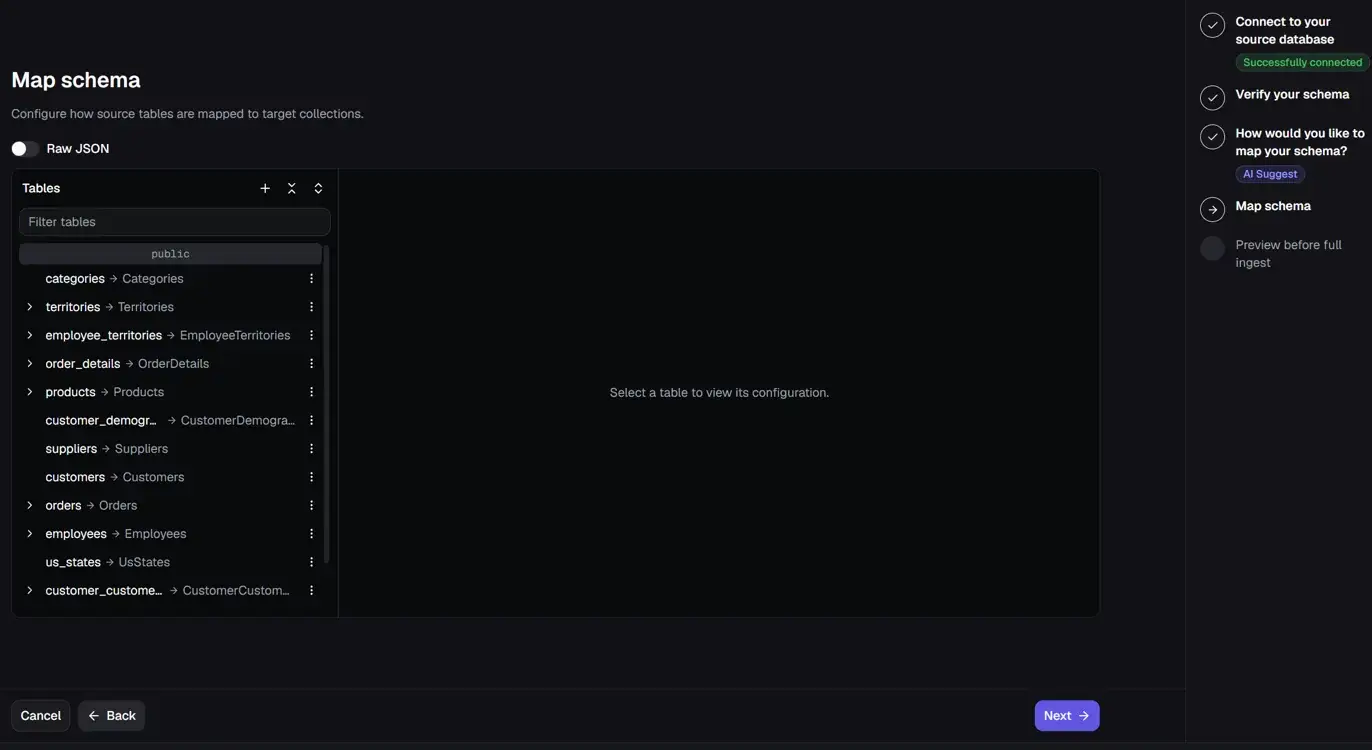
Step 4: Preview before full ingest.
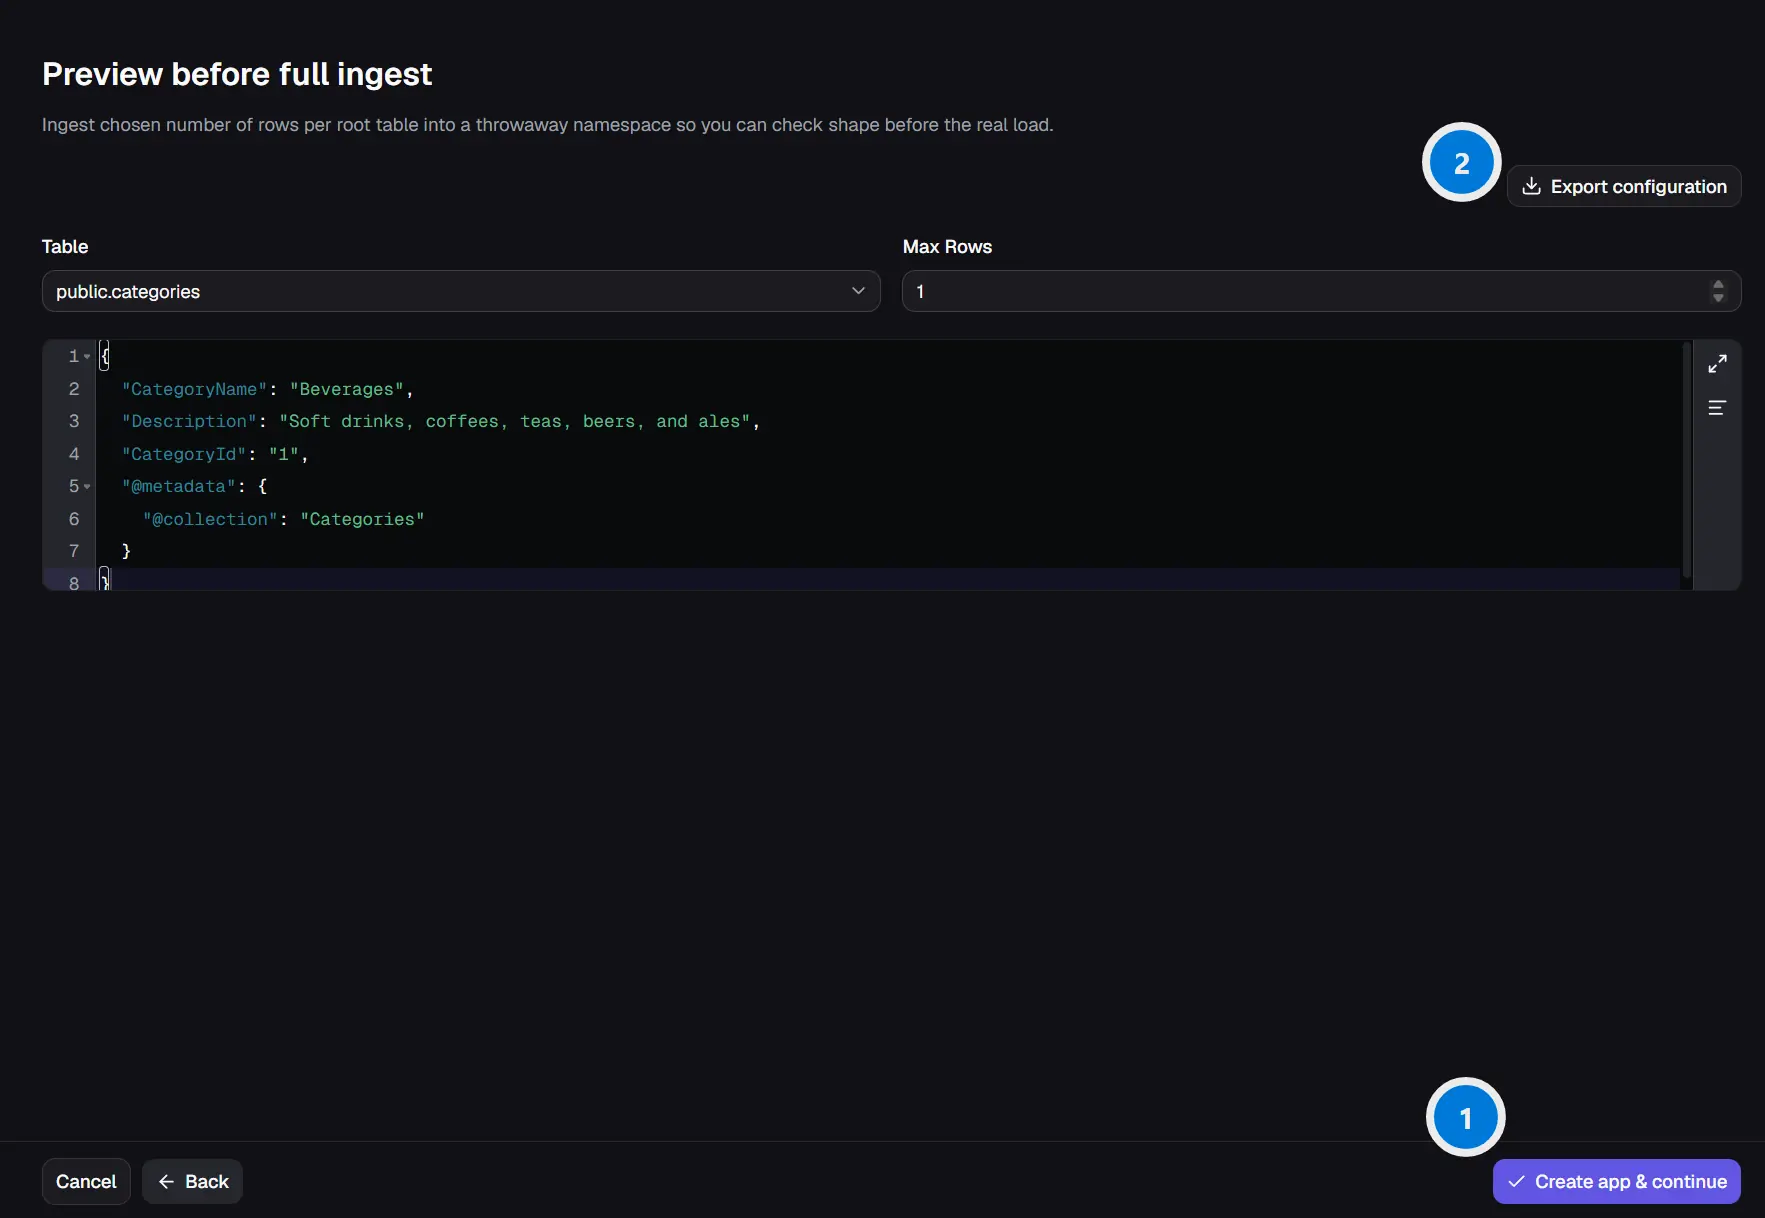
Before committing, Quill can load a small number of rows (you set Max Rows) into a throwaway namespace so you can see the shape of the resulting documents. This is the moment to confirm the translation did what you expected. For example, Northwind “Categories” row comes back as a document like:
{
  "CategoryName": "Beverages",
  "Description": "Soft drinks, coffees, teas, beers, and ales",
  "CategoryId": "1",
  "@metadata": {
    "@collection": "Categories"
  }
}
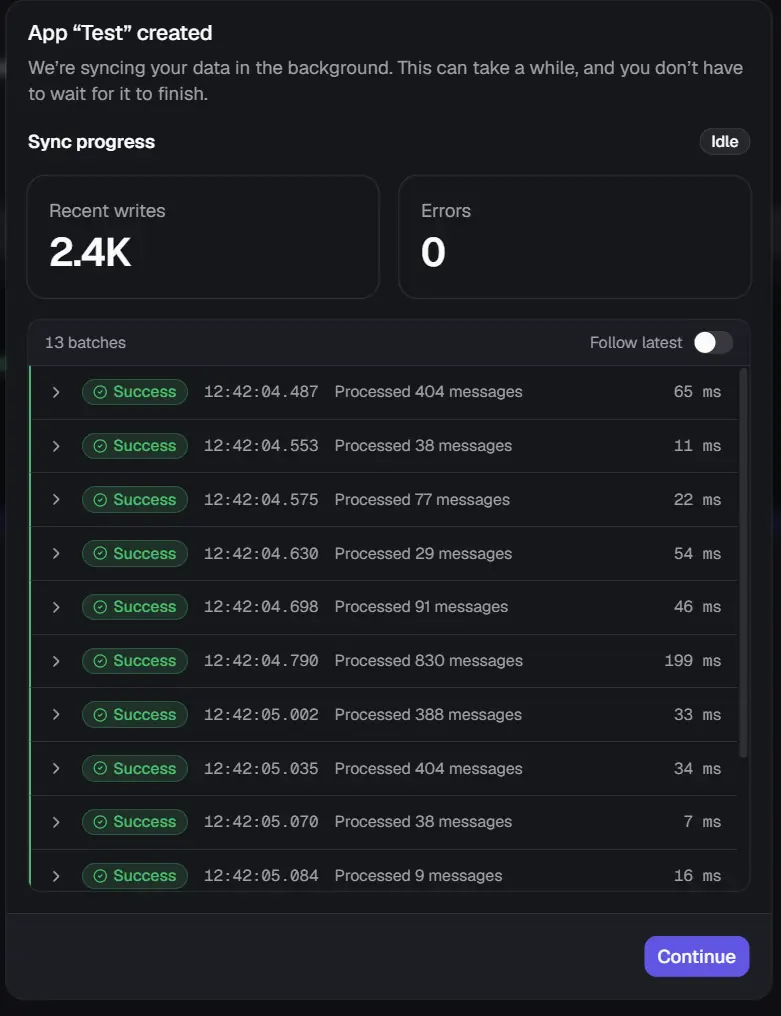
That is a relational row turned into a JSON document in a named collection. If you don’t like the result, go back and fix the mappings. After the preview looks right click “Create app & continue” (1). This will spin up the data sync.
When the load finishes, your data has mirrored:
Connect an LLM
Before the agent can answer anything, it needs a model. We’ll describe how to reach it by defining three main things:
- The model (e.g. gpt-4.1-mini)
- The LLM provider/vendor (e.g. OpenAI, Azure)
- Your credentials - e.g. OpenAI API key
Other miscellaneous or advanced options:
- Name a friendly label to identify this connection later, e.g.
demo-llm - Endpoint the base API URL requests are sent to (e.g.
https://api.openai.com/v1or your Azure resource URL) - Deployment name (Azure OpenAI only) the name you gave your model deployment in the Azure portal
- Organization name (OpenAI only) your OpenAI org ID to attribute usage/billing to a specific org
- ProjectID (OpenAI only) scopes the API key to a specific OpenAI project for usage tracking/limits
- Prompt caching reuse repeated prompt prefixes to cut latency and cost on subsequent calls
- Temperature randomness of outputs: lower = more deterministic, higher = more creative
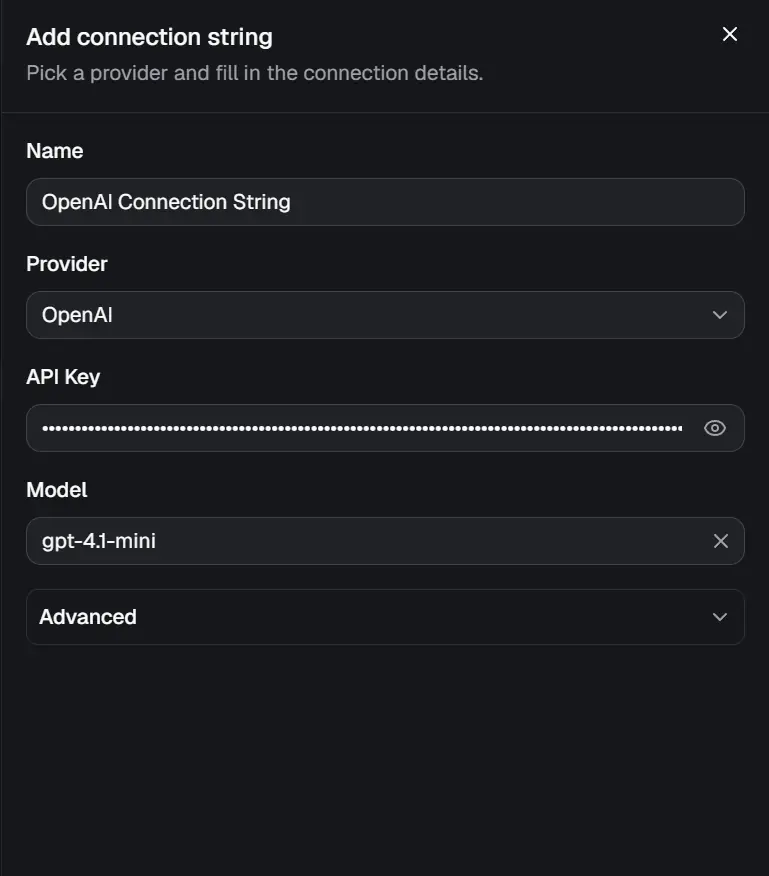
Save, and the connection is ready.
Build the agent
Now you have the two ingredients, your data and a model. Building the agent fuses them together.
Let’s start with tools: The tools you define are the queries the agent is allowed to run, so they decide what data it can see and answer from. That also keeps it grounded: the agent answers from your actual data, not guesswork. So an agent is really three things, the model connection you just made, a system prompt, and a set of query tools.
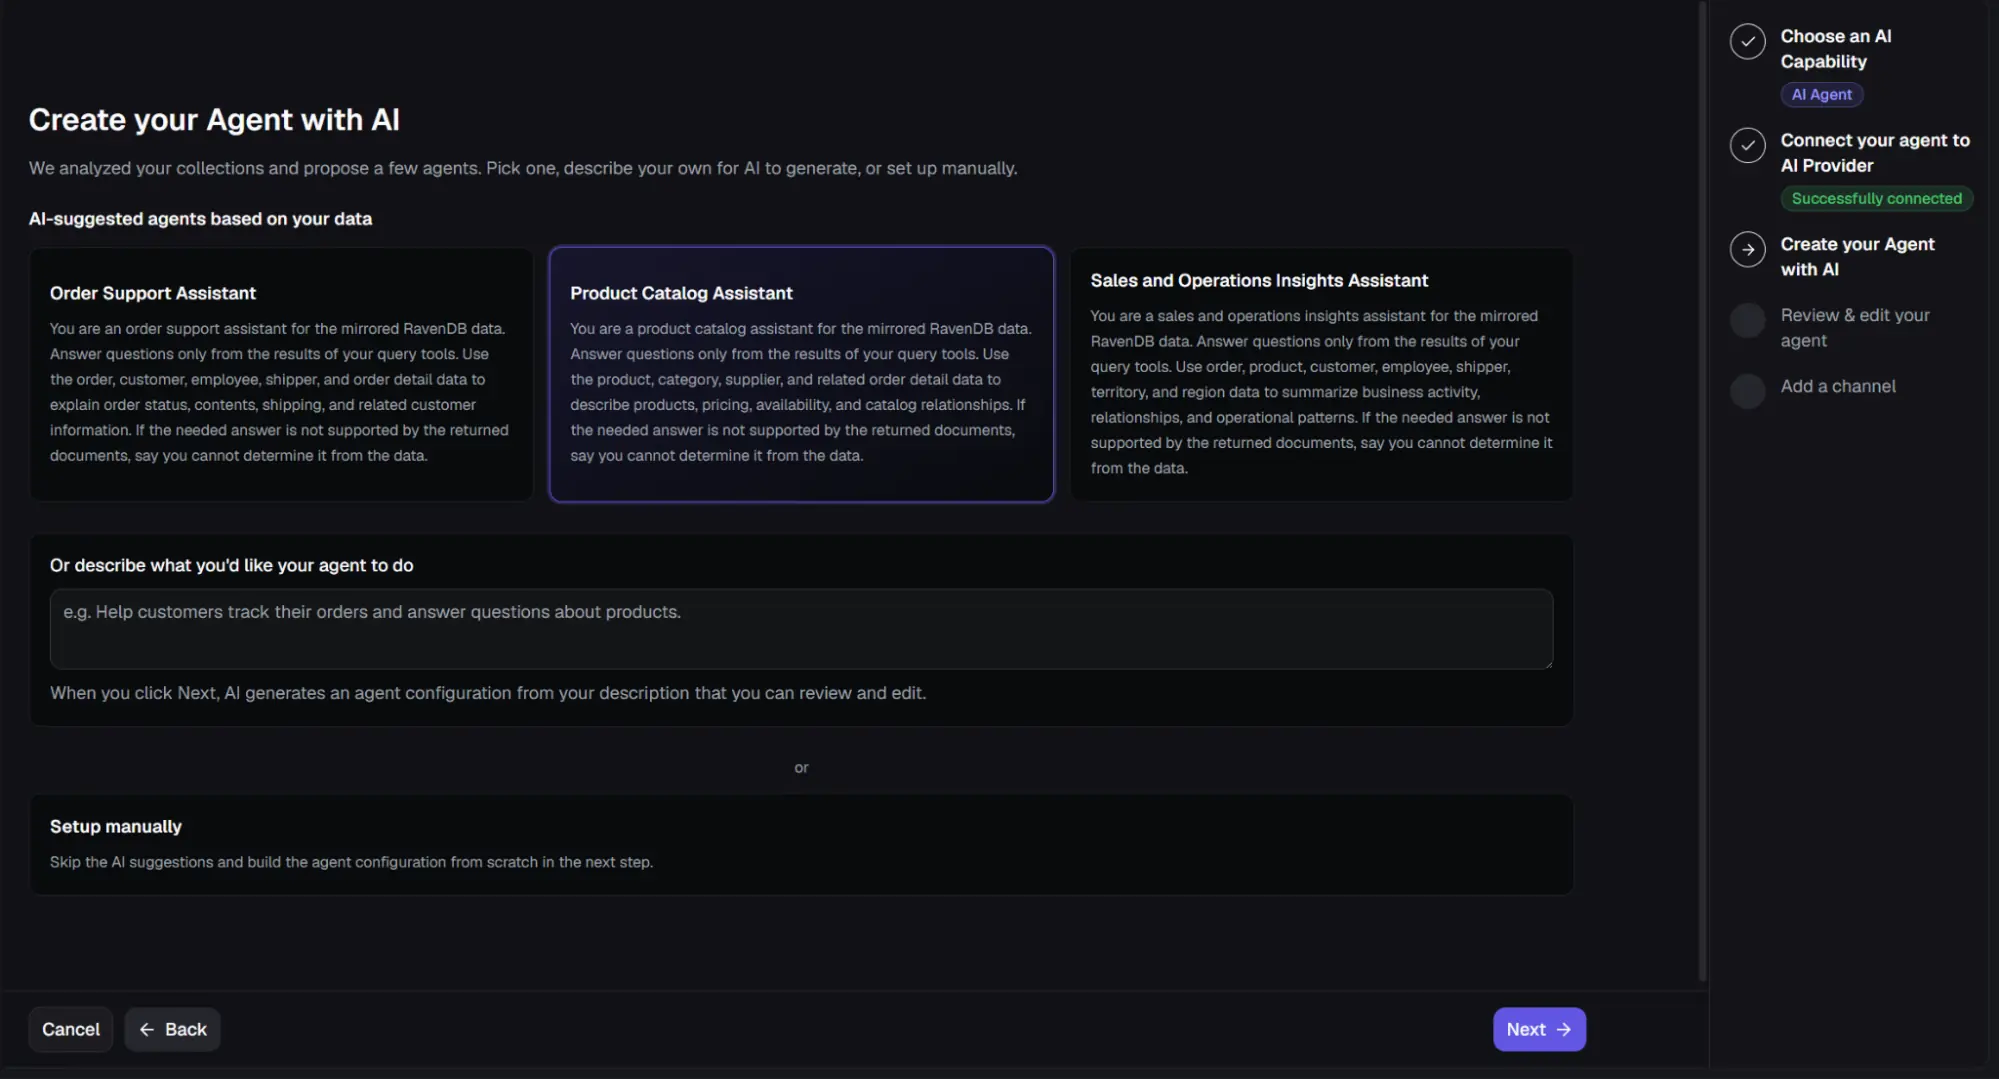
You can see in the step list we’ve automatically skipped “Choose an AI Capability” step. You can go back to it, but for now, in beta, there’s only one option available.
Step 1: Scaffold agent configuration with AI
Pick an agent if it matches your goal, generate config from prompt (recommended). You can also choose to build one for yourself manually (this takes us to step 2 immediately).
Step 2: Review and edit.
In this step you can edit and adjust all of these before saving, across two tabs.
The AI suggestion tab is the summary view. It lays out what was generated at a glance. If it all looks right, you can go straight to testing and saving.
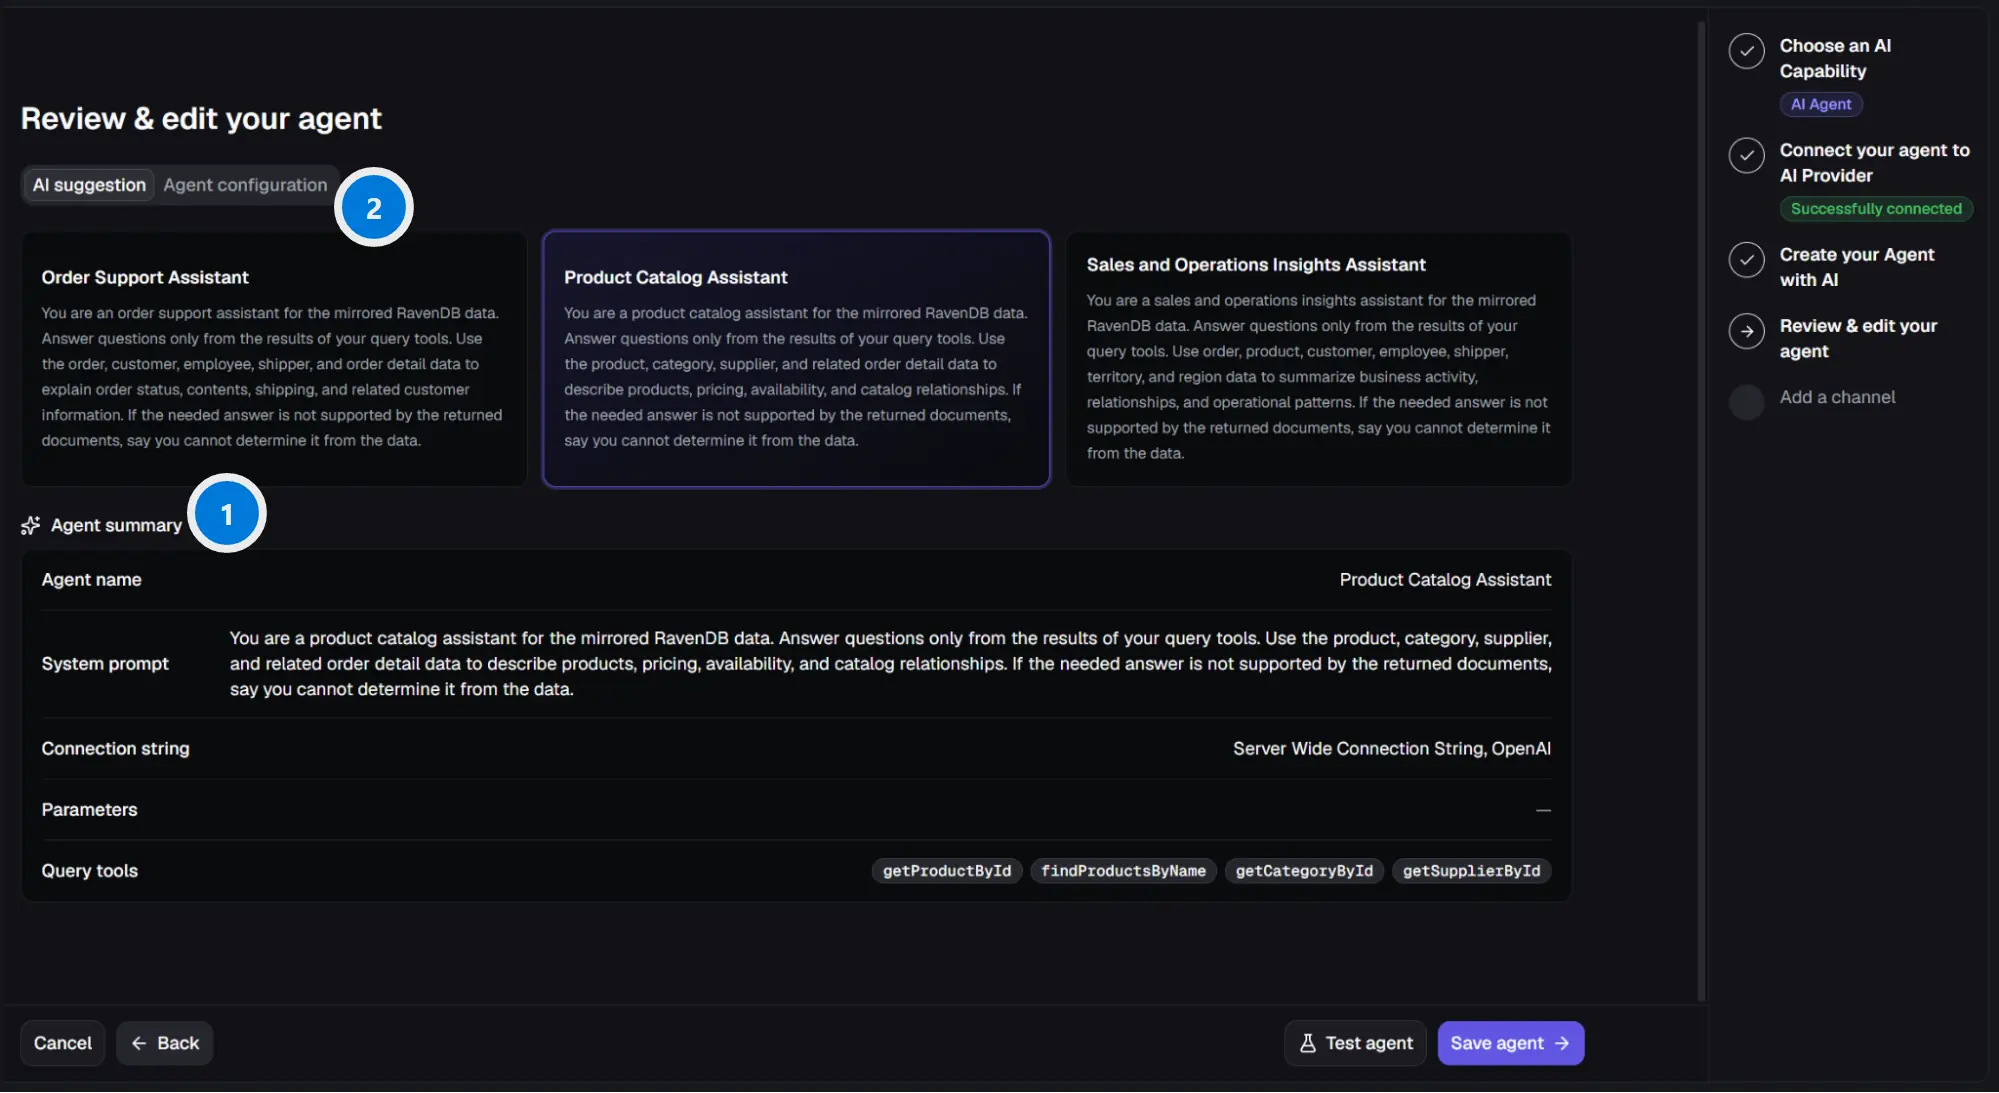
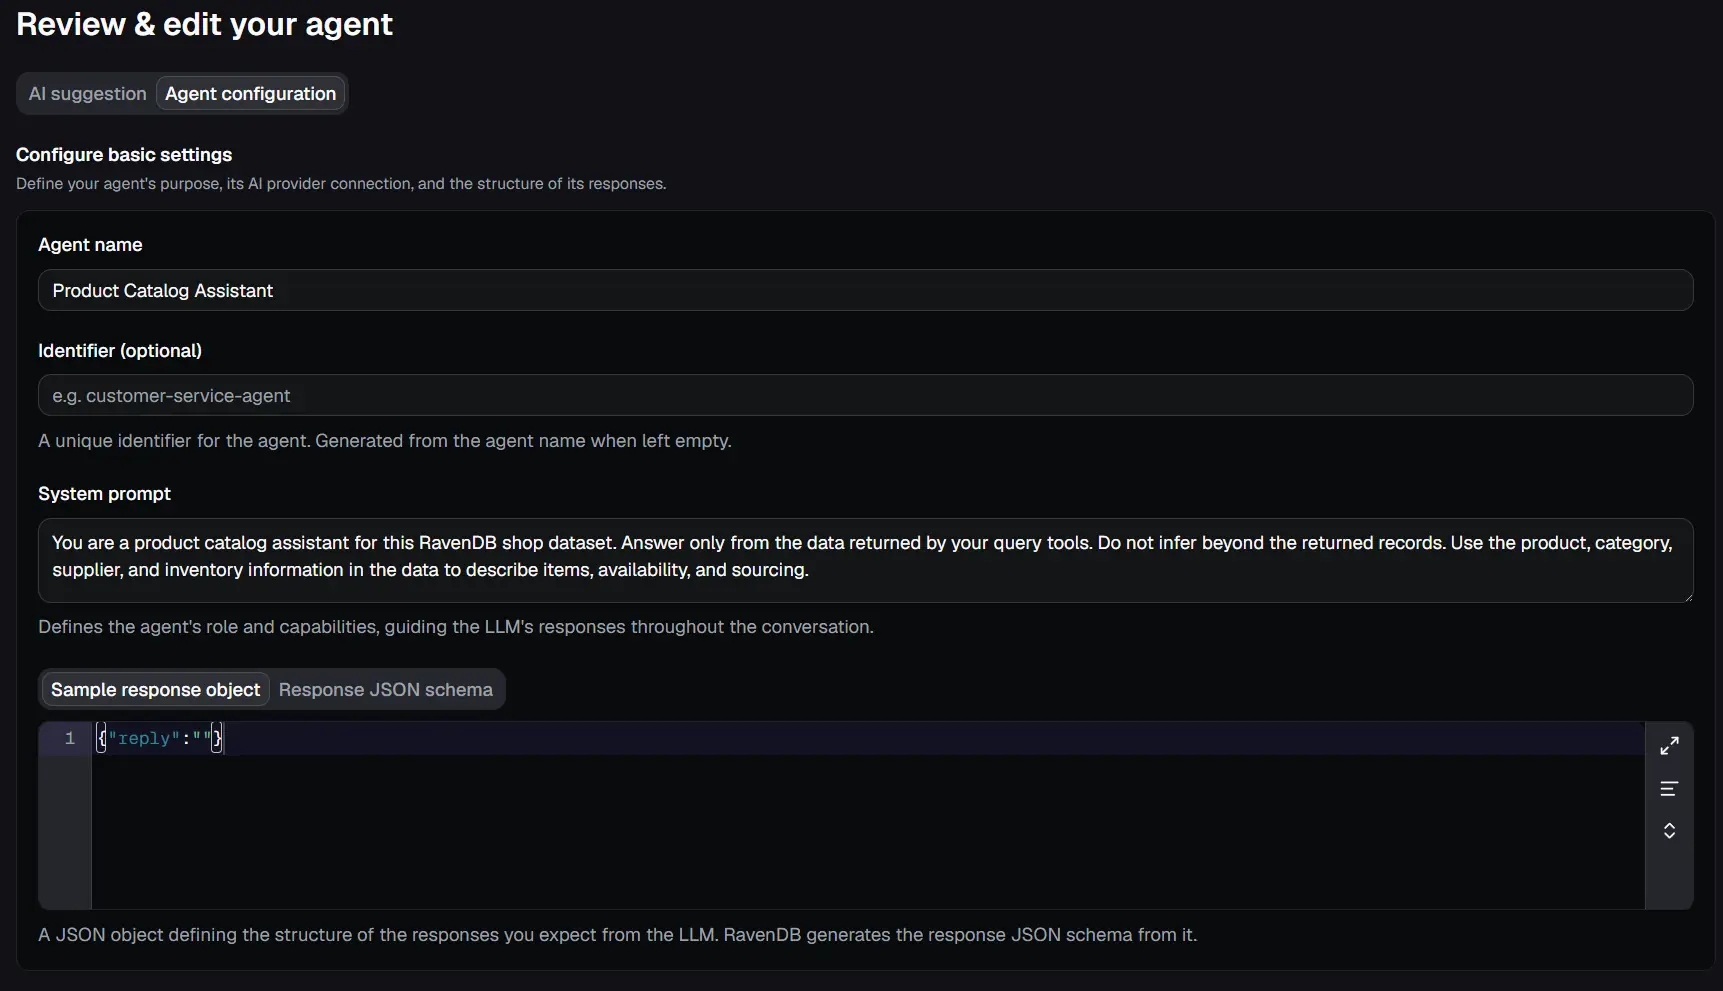
The Agent configuration (2) tab is the full editor, showing the same generated agent as editable fields. Agent consists of its name, system prompt, response shape, parameters, and query tools. If you’ve generated the configuration with AI, all of it should be pre-filled, that’s why we’re recommending this approach.
About the options:
- Identifier is a unique agent id which auto-generated from the name if you leave it empty.
- System prompt describes the agent's job and its guardrails
- Response shape. A Sample response object (like
{"reply":""}) that Quill turns into a schema the model must follow, keeping output structured rather than free-form. For advanced control, you can also define the JSON Schema.
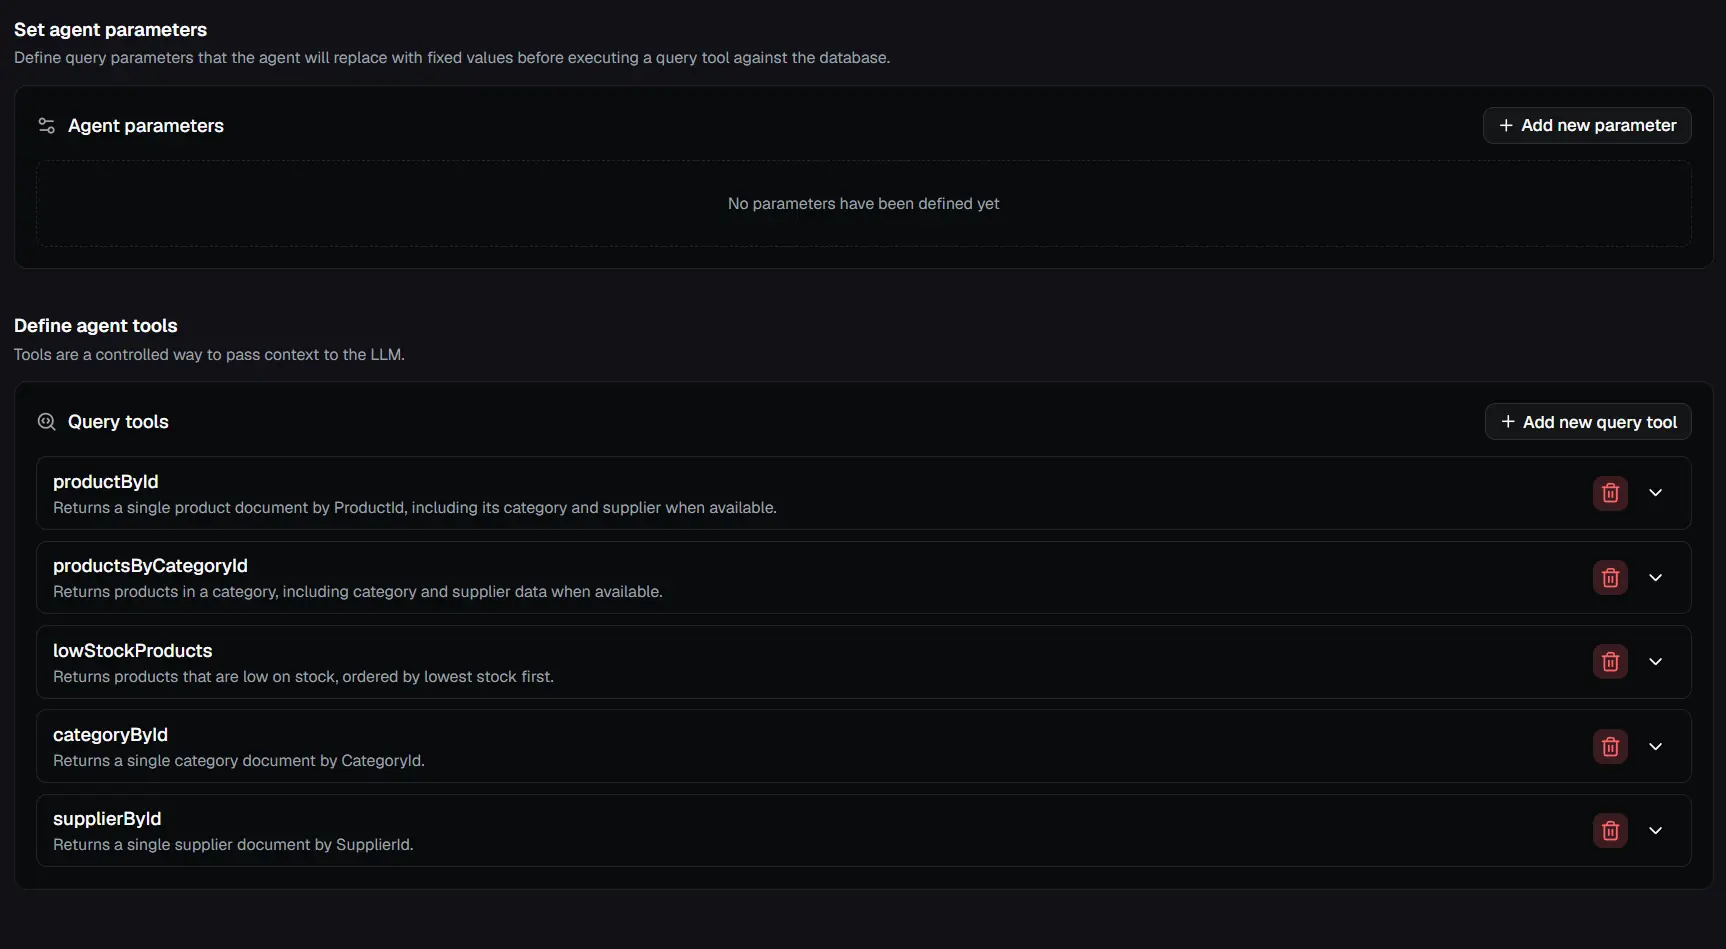
- Agent parameters. Fixed values the agent cannot change itself. It can be injected into a query before running it. Often empty, you add one only if a tool needs a value pinned rather than filled by the model - e.g. userId for user-bounded queries.
- Query tools. The named queries the agent may run, in order to reach for your application data. Each has a name, a description (for the model to decide when to use it), RQL query (RavenDB's query language, e.g.
from Products where search(ProductName, $term)), and a sample parameters object defining what LLM has to supply. Two switches control when a query runs: Allow model queries (the model runs it on demand) and Add to initial context (pre-runs to fill the model at start).
Either way, you can click Test agent and try asking a few questions before saving to fine-tune the model configuration. It’s the fastest way to catch a vague tool description or a query that returns nothing. When it answers well, Save agent.
Where this leaves you
You have a working agent: connected to your data and backed by a model. Test agent should be giving real answers from your data. After you save, the wizard's last step is Add a channel. We'll create that channel and connect to it in the next part.
Put the agent into your app
A channel lets your application users reach the agent.
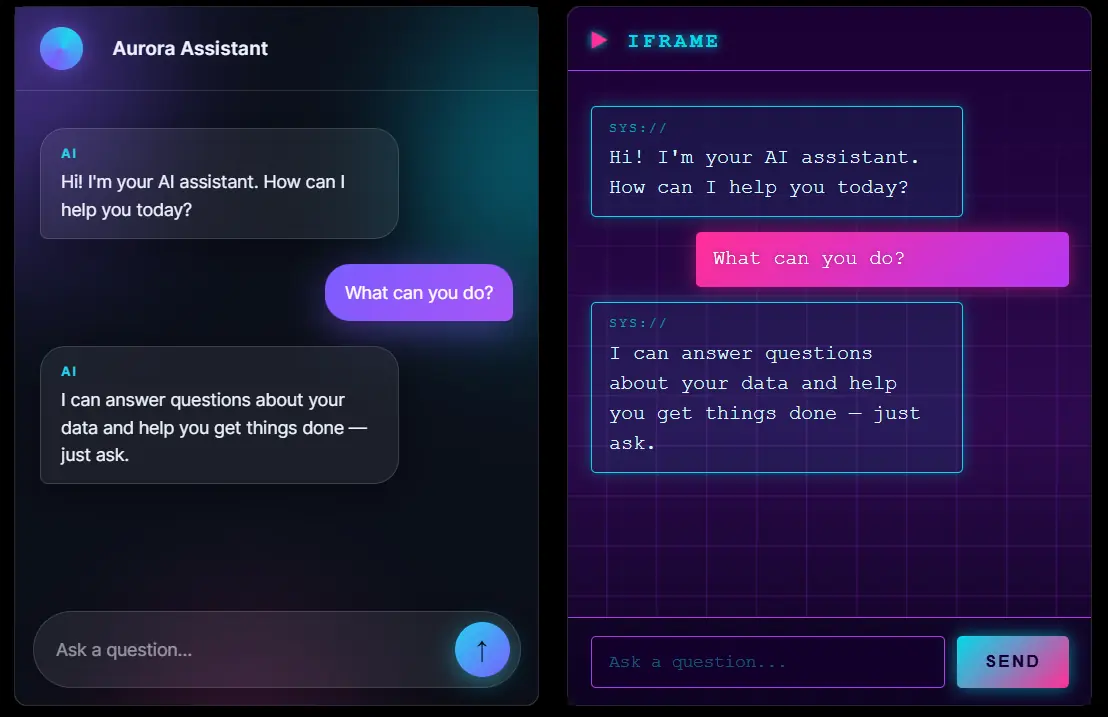
Quill’s channel also ships you a ready-made chat widget, available via iframe, styled by Quill, with fully customizable CSS.
Create the web widget channel
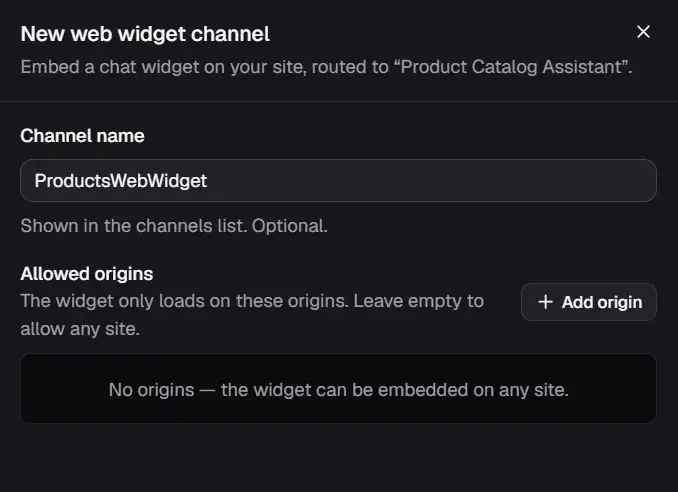
Creating a web widget channel is the agent wizard's final step: right after you save the agent, it lands on Add a channel. Add a web widget channel routed to your agent, with two fields:
- Channel name: a label for your own reference in the channels list. Optional.
- Allowed origins: the sites the widget is allowed to load on. Add the origins your page will be served from (e.g. https://yourapp.com). Leave it empty and the widget can be embedded anywhere, fine for a quick test, but for production deployment you'll want to lock it to your known origins.
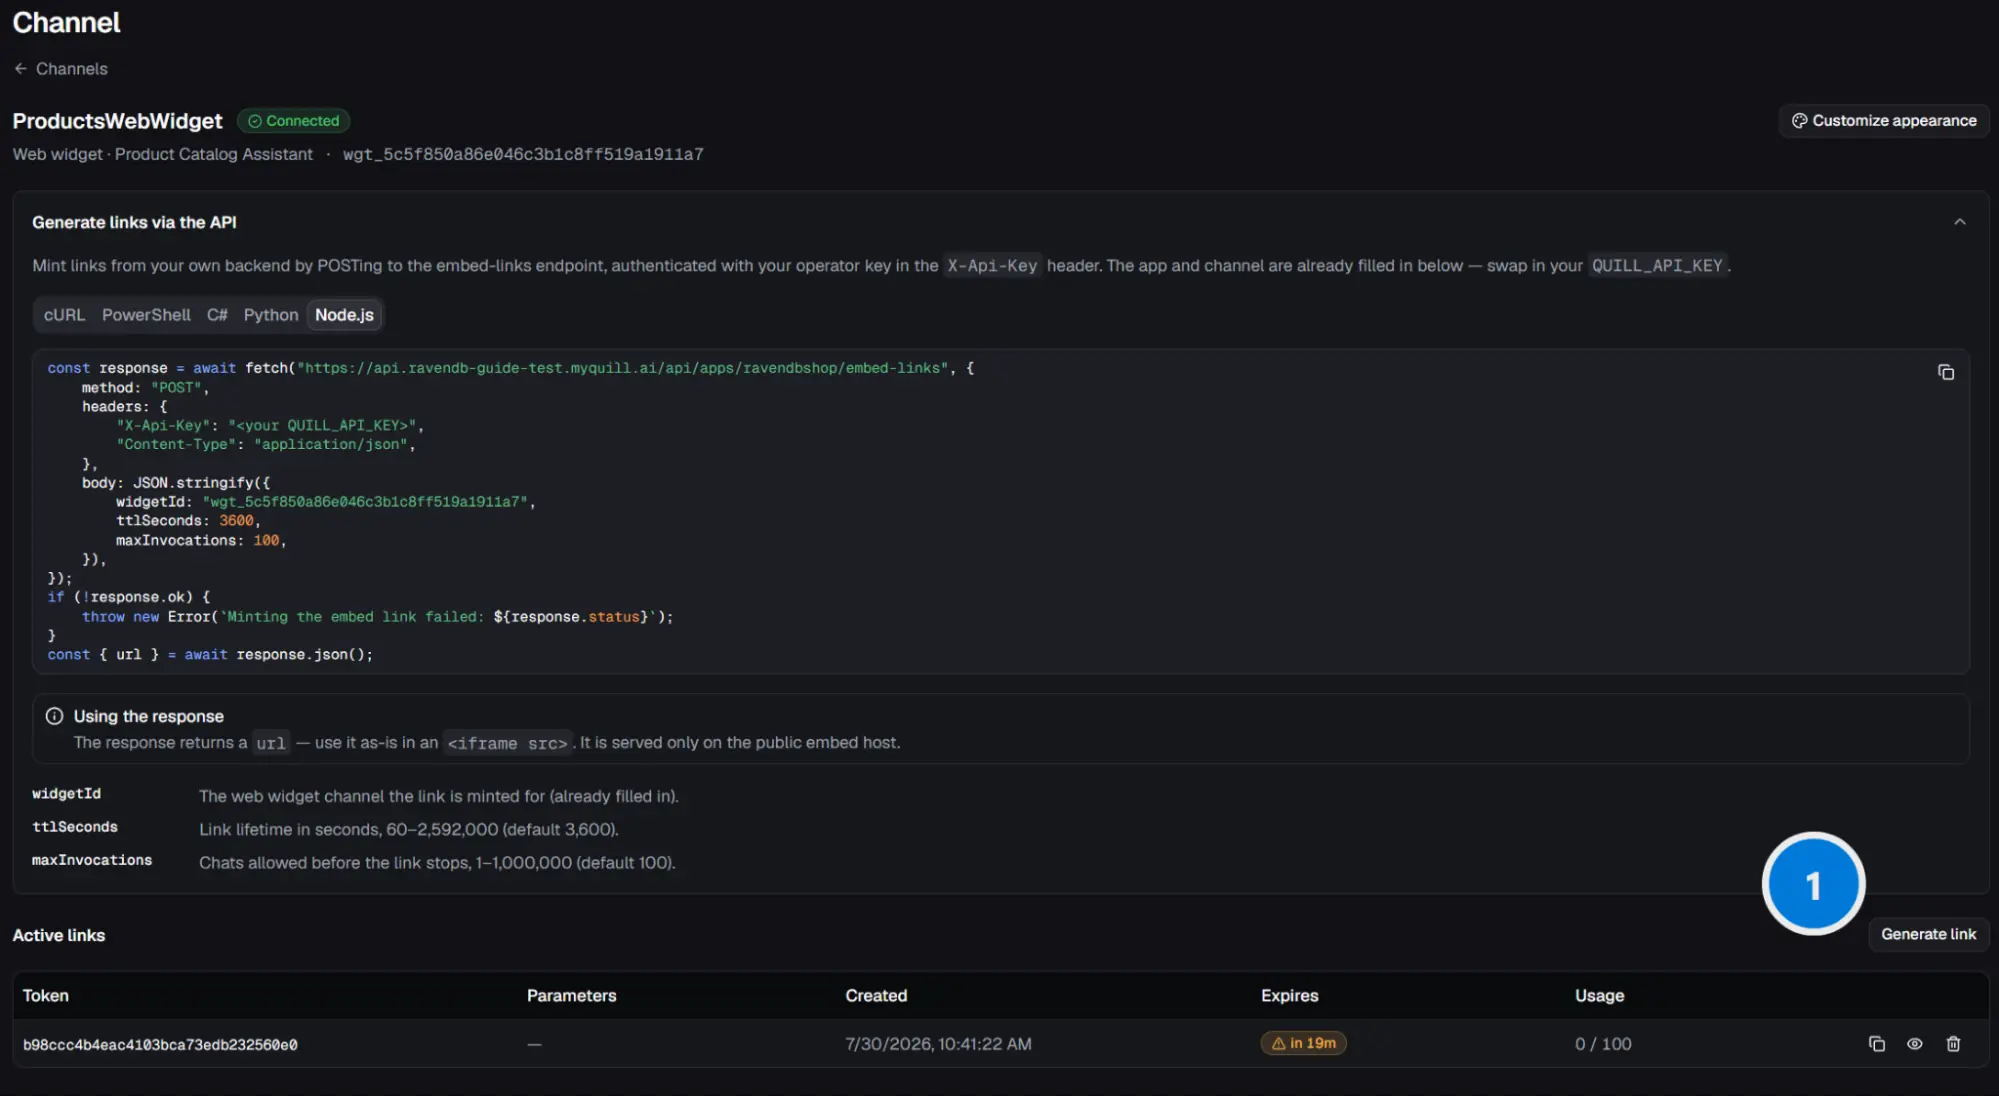
Save, and the channel shows as Connected. It has a widget id (wgt_…) you'll use when minting links.
Generate a link to try it
The fastest way to see the widget working is to generate a link from the dashboard. Go to the Channels tab, and on your channel click Generate link (1).
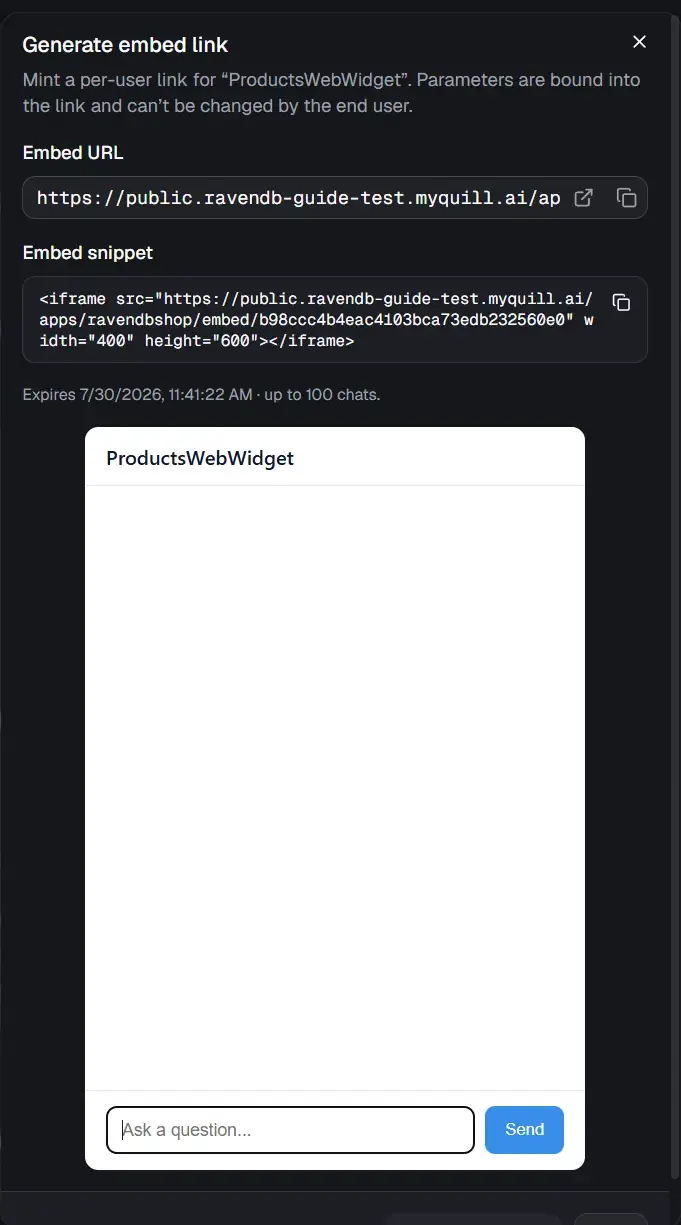
Choose how long it should last (Link expires after) and how many chats it allows (Max invocations), and Quill gives you a link that stays live for that window.
Every link expires after its lifetime and stops working after its chat cap, and the parameters are baked in so whoever opens it can't change them. For actually putting the widget into a page, don't paste a hand-generated link, use the approach we will explain next.
Generate links from your own backend
For a real app you have to make your backend generate a fresh iframe per user or session. Fortunately, Quill allows that by simply calling embed-links endpoint, which returns the chat URL ✨
The channel page shows the exact call under Generate links via the API, with samples for cURL, PowerShell, C#, Python, and Node.js. It's a POST to the embed-links endpoint:
POST https://api.<your-domain>.myquill.ai/api/apps/<your-app-slug>/embed-links
X-Api-Key: <your QUILL_API_KEY>
Content-Type: application/json

{ "channelId": "<your-channel-id>", "ttlSeconds": 3600, "maxInvocations": 100 }


Response fields:
token
-----
966a0a65a8786a6...

url
---
https://public.ravendb-guide-test.myquill.ai/apps/test/embed/966...
The response contains a url, and you drop that straight into an <iframe src>. The three body fields you fill on every request are the same knobs as the dashboard dialog.
The X-Api-Key is your API key, the QUILLDASH-… from email (the same key you log into the dashboard with). Here it goes straight into the header, with no prefix.
Here's the whole pattern as a minimal example. The backend holds the key and mints the link; the page only ever sees the finished url. First the server (Node, no dependencies):
import { createServer } from "node:http";

createServer(async (req, res) => {
  if (req.url === "/api/embed-link") {
    const r = await fetch(
      "https://api.<your-domain>.myquill.ai/api/apps/<your-app-slug>/embed-links",
      {
        method: "POST",
        headers: { "X-Api-Key": process.env.QUILL_API_KEY, "Content-Type": "application/json" },
        body: JSON.stringify({ channelId: "<your-channel-id>", ttlSeconds: 3600, maxInvocations: 100 }),
      }
    );
    const { url } = await r.json();
    res.writeHead(200, { "Content-Type": "application/json" }).end(JSON.stringify({ url }));
  }
  // ...also serve your index.html here
}).listen(3000);
Then the page asks that endpoint for a url and drops it into the iframe:
<iframe id="widget" style="width:400px;height:600px;border:0"></iframe>
<script type="module">
  const res = await fetch("/api/embed-link");
  const { url } = await res.json();
  document.getElementById("widget").src = url;
</script>
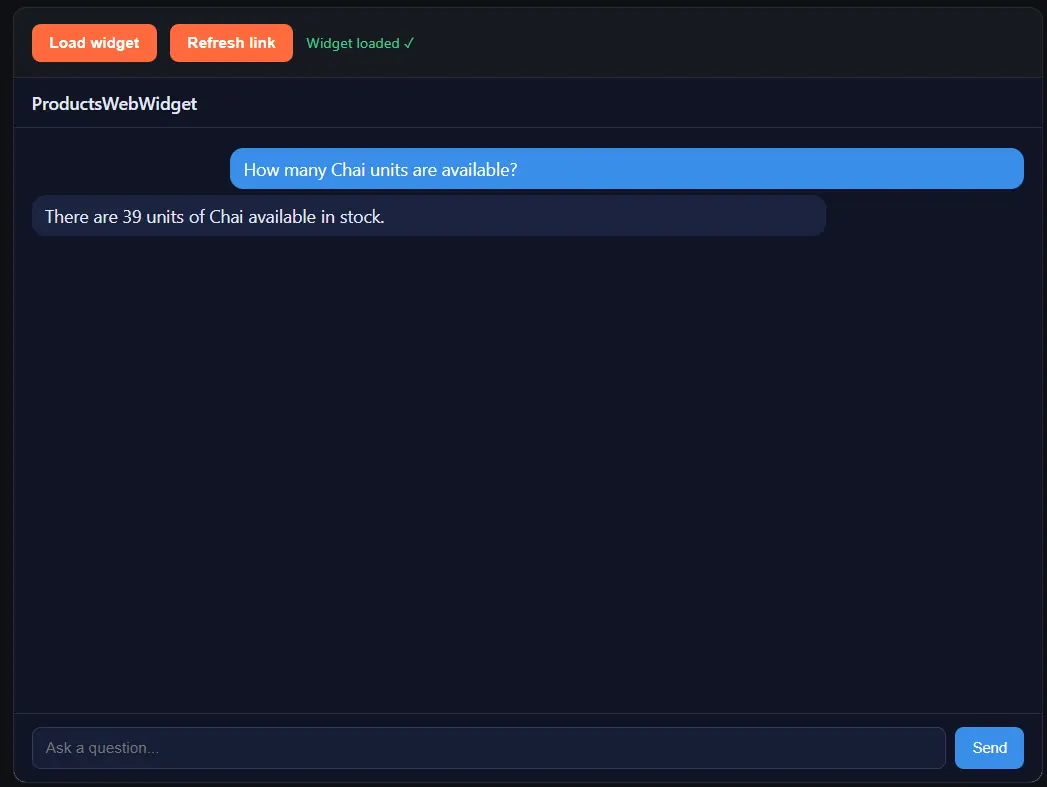
Run it with the key in the environment (never hardcoded), then open the served page:
QUILL_API_KEY=your_key node server.js
If the embed won't load
Two failures are common when wiring this call into your own backend, especially on a corporate Windows machine:
- fetch failed (UNABLE_TO_VERIFY_LEAF_SIGNATURE). A corporate proxy or antivirus is intercepting TLS and re-signing HTTPS with a private company CA. Your OS trusts it, but your runtime (Node, for one) ships its own certificate store and doesn't. The proper fix is to point your runtime at the corporate root CA (for Node, the NODE_EXTRA_CA_CERTS environment variable).
Customize the widget's look
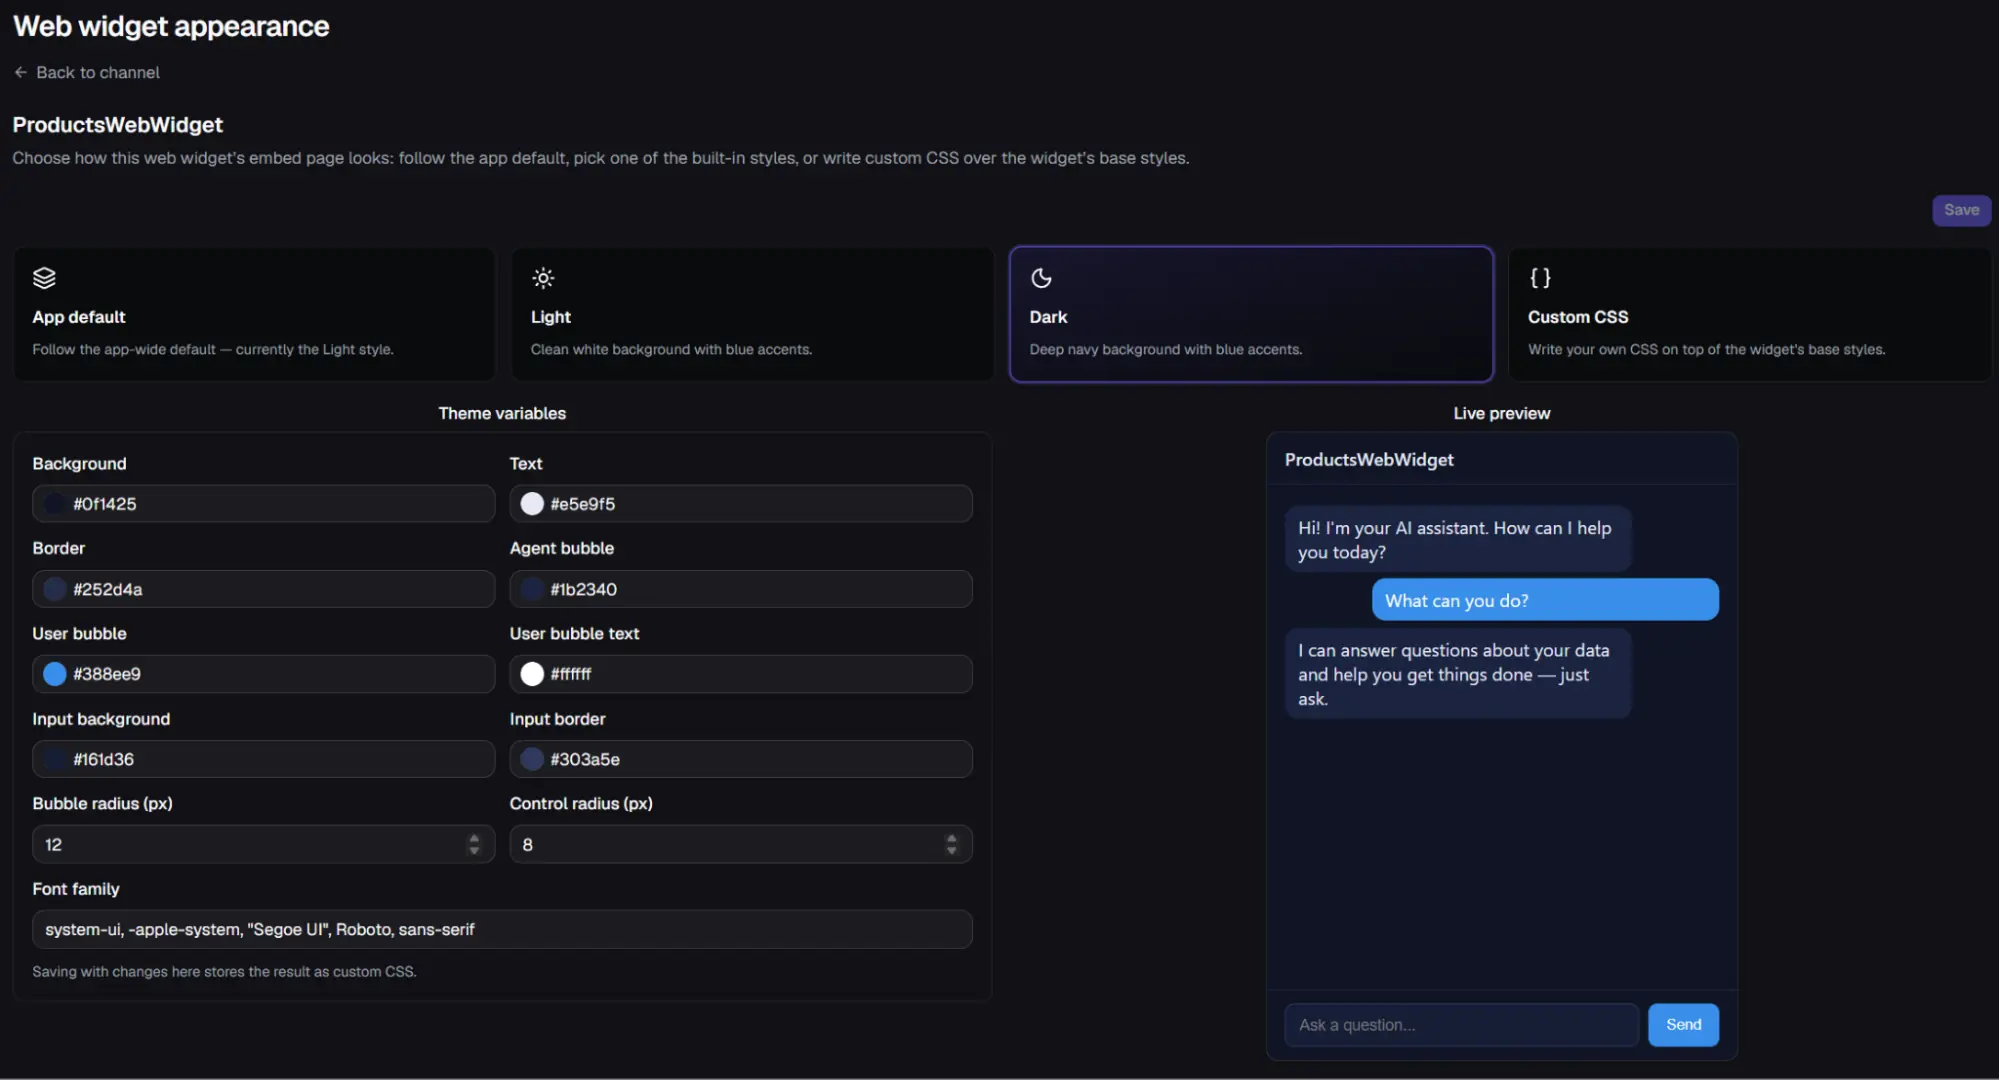
The widget's appearance is set per channel, click Customize appearance on the channel. Pick a preset (App default, Light, or Dark), or Custom CSS to write your own, and fine-tune the theme variables (background, text, border, the agent and user bubble colors, input colors, corner radii, and font) with a live preview beside them. Saving after editing any variable stores your choices as custom CSS.
Keep an eye on it
Once your app is live, two dashboard views tell you how it's doing.
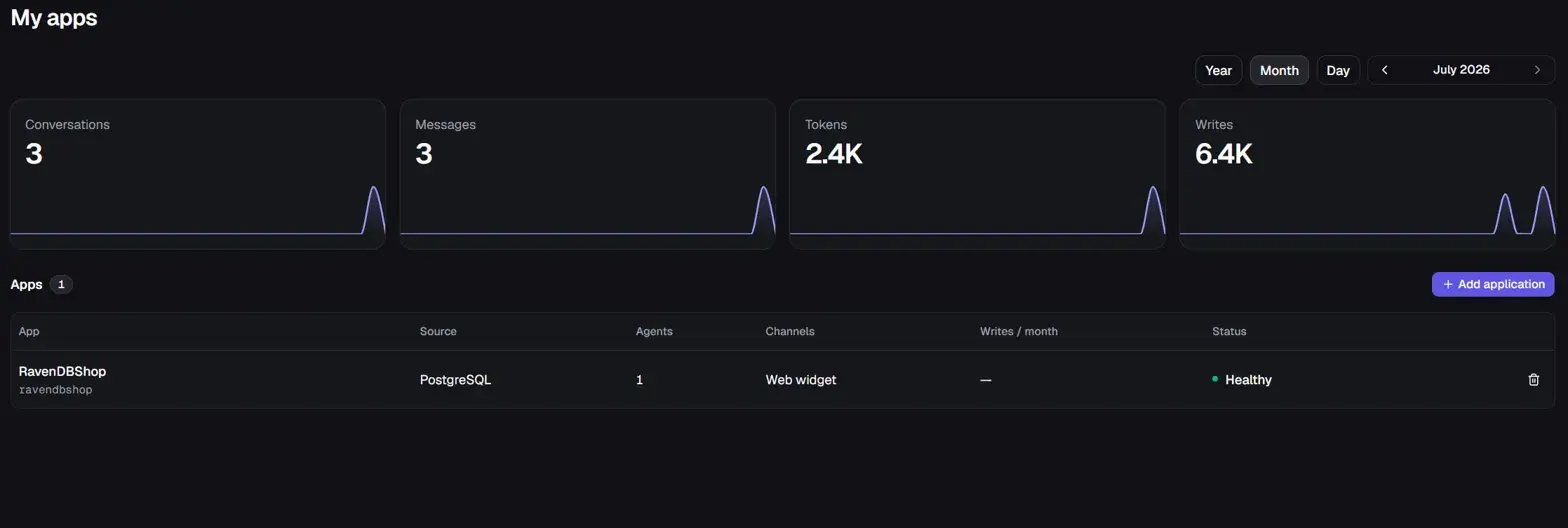
“My apps” is the landing view: your apps listed with their source, agents, channels, and a health status, plus headline numbers up top (conversations, messages, tokens, writes) for the period you pick.
It's your quick "is it up, and is anyone using it" check, conversations and messages tell you whether people are actually talking to the agent. It's also where the Add application starts a new app.
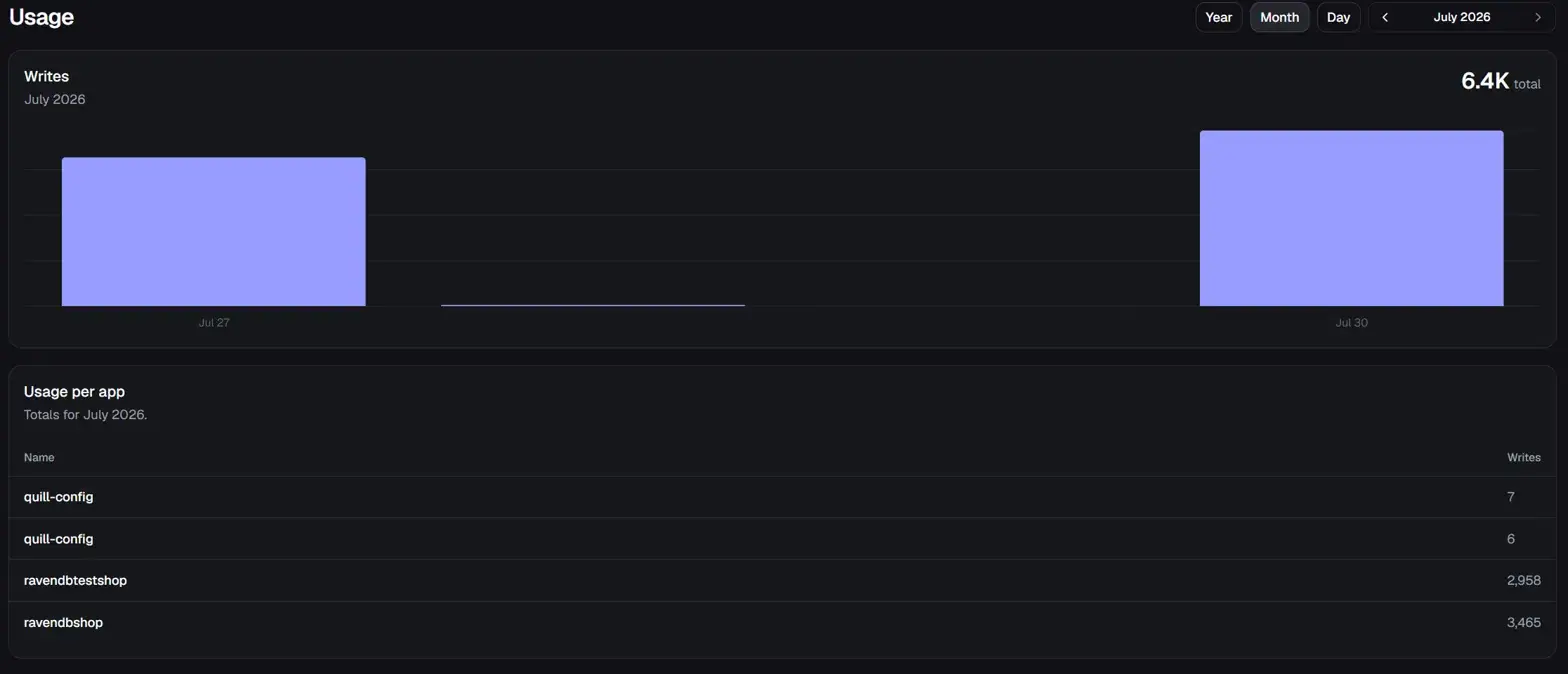
Usage goes deeper on consumption: a writes chart over time and a per-app breakdown. Writes are the main thing to watch; they're what your activity comes down to, so the per-app table tells you which app is driving usage and cost. Tokens track how much the model is being used, which you can sanity-check against your model provider's own bill.
In practice you'd look here right after launch to confirm traffic is flowing, then now and then to see how adoption is trending or to explain a jump on your bill. A sudden spike in one app's writes or tokens is the cue to go check what changed.
Summary
By this point you've got Quill running from a single Docker command, mirroring your existing database, and serving an agent that queries the copy rather than your production rows.
- Run the appliance with one Docker command; it pulls the image and activates itself.
- Don't swap the keys: QUILL-… activates, QUILLDASH-… logs you in.
- Connect your existing database; Quill mirrors it and the agent queries the copy.
- The database must be reachable from the container and CDC-ready.
- Connect a hosted model, then let Quill generate the agent and edit it if needed.
- Query results reach the model, so keep sensitive data out of the agent's collections.
- Test with a generated link; embed by having your backend request per-user links.
- Keep the API key on the server, never in frontend code.