New in 7.0: RavenDB to Snowflake

Introduction
Just as snowflakes are unique, so are databases. In RavenDB 7.0, we introduce a plethora of new features, one of which is the ongoing Snowflake ETL task. With this feature, you can effortlessly set up a task to connect to your Snowflake account and continuously sync your endpoint data with your cloud warehouse.
Prerequisites
NOTE: You require an Enterprise tier license to use Snowflake Ongoing Task.
What you will need:
In this article, we will cover how to connect RavenDB with Snowflake using ETL, assuming you have an internet connection, as it’s required to connect to the cloud service.
To showcase the feature usage, we will cover a simple IoT case, where sensors are placed at different traffic lights in the city, collecting simple analytics data.
For this article, we prepared a basic mock of the sensor in Python to simulate its behavior. It continuously generates data with a 1 to 10 second delay, simulating a real scenario. The code for this generator looks like this.
Using the ETL feature, we’ll send this data from a database-equipped endpoint to the Snowflake data warehouse. RavenDB abstracts out writing an ETL logic. It lets you focus on the important stuff while we take the effort of ETL code maintenance on our shoulders.
Preparing Snowflake for data
Snowflake is an SQL-based database, so we must prepare tables and columns for our traffic data. First, we need to create a database. Let’s begin.
Go to your Snowflake instance panel and then to the Data section. Click the blue ‘Database’ button on the right side of the screen. Once the database is set up, open it and create a schema the same way you created your database. On the right side of the screen, press the blue button ‘+Schema’. Just like namespace organizing code, schema organizes tables and other objects.
Now, we will need to create a table for our traffic data. We’ll do that using our worksheet connected to our database, which allows remote SQL execution. Go to the ‘Projects’ tab and create a new SQL worksheet. After opening this worksheet, change the destination (1) where it will make your tables.
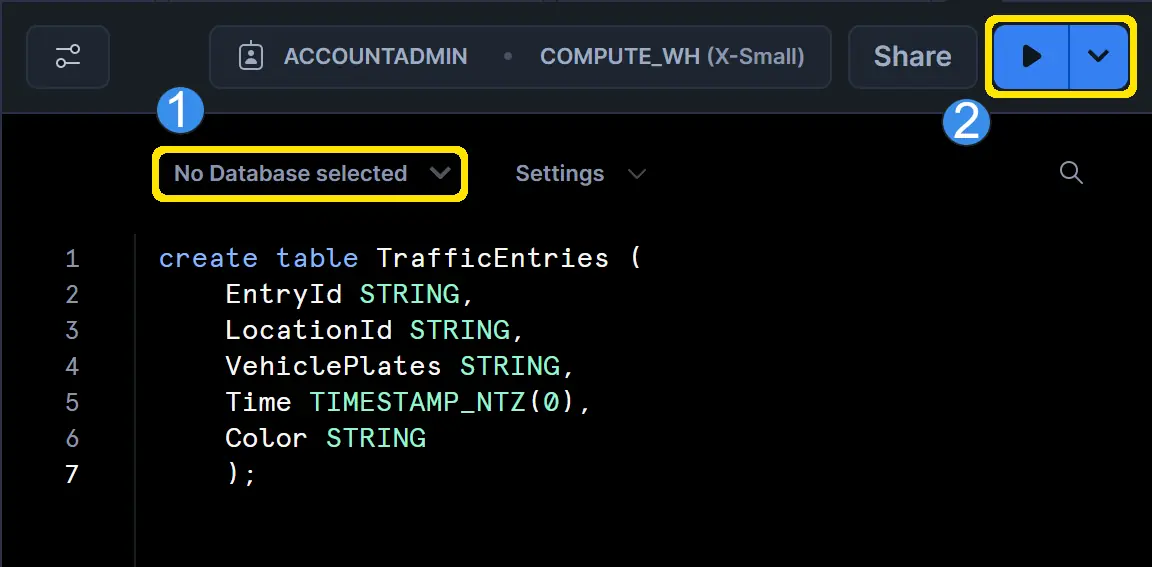
Tables hold columns that the SQL database needs to process the data. Rows will hold the data that we import from RavenDB. Creating tables is fairly easy. Our data table will look like this:
create table TrafficEntries (
    EntryId STRING,
    LocationId STRING,
    VehiclePlates STRING,
    Time TIMESTAMP_NTZ(0),
    Brand STRING,
    Color STRING
    );
As you can see, we have columns for ID, plates, the time our cars pass, and other additional data. You can check all data types on this page. You can also alter columns by adding actions, which you can see here. Run the create command, and check if it was successfully created.
Now we need to put the data as we wanted, having our table already set in Snowflake.
Creating a task
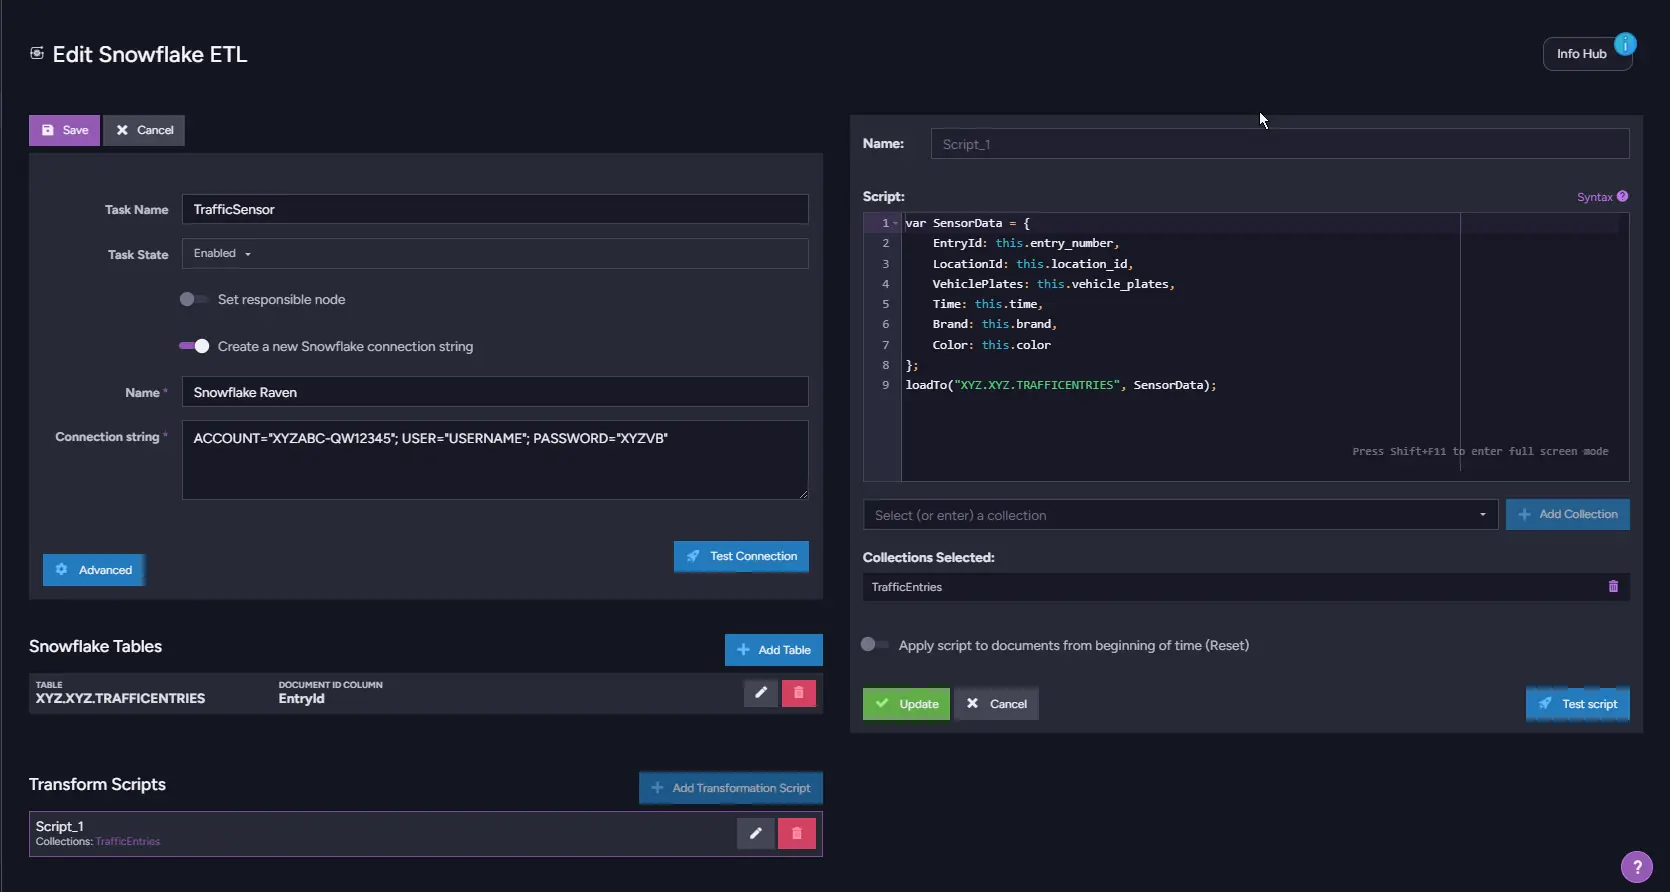
Snowflake ETL is an “Ongoing Task” in the RavenDB ecosystem. To create it, select your database, and in the Task section, select Ongoing Tasks. Then, add the database task and choose Snowflake ETL. Name your task, and let’s proceed.
First, we need to connect your task to your Snowflake account. Write a connection string:
ACCOUNT="XYZABC-QW12345"; USER="USERNAME"; PASSWORD="XYZVB"
Copy your Snowflake account information to fill it. In the URL of your Snowflake, you can notice that after app.snowflake.com, you have two sets of characters. Those two create the Account ID, which we must put in the ACCOUNT value. All you need is to copy it into it and change / into -. Then check your connection with the Test Connection button.
Specify which Snowflake table ETL should reach, preferably in ‘database.schema.table_name’ format. For example, ‘CityTraffic.Sensors.TrafficEntries’ is a valid option where ‘CityTraffic’ is the database name, Sensors is the schema name, and the table is called ‘TrafficEntries’. Together, it should look like this:

Choose which column holds an identifier (primary key). RavenDB needs this to update the data efficiently. For us, this will be EntryId.
Now let’s write a transform script. We need it to load only desired, correct data. The transformation script alters any document to be loaded by an ETL. The one we will use looks like this. It gets rid of unwanted data:
var SensorData = {
    EntryId: this.entry_number,
    LocationId: this.location_id,
    VehiclePlates: this.vehicle_plates,
    Time: this.time,
    Brand: this.brand,
    Color: this.color
};
loadTo("XYZ.XYZ.TRAFFICENTRIES", SensorData);
First, we create a variable in which we define which field in our RavenDB database is which column in Snowflake. It is structured like:
VehiclePlates: this.vehicle_plates,
The ‘this’ points to the currently processed document. This way, we build an object containing all the data we need to send. Then we use ‘loadTo’, which sends this record to the Snowflake.
For our traffic data, the script maps each RavenDB document field to a Snowflake column like this:
| RavenDB document field | Snowflake column | Type |
|---|---|---|
this.entry_number | EntryId | STRING |
this.location_id | LocationId | STRING |
this.vehicle_plates | VehiclePlates | STRING |
this.time | Time | TIMESTAMP_NTZ(0) |
this.brand | Brand | STRING |
this.color | Color | STRING |
NOTE: We can also build separate objects and send them to different tables. It can help with processing embedded data. If you want to read more about loading to multiple tables, check our documentation.
On the other hand, we could (just for example) separate red Toyotas from the rest of our data:
if (SensorData.Brand === "Toyota" && SensorData.Color === "Red") {
    loadTo("XYZ.XYZ.SPECIALENTRIES", SensorData);
}
Choose the collections containing your documents from the menu below the transformation script. After this step, you’re all set. Just wait for Snowflake to load your data; this may take a while, based on your database's size. Since ETL transfers data in batches, avoid restarting it.
To verify if your data is being actively appropriately transferred, go to the ‘Monitoring’ section in Snowflake and select ‘Query history’.
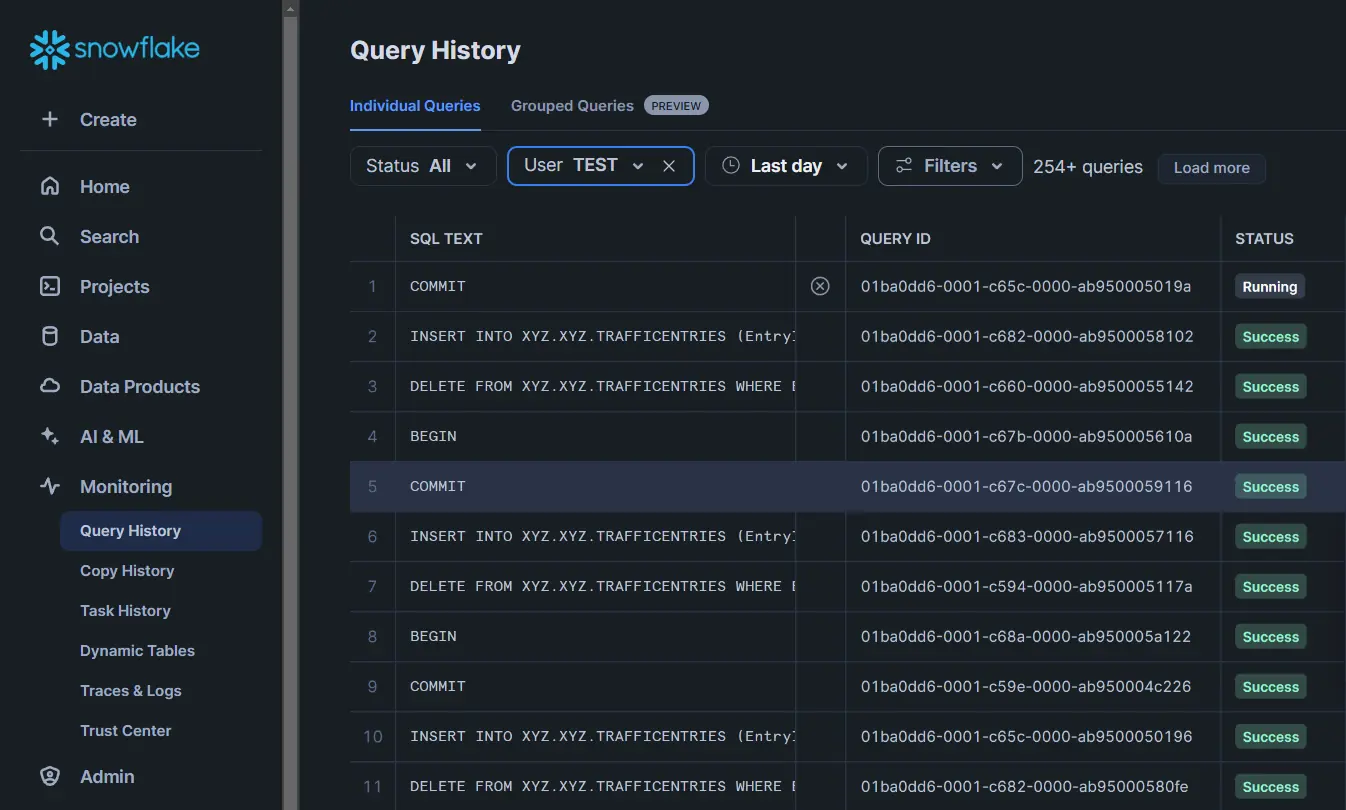
You should see logs of the transferred data appearing there until the process is complete, likely with a Running or Success status. In our example, the generator in the background continuously creates more documents. Those new documents are sent to Snowflake, which can be noticed in the query history.
After we’re synced, we can try analyzing this data. We might want to know the average speed of vehicles that pass two sensors. This way we can detect a traffic jam in real time.
To simplify, let’s assume that we have a highway with no crossings along the way. We get the data at two locations: A and B. If a car reaches location A, it must also drive through location B (the only way to free himself from this situation is to drive off the highway, yikes).
To calculate this, we will pair records with the same vehicle plates but different locations. Additionally, let's assume the distance between locations one and two equals 500 meters.
Then all we need is to take our timestamps and calculate vehicle speed in meters per second. Convert it to kilometers per hour (alternatively, with no trade-offs, miles per hour!).
For example, we can do that like this:
WITH VehicleMovements AS (
    SELECT
        t1.VehiclePlates,
        t1.Time AS StartTime,
        t2.Time AS EndTime,
        TIMESTAMPDIFF(SECOND, t1.Time, t2.Time) AS TimeDifference,
        ROUND((500 / NULLIF(TIMESTAMPDIFF(SECOND, t1.Time, t2.Time), 0)) * 3.6, 1) AS Speed_kmh
    FROM TrafficEntries t1
    JOIN TrafficEntries t2
        ON t1.VehiclePlates = t2.VehiclePlates
        AND t1.LocationId = 'A'
        AND t2.LocationId = 'B'
        AND t1.Time < t2.Time
)
SELECT * FROM VehicleMovements;
The results look amazing:
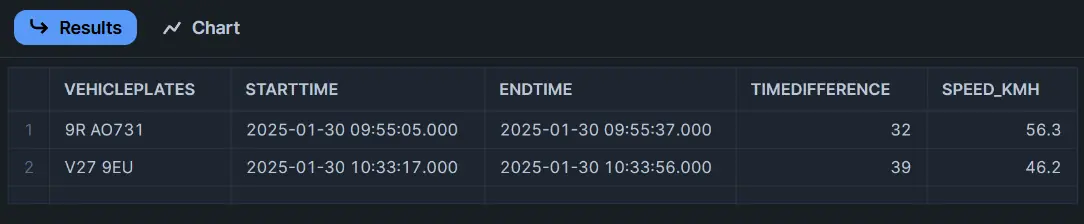
Just imagine, how you can fuse RavenDB and Snowflake yourself, using our feature!
Summary
In this article, we walked through the entire process of setting up RavenDB Snowflake ETL, following a real-life usage scenario. After we synced the data with the remote Snowflake data warehouse, we analyzed our data to detect traffic jams in real time. This way we showed how powerful the feature can be. It simplifies the work for system engineers by far!
- RavenDB maintains the ETL plumbing for you, so the only code you own is the transformation script, not the transfer and retry logic.
- The transformation script both filters and reshapes each document, and a single script can route different subsets to different Snowflake tables with multiple loadTo calls.
- Snowflake ETL runs continuously and transfers in batches, so new documents keep syncing automatically and you should avoid restarting the task mid-transfer.
- Once documents land in Snowflake, ordinary SQL turns raw sensor rows into real-time analytics, such as joining two locations on vehicle plates and time to compute speed and detect traffic jams.