New in 7.0: RavenDB and Amazon SQS ETL

Introduction
In version 7.0, we introduced a new ongoing task: Amazon SQS ETL. Amazon SQS, short for Simple Queue Services, is a fully managed queuing service that is part of AWS.
This ETL will allow you to integrate your RavenDB database into the AWS ecosystem, with an AWS SQS queue as an entry point. We will also show you how to process documents received by SQS using Lambda.
Prerequisites
An Enterprise tier license is required to use the Amazon SQS ongoing task.
What you will need:
- AWS account
- RavenDB database
Let’s cover an actual usage scenario. We’ve written a speeding tickets data generator to simulate the continuous data stream. It will fill our database with fresh data. We'll create a new ETL task to route the data flow down to the SQS.
Creating a task
1. Create a new ETL task
Open your chosen database and select the tasks menu. There, you want to choose ‘Ongoing Tasks’ and click ‘Add Database Task.’ In this menu, you can select which task you want to add; we need ‘Amazon SQS ETL.’
2. Get your keys and create a connection string
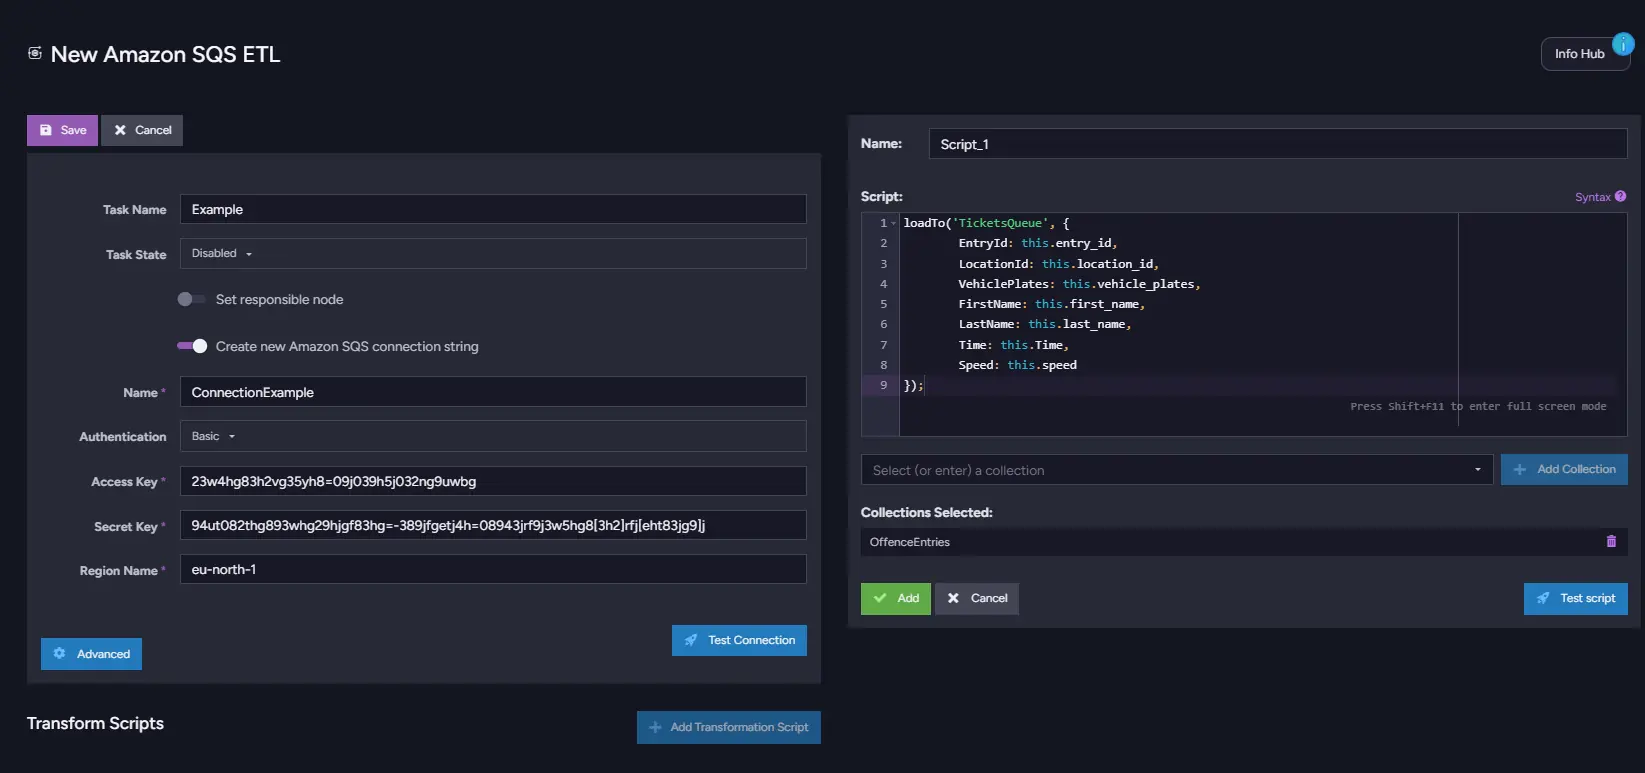
Let's connect our database. To do that, focus on the left window. Naming your task is optional, so let’s focus on the connection established by the connection string. You need two keys: the Access key and the Secret key. Luckily, they are easily obtained at the same place.
Open your AWS account and click on your account name at the top right corner of the website to access the ‘security and credentials’ menu.
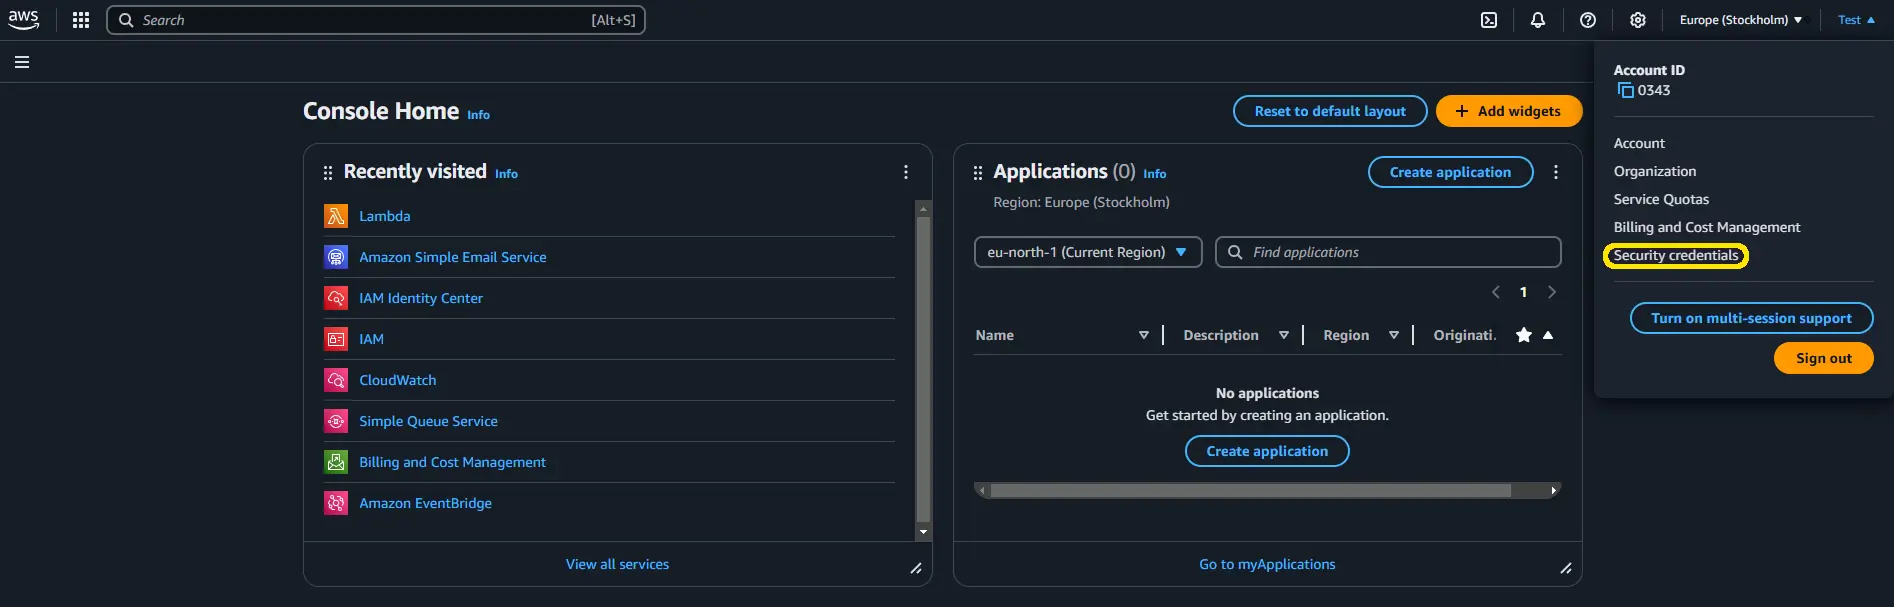
You can create a new access key by pressing the ‘create new access’ button. Then, check the box that says you acknowledge risk and create your access keys.
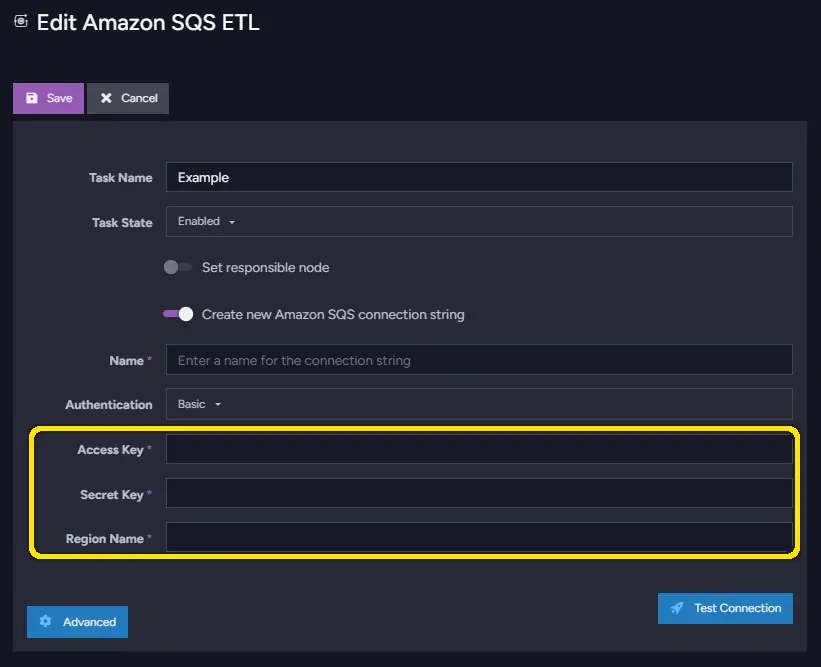
Be sure to save your keys somewhere secure. After closing the AWS page, you will lose access to the secret key. Copy your access key and secret key into your RavenDB task.
When your keys are pasted, you need to specify your region name. It’s easy to find in AWS near the top right menu you opened before to access security and credentials. Click on the city paired with the selected region next to it and check the corresponding region name, which should be to the right of the city name.
After you have pasted all of this, you can click "test connection" to validate whether it has connected. If you receive confirmation, you can proceed with creating your transformation code.
3. Create and configure the transformation script
We can send most things by creating a basic transformation script based on this one:
loadTo('TicketsQueue', {
        EntryId: this.entry_id,
        LocationId: this.location_id,
        VehiclePlates: this.vehicle_plates,
        FirstName: this.first_name,
        LastName: this.last_name,
        Time: this.time,
        Speed: this.speed
});
LoadTo queues the document to be loaded by an ETL process to a specified queue. If a queue doesn't exist, it will automatically create one. In our example, we’re just creating a JSON out of document fields, but with your data, you can do whatever you need in the transformation code. You may modify it, make conditionals, use multiple loads, etc.
4. Add the collection
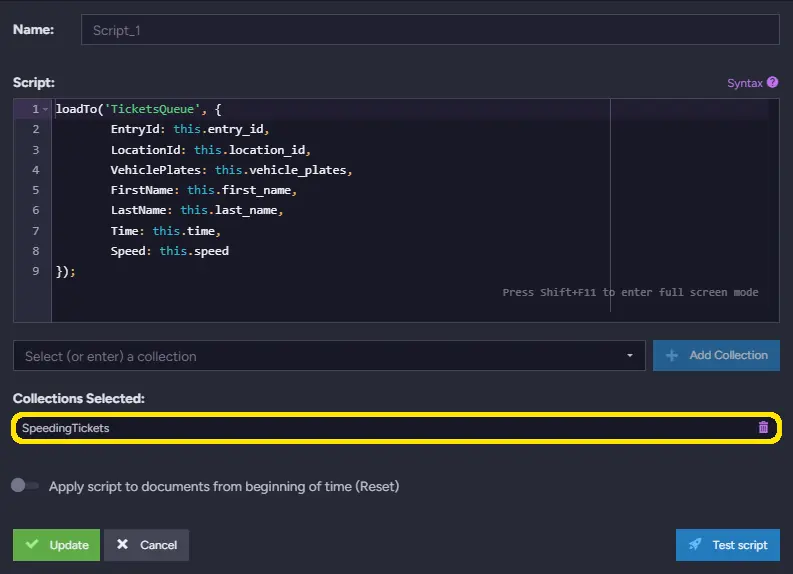
Then, select the collections you want to ETL below the transformation code. In this example, we use the ‘SpeedingTickets’ collection created by our generator. Save your task.
Processing
At this point, your ETL should be working. Your documents should be continuously streamed to the queue. It’s not fancy; we just sent the data from our database to the queue.
But now that our data is in the AWS SQS, we’ve unlocked many opportunities to process it further using the vast and rich AWS ecosystem.
As our ETL just opened up the pipeline, let’s do something cool by building the next step.
We will use AWS Lambda, a serverless functions service. We’ll use it to run the code that receives the data from our queue and then emails the new traffic ticket notification. In our case, handling only one email just for this demo, we will get email notifications if Mr. Joshua Graham is speeding.
1. Create a role that can operate on your queue
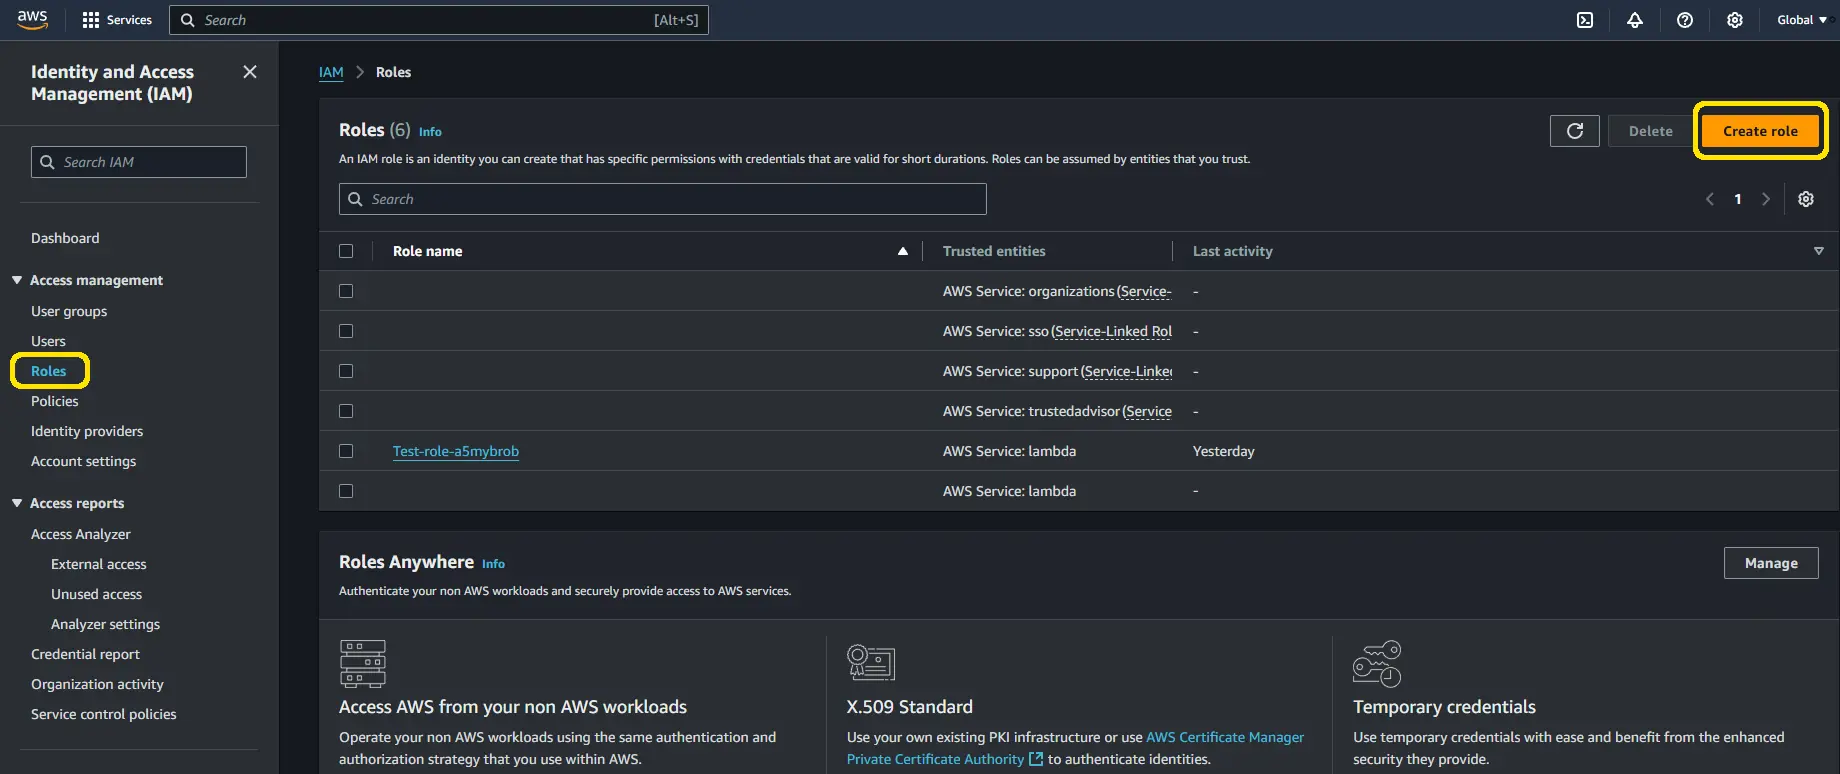
First, let’s give the Lambda permissions to operate on our queue data and to send mails using AWS SES. To do that, we will use IAM AWS roles. Use your account and log into the IAM dashboard. You want to find the ‘Roles’ section on the left bar there. You create a new role using the top right corner button. Inside, you want to select the ‘AWS service’ option and then Lambda; then you press ‘next’.
Then, we must add two permissions, one for SQS and one for SES. You need to add the permissions AmazonSESFullAccess and AWSLambdaSQSQueueExecutionRole so that our Lambda can function as we want. We can return to Lambda now.
2. Create a Lambda function with the role assigned
In the Lambda dashboard, create a new function. You can do that by pressing the ‘create function button’ with an orange button on the top right screen. Name it, choose the language (this article uses Python 3.13) and architecture (we will use arm64 for lower costs), and then unfold the default execution role. We want to change Lambda's role so we can use permissions from the role we created there. Change to ‘Use an existing role’ and then select the name of the role you created just before.
3. Develop your function code
Now, let’s develop the code. Let’s scroll down a bit and put this code in Lambda:
import json
import boto3

def lambda_handler(event, context):
    client = boto3.client("ses")

    for record in event["Records"]:
        data = json.loads(record["body"])["data"]
        first_name = data.get("FirstName")
        last_name = data.get("LastName")
        speed = data.get("Speed")
        full_name = " ".join(filter(None, [first_name, last_name]))

        target_name = "Joshua Graham"
        subject = "Speeding Alert"
        body = f"Looks like Mr. {full_name} was speeding {speed}km/h in 30km/h zone."

        message = {"Subject": {"Data": subject}, "Body": {"Html": {"Data": body}}}
        if full_name == target_name:
            response = client.send_email(
                Source="example@email.com",
                Destination={"ToAddresses": ["example@email.com"]},
                Message=message
            )
            print(f"Email sent to example@email.com: {response}")
    return {"statusCode": 200, "body": "Processed all records"}
Let’s quickly discuss this code. First, we import the ‘json’ library and boto3, which we will use. The ‘json’ package is widely known for working with JSON documents. The boto3 package is part of the AWS SDK, allowing us to use SES to send emails. Then, we use a lambda handler, which will be run when the lambda is triggered.
Then, we need to work with the CloudEvent document. RavenDB Queue ETLs use this format when sending documents to integrate with the CloudNative environments. We need to extract the data out of it - see how it looks:
{
  "Records": [
    {
      "messageId": "00000ae-000e-0b00-b000-0c000c0a0e0",
      "receiptHandle": "ajrgiaehgbvanpovaebougwVNAEOBHGOEWIFPOWW0T53UUTG0RO2HT953-918HEUWEBGF92H3R0FNFUORWUGHW0IGVHJGAWH984THFWHPGFUESABUAPHUGFHAA3HTG83-9QHTGQH023HT983QH9GH3WE8Q4Y5TH7GQH4GQG36F8H78HTGG4GYRG872TGUYGWSEYG5IT3G5YI3GIUG2IU3IVG2YIG3OIUGIU5GIYIGU2GI35UG2I3U5G",
      "body": "{\"specversion\":\"1.0\",\"id\":\"A:288-D8rH7QKCFkCMHHPz2ltLMg\",\"type\":\"ravendb.etl.put\",\"source\":\"http://000.0.0.0:8080/TicketsData/Example/Script_1\",\"data\":{\"EntryId\":\"111a7c78-b3f1-44a8-a748-bae8817df5b9\",\"LocationId\":3,\"VehiclePlates\":\"HIM2761\",\"FirstName\":\"Joshua\",\"LastName\":\"Graham\",\"Time\":null,\"Speed\":149}}",
      "attributes": "Object",
      "messageAttributes": {},
      "md5OfBody": "b8505e5b1034d9047a23996892da2ba8",
      "eventSource": "aws:sqs",
      "eventSourceARN": "arn:aws:sqs:eu-north-1:034362057022:TicketsQueue",
      "awsRegion": "eu-north-1"
    }
  ]
}
As you can see, our data is nested and tangled with the surrounding content, so the code for extracting it may not look so simple, even though it is indeed.
Proceeding with our code, we’re looking for Mr. Graham’s speeding tickets. If we find one, we send an email to our hardcoded address. You may customize this code to resolve any driver's email, too!
4. Configure AWS SES and deploy
For now, we will leave the example address. We will replace it with our address when we already have SES configured. Finally, deploy your Lambda function with the finished code.
We're using SES to send emails because it’s part of the AWS ecosystem. However, you can use your favorite email service here.
AWS SES will send our emails just after a slight configuration. It can send emails only to verified addresses. We can validate our address while creating an ‘Identity’.
Go to AWS SES and enter your dashboard. On the left bar, select ‘Identities’ and create a new identity. We chose the ‘email address’ option for this case. In this configuration, only identified emails can be sent or received using Lambda so we will use the same email twice. To make your email valid, log in to your email address and click the link sent to you. It’s a mechanism securing against sending spam.
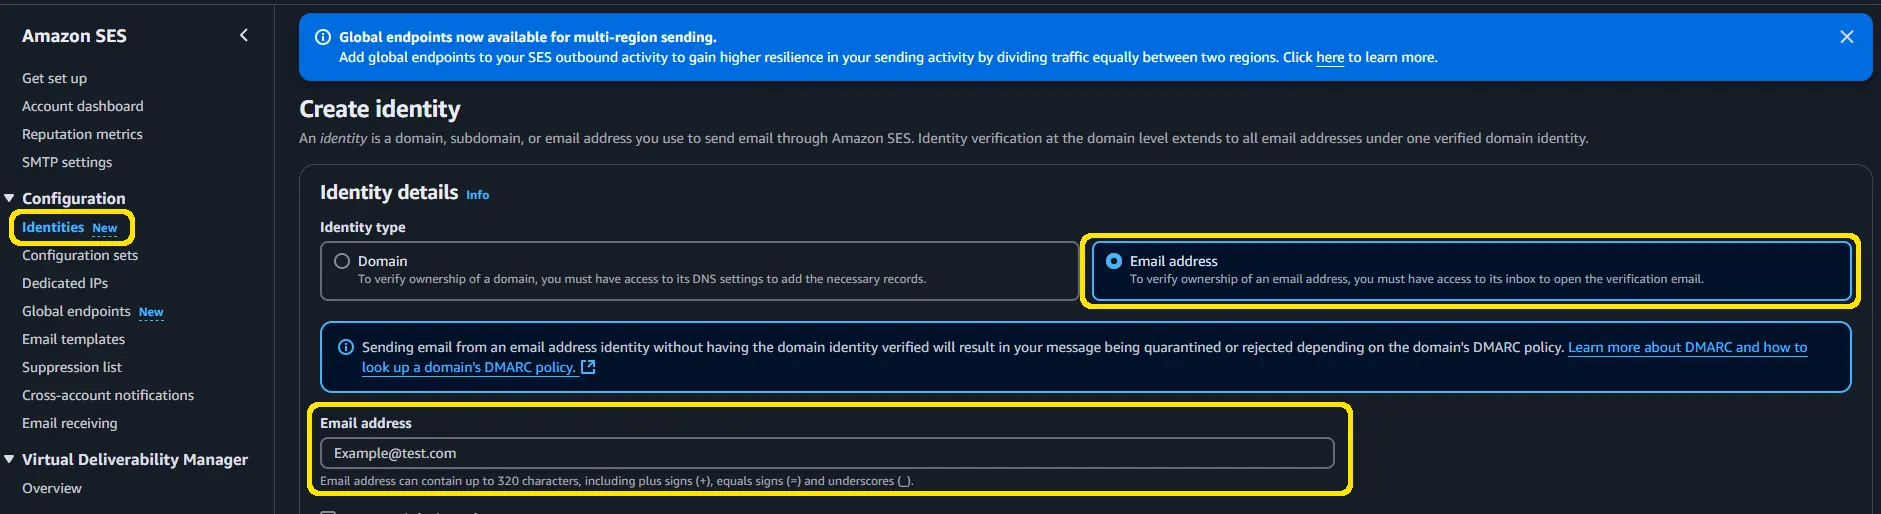
When you validate your email address, return to your Lambda function and replace the email addresses at the end of the code, both the source and destination.
      Source="example@email.com",
      Destination={"ToAddresses": ["example@email.com"]},
5. Add a queue trigger
Finally, add SQS as a trigger to execute your function over a new queue message. In the function overview, click ‘Add trigger’. There you want to select SQS and then a specific queue. For testing purposes, you don’t need to change anything else, but if you have particular requirements, you can modify them, for example, by changing batch size.
Great! We deployed a secured serverless function that fires up automatically on queue updates, sending emails when conditions are met.
6. Test the pipeline
If you want to ensure that SQS works, you can manually add a SpeedingTicket document with the name of Mr. Joshua Graham to the database. You may use RavenDB Studio for convenience with that, and see if it will work. ETL will send the document to the queue, the queue will trigger the function, and the function will send an email!
We’re hardcoding here only one user (one e-mail) to demonstrate the working system without tinkering with AWS SES email verifications. If you’d like to send all traffic tickets to their unlucky recipients, you’d need to obtain and verify their email addresses and store them in the database along with the rest of the data. You can go completely different with your system design, and you may eliminate the verification problem. We skipped this, as it’s out of our article topic scope.
Summary
In this article, we've walked you through setting up an Amazon SQS ETL task. By connecting RavenDB to SQS, we can easily share data from our documents with the AWS ecosystem. We used AWS SES and Lambda service to show how to leverage this integration while creating a short data pipeline from RavenDB through AWS.
- The transformation script is the only code you own on the RavenDB side, and loadTo creates the target SQS queue automatically if it doesn't already exist.
- The secret key is shown only once when you create it, so save it before leaving the AWS page; you also need the region name to complete the connection.
- RavenDB Queue ETL wraps each document in a CloudEvents envelope, so your Lambda must parse the record body and read the nested data field rather than the raw document.
- AWS SES only delivers to verified identities while your account is in the sandbox, so verify both the source and destination addresses before expecting mail to flow.
Want to try this on your own cluster? Grab a free developer license at ravendb.net/dev, and bring questions to the RavenDB community on Discord.