Migrate Your Databases in RavenDB

Introduction
Most probably, you're here because you need to migrate your data from one database to another. You are in luck because RavenDB makes it easy. There are a couple of ways to achieve it that fit different scenarios:
| Criterion | Export & Import | Import via URL | External Replication |
|---|---|---|---|
| Downtime | Yes | Yes | No |
| Best for dataset size | Whatever fits on your disk, check the storage report | Any | Any |
| Needs local disk space | Yes | No | No |
| Resumable if interrupted | Yes | No | Yes |
| Copies indexes, subscriptions, identities | Yes | Yes | No, move them separately |
| License | Any | Any | Production tier, or Development on Cloud |
You don't need to write your custom app or script to migrate your data; we've already prepared solutions for this scenario. Let's dive in and move this data where it is needed.
Simple method: Export and Import
Exporting a file and importing on the other end:
- Simplest solution that works well
- Best if you move your database from one instance to another
- Gives most control, considering that you are getting your database on your hard drive
- The best way to move into the local server
- Consuming your storage - the export file lands on your disk, so check the storage report first and pick a different method if it will not fit comfortably.
tl;dr
- Export your data using the Export function.
- Import your data into the new database.
Step 1: Export
To transfer your data from one database using this method, start by entering your source database. Then, in 'Tasks,' select the 'Export Database' menu.
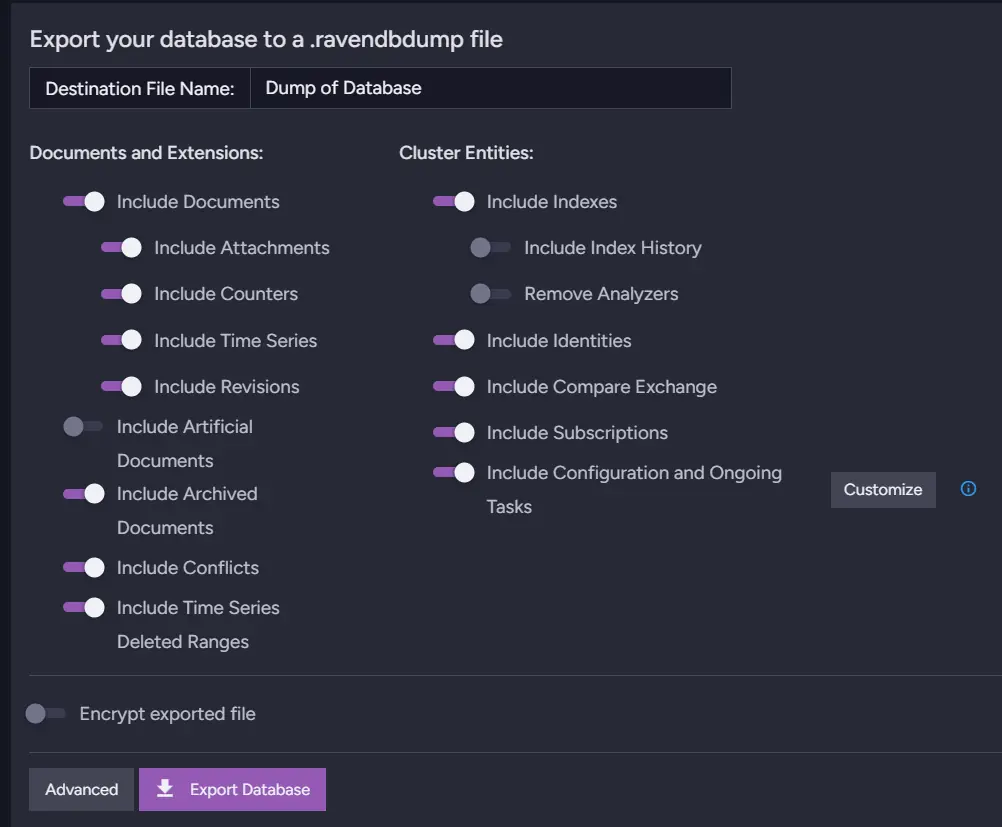
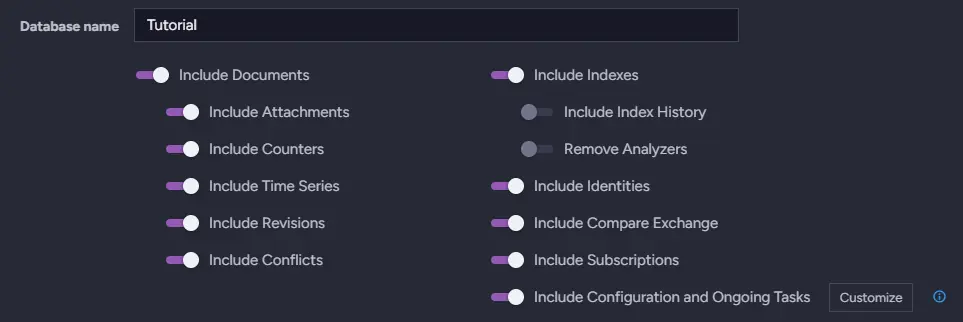
Choose what you want to export and name your file at the top. There is no need to downsize what you export, as you'll be able to choose what you'll be importing later, specifically. If you need to encrypt your data, for example, when you need to send it through a not perfectly secure channel or communicator, it is available near the bottom. Optionally, in the Advanced section, you can further customize what you specifically export from your database to the file.
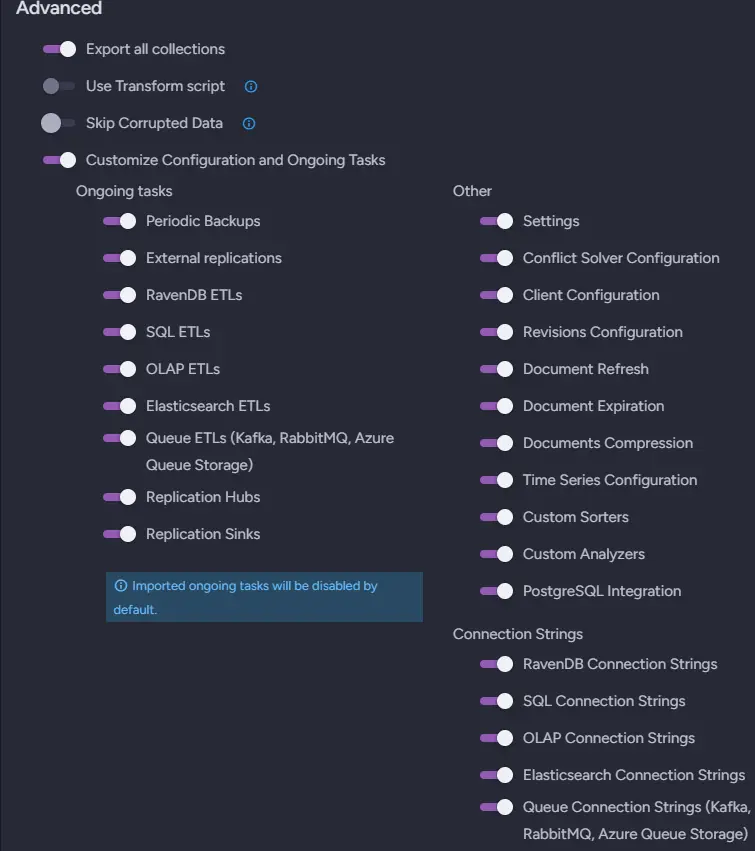
After selecting your options, open the customization menu. Next to the 'Export Database' button, you can change your compression algorithm to fit it more to your needs, like decompression speed. Clicking 'Export Database' will start preparing and downloading your database. Ensure you have sufficient free storage space for your file. We can't precisely determine how big it will be, but you can determine the approximate size in the storage report in the 'Stats' section. The purple color on the right represents your database, and the size of your compressed file will be approximately the same or less than the one displayed after hovering over this rectangle.

Remember that if you create a new database and your source database is encrypted, the target database must also be encrypted.
Step 2: Import
Enter the same 'Tasks' section in the target database and choose 'Import Data'. You need to select your file, and then you can choose what to import again. Choose which items you want to import from the file. Then, simply press 'Import' and wait for it to finish. There, you will have a screen updating you on progress.
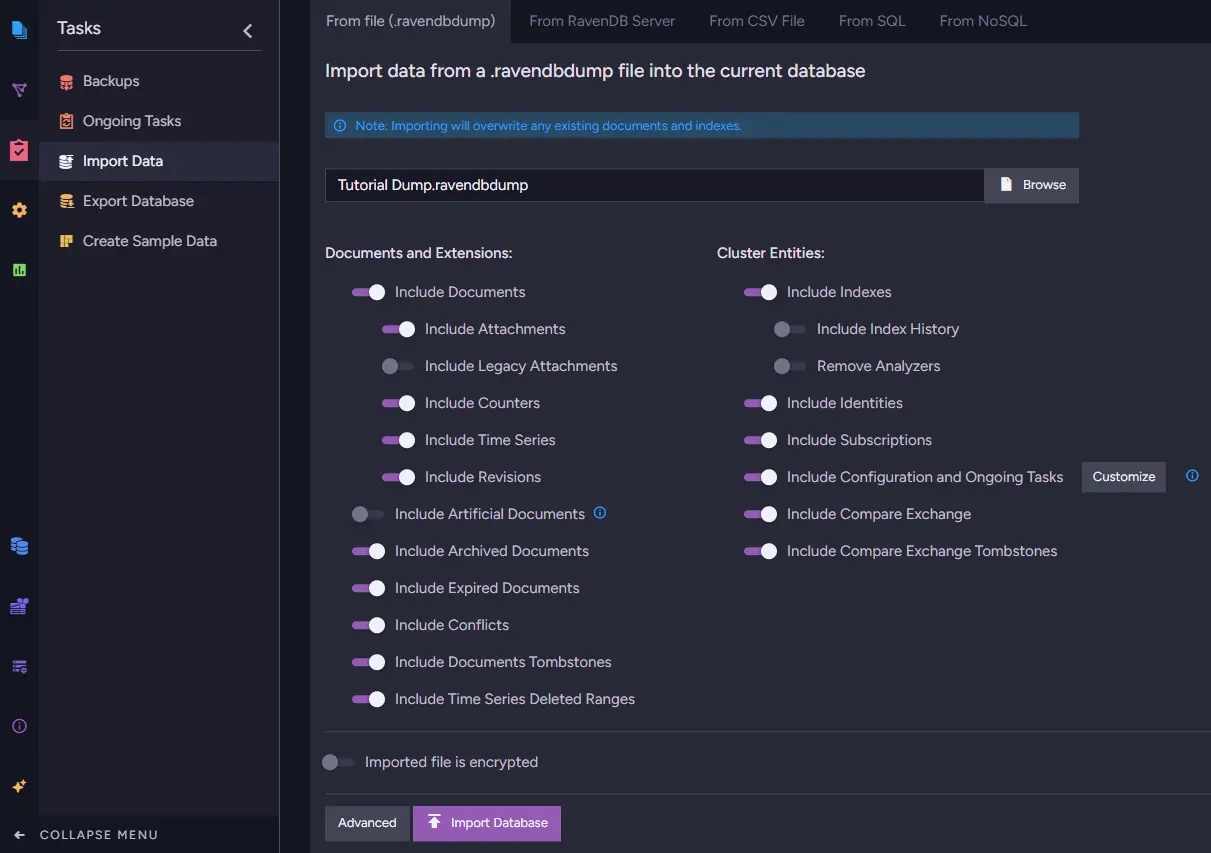
You can refer to the Export Database view documentation for more information about this.
Before you start: certificates and firewall
The export and import method above moves a file, so it needs no server-to-server access at all. The two methods below do: they connect the target server straight to the source. If both servers sit on the same machine you can skip this part. Otherwise, if your source is on RavenDB Cloud or on a secured 4.x+ server using HTTPS, set the access up first.
If you haven't done it already, create a new database in the target server. First, export the certificate from the target server. They are necessary to allow for server communication. Open the Manage Server view in RavenDB Studio, go to the Certificates section, and select the 'Export Server Certificates' option from the 'Server Certificates' drop-down menu.
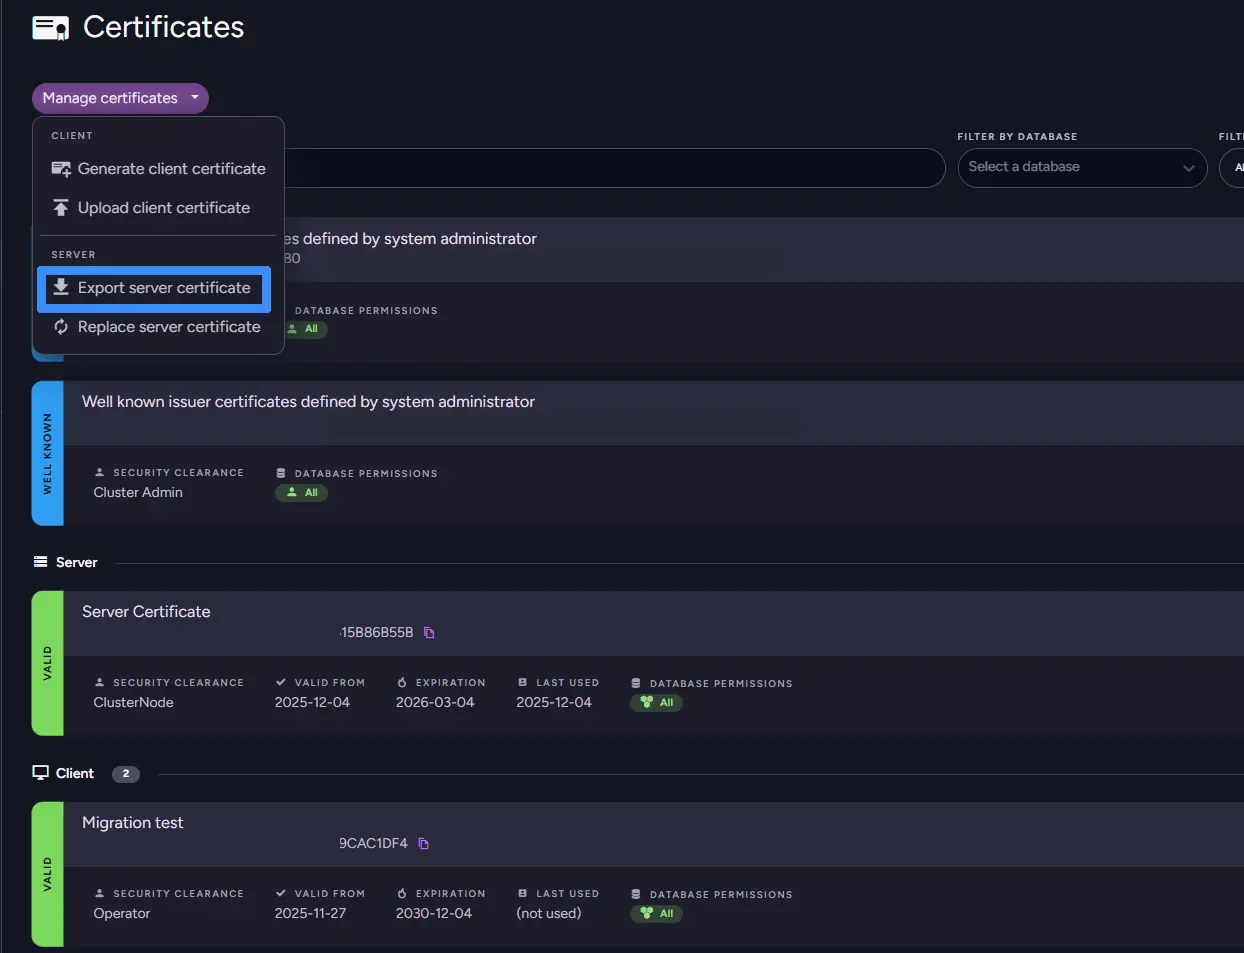
In the source server Studio, open the Manage Server view, go to the Certificates section, and choose Upload client certificate in the Client certificate section. Set the certificate details by entering a name, selecting a security clearance level (User, Read/Write should be enough), uploading the .pfx certificate file, and configuring database permissions. Click Upload to complete the process. There is more on this in the certificate management documentation.
Also, remember that if you're using RavenDB Cloud or have your own firewall/security group, you need to exclude the source server IP from being blocked by a firewall. This way, traffic can flow between the machines. It's also worth checking if your database's server address didn't change after a restart.
For all sizes: Import with URL
This method:
- Best if you cannot just download the export file, as your database is too large
- One-time replication that requires downtime
- Skips the need to download the file to the storage (direct import)
- Requires a stable internet connection as this is a non-resumable process.
tl;dr
- If you are using HTTPS, set up the certificate and firewall access described above
- Select URL and Database
- Select import options and import
Step 1: Choose server and database
Enter the 'Tasks' section in the target database and choose 'Import Data'. From the options on the top of the page, select 'From RavenDB server'. Enter the URL of your server in the 'Server URL' input field. You can obtain it either from the 'Manage' menu of your RavenDB Cloud Portal in the 'Products' tab instance or by copying it from the URL bar. If you are importing from on-premises, you just need your server address. After your servers are connected, you must select the database to import. Just type in the database name to proceed.

Step 2: Select import options
Now choose the options that appear. They are nearly identical to when exporting and importing from the previous method. After that, just press import and let RavenDB do the work: it pulls the documents straight from the source server, so nothing has to land on your disk along the way.
If you want more information about this method, read Import from a RavenDB server.
Live copy of database: External Replication
If you want a live database copy, you want External Replication. This is:
- Perfect method for no-downtime migration, though it's the most complex one
- Requires a 'Production' tier RavenDB license or higher in case of a local server or a 'Development' tier instance for RavenDB Cloud
- It can help to move Documents, Attachments, Revisions, Counters and Time Series. The rest requires individual treatment (e.g., settings, indexes, subscriptions, and so on)
tl;dr
- If you are using HTTPS, set up the certificate and firewall access described above
- If needed, import settings, Subscriptions, or anything that isn't Attachments, Revisions, Counters, Time Series
- Enter the 'Ongoing tasks' menu in the source database and create a new ongoing External Replication task
- If needed, stop replication after that and start running a Subscription to process it
Step 1: Migrate settings
If you have customized settings, Subscriptions, or any other non-data items, transfer them with a simple export and import before toggling your External Replication. You can use the methods we mentioned earlier, but skip documents, revisions, counters, and time series. If you import anything that might start processing, like a Subscription, disable it.
What is not replicated:
- Indexes
- Conflict Resolver Definitions
- Compare-Exchange
- Subscriptions
- Identities
- Ongoing tasks
Step 2: Replication Task
Find the Ongoing Tasks menu in the source database's 'Tasks' section and create a new task. Then enter the Name of your connection string, the targeted Database name that you will target, and the URL to your server. Optionally, you can select a name for your task, set a delay (data will be replicated only after this time period has passed; more information is available in the External Replication task configuration), and/or select an existing connection string if you have one. After saving, your task should start transporting your files.
Step 3: Managing subscriptions
Now, if any Subscriptions are active on your database and their processing routines are idempotent, you need to create a delay for your app, allowing it to switch to the target database without losing any data.
-
First, replicate most of the data from the source to the target using External Replication. Once the database on the target is up to date, disable the External Replication task on the source.
-
Next, review all Subscriptions on the target and set their starting point to 'Latest Document'. After that, turn the External Replication on the source back on. Allow some time for the Subscription processing to complete on the source. You need to wait until the last replicated documents are processed in the Subscription on the source.
-
Then, wait for replication to catch up on target; checking the number of documents should be sufficient to confirm this. Finally, switch the application and Subscription processing over to the target database.
Again, you can read the External Replication task documentation if you want to learn more about it, or the replication overview for how it works under the hood.
Summary
- Use Export and Import when you are moving a small or medium database and want the file on your own disk. It gives you the most control and works between any two instances.
- Use Import with URL when the export file is too large to download comfortably. It streams straight from source to target, but it needs downtime and a stable connection, because it cannot resume.
- Use External Replication when you cannot afford downtime. It keeps a live copy, but it needs a Production tier license on a local server, or a Development tier instance on RavenDB Cloud.
- External Replication moves documents, attachments, revisions, counters and time series only. Indexes, conflict resolver definitions, compare-exchange values, subscriptions, identities and ongoing tasks need a separate export and import.
- If subscriptions are running against the source, cut over in order. Drain the source, point the subscriptions on the target at Latest Document, let replication catch up, then switch the application.
Now that your data is in its new home, it is worth setting up a safety net for it. Have a look at our guide on backups in RavenDB to get scheduled backups running on the new instance, or at on-demand production database replication if what you actually want is a copy of production data to test against.