Integrate RavenDB into Next.js app
In this article we will explore Next.js, an open-source web development framework created by Vercel company, and build step by step a sample web application for ordering Beverages between a wholesaler and a bar to see the advantages of using this framework. As a database, RavenDB will be used along with our Node.js ravendb client API and server actions functionality from the framework. Everything in this tutorial will be wrapped up in a GitHub repository for easier access.
Create Database
In order to begin, we need to set up a RavenDB database server, there are few options available here, starting from Demo instances (beware that the data is public there, this is just a playground server), Free RavenDB Cloud instances and with a local installation. It is up to you to pick the one that you need, nevertheless we are leaving links to each type of them for quicker few-minute setup.
- Demo Server: Go to live-test.ravendb.net
- Free Cloud Instance: Go to cloud.ravendb.net, create account and then create free product
- Local server: Go to ravendb.net/download, get RavenDB for your system and run it
For more details, visit the ravendb.net/try.
Create Next.js project
Used Node.js version: 20.11.1
Init Next.js project
After the RavenDB database is installed, we need to create an initial project structure. Fortunately, the authors of the Next.js framework did a great job and created a wonderful template that in a few Yes/No questions will create for us exactly what we want.
In order to start the template generator execute:
npx create-next-app@latest
And what do we actually want? We would recommend using TypeScript for type safety and enhanced code maintainability, ESLint is also important because it ensures code quality and consistency, with Tailwind CSS we will be able to quickly style our components with utility classes, and App Router is the last important component that will allow us to efficiently manage navigation within our application.
To make it shorter, our recommendation would be to answer as follows:
Ok to proceed? (y) y
√ What is your project named? ravendb-next-js-example
√ Would you like to use TypeScript? Yes
√ Would you like to use ESLint? Yes
√ Would you like to use Tailwind CSS? Yes
√ Would you like to use `src/` directory? Yes
√ Would you like to use App Router? (recommended) Yes
√ Would you like to customize the default import alias (@/*)? No
Install ravendb package
Our next step, since we want to store our data in RavenDB, would be to add a Node.js RavenDB Client API.
cd ravendb-next-js-example
npm install ravendb
For ravendb to work properly with server components, we must add the package name in the Next.js configuration.
The next.config.mjs file should now look like this:
/** @type {import('next').NextConfig} */
const nextConfig = {
    experimental: {
        serverComponentsExternalPackages: ["ravendb"],
    },
};

export default nextConfig;
Example app
Now when we are good to go, and since we are building an application that lists orders from between a wholesaler and a bar, our new systems needs a basic functionality so we can order the Beverage we want with desired quantity. Once we place an order, it must be marked in some way, so we will add the option of crossing-out or completely removing the item from the list.
Since our solution is using Tailwind CSS, we will take advantage of it and use it for CSS styling purposes.
Setting up database
What is an application nowadays without a data storage? Let's set up in few steps the database connection.
Create a store.ts file inside src/db/.
We need to import DocumentStore from the ravendb package. Then we create a new store object.
As the first parameter, we provide the address under which our server is running.
- If you created a database on the demo server, it will be https://live-test.ravendb.net.
- In the case of a cloud instance, you will find the address in the cloud portal.
- For a server running locally, enter the one you have set (default is http://127.0.0.1:8080/)
The second parameter is the name of the database you created.
Now we can initialize the store, and export it.
// store.ts
import { DocumentStore } from "ravendb";
import { BeerOrder } from "@/db/models";

// Change it to your url and database name
const store = new DocumentStore("https://live-test.ravendb.net", "beer-order-database");

// Avoid class name minification in production build
store.conventions.findCollectionName = constructorOrTypeChecker => {
    if (constructorOrTypeChecker === BeerOrder) {
        return "BeerOrders";
    }

    return constructorOrTypeChecker.name;
}

store.initialize();

export { store };
Models
Before diving into creating components, it's crucial to define models for out data entities. Models provide a structured way to interact with the database, ensuring type safety and consistency throughout the application.
With these models in place, we're equipped to seamlessly integrate RavenDB into our Next.js application, ensuring a smooth flow of data between frontend and database.
In the ravendb client, you can represent entities as either classes or object literals.
We will use the class approach here.
Let's create a models.ts file in src/db directory. For our application, we will need a document in which we store information about added orders. We'll call it BeerOrder.
// models.ts

export class BeerOrder {
    constructor(
        public id: string | null = null,
        public beerType: string = "",
        public liters: number = 0,
        public isDone: boolean = false,
        public createDate: Date = new Date()
    ) {}
}
Styling
We will start a little differently. Let's add all the css classes needed for this project, so that we won't have to look at them later and focus on the more important stuff. Let's create the page.css file in the src/app/ folder and paste in these classes.
// page.css

.beer-order-page {
    @apply w-96 mx-auto p-4 mt-8 bg-gray-800 rounded-md text-white;

    .title {
        @apply text-2xl font-bold mb-4 text-center;
    }

    .add-form {
        @apply flex flex-col gap-4;

        label {
            @apply flex flex-col;
        }

        input {
            @apply text-black p-1;
        }

        .add-button {
            @apply bg-blue-500 rounded-md p-2 transition-colors w-full hover:bg-blue-600;
        }
    }

    .order-item {
        @apply flex justify-between items-center bg-gray-700 p-2 rounded-md transition-colors mt-4 hover:bg-gray-600;

        .liters-text {
            @apply text-gray-400;
        }

        .delete-button {
            @apply bg-red-500 rounded-md p-2 transition-colors w-full hover:bg-red-600;
        }
    }
}
Main component
In this section, we'll focus on the main component of our Next.js application. Navigate to src/app/page.tsx and clear out any existing code.
The form includes input fields for the beer type and the quantity in liters, along with a submit button labeled "Add order".
With this main component set up, users will be able to interact with our application by submitting beer orders through the form. In the subsequent sections, we'll enhance this functionality by integrating RavenDB for storing and managing these orders efficiently.
// page.tsx

import "./page.css";

export default async function Home() {
    return (
        <main className="beer-order-page">
            <h1 className="title">
                Beer Order
            </h1>

            <form className="add-form">
                <label>
                    Type
                    <input type="text" name="beerType" required />
                </label>
                <label>
                    Liters
                    <input type="number" name="liters" required min="1" />
                </label>

                <button className="add-button">
                    Add order
                </button>
            </form>
        </main>
    );
}
Now in the terminal run
npm run dev
and open http://localhost:3000 in the browser. Your component should look like this.

Server actions
For form submission we will use server actions from Next.js.
It can be done inline like so:
<form action={
    "use server"
    // some db call
}>
However, we will create a file in which we will place all the actions.
Let's create actions.ts in src/app/. To make all functions inside the file run on the server side, we will add "use server" at the beginning.
From formData we can get value by input name.
Inside our function we can just simply use the RavenDB database store.
// actions.ts

"use server";

import { revalidatePath } from "next/cache";
import { BeerOrder } from "../db/models";
import { store } from "../db/store";

export async function addOrderAction(formData: FormData) {
    const beerType = String(formData.get("beerType"));
    const liters = Number(formData.get("liters"));

    const session = store.openSession();

    await session.store<BeerOrder>(new BeerOrder(null, beerType, liters));
    await session.saveChanges();

    revalidatePath("/");
}
Once we have the function that adds an order to our database, we should now use it. Let's go back to the page.tsx file, import the action and add it to the form.
// page.tsx

import { addOrderAction } from "./actions";

...
    <form action={addOrderAction} ...
...
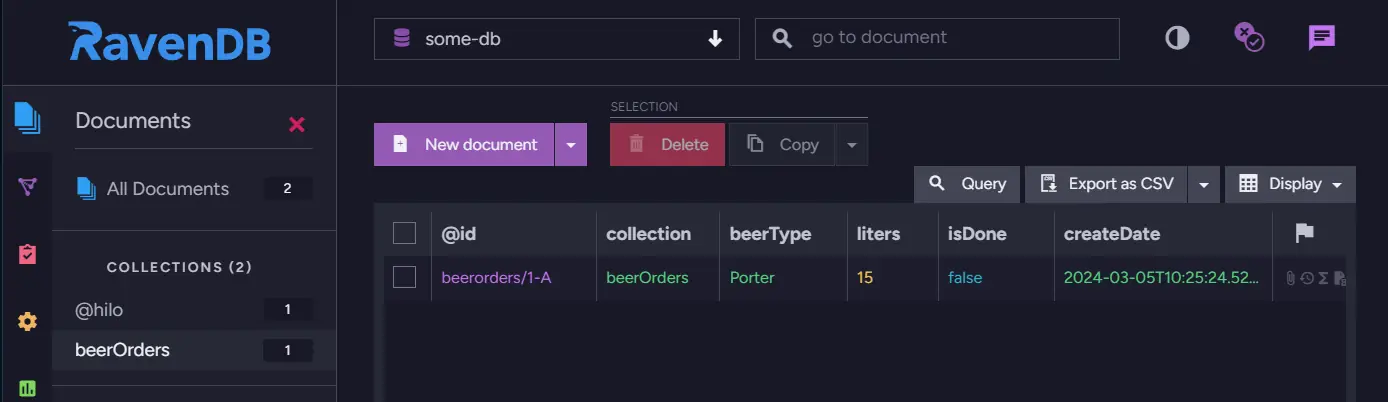
Now let's try to add an order. Fill the form with some values and hit "Add order".

New document should be added to your database.
Getting data from database
As you can see, our order is in the database, but nothing has changed in the application. As our Home component is asynchronous, we can easily get data from the RavenDB database directly there.
Let's import the store in page.tsx, then we can just open the session and get the data. For now log it to the console, and you should see a list of one object we created. Remember that this is a server component, so it will appear in the terminal where you run the Next.js server (not in the browser).
// page.tsx

import { store } from "../db/store";
import { BeerOrder } from "../db/models";
...

export default async function Home() {

    const beerOrders = await store
        .openSession()
        .query<BeerOrder>({ collection: "BeerOrders" })
        .orderBy("createDate")
        .all();

    console.log(beerOrders)

    ...
Time to show the list on the UI.
If we run the dev version, we should see the latest list after adding the order. However, if we do a build, the component will be cached. To avoid this, we can ensure that this component is not cached.
unstable_noStore was deprecated in Next.js 15. If you are on Next.js 15 or later, replace it with import { noStore } from 'next/cache' and call noStore() the same way.
// page.tsx

import { unstable_noStore as noStore } from "next/cache";
import { addOrderAction } from "./actions";
import { BeerOrder } from "../db/models";
import { store } from "../db/store";
import "./page.css";

export default async function Home() {
    noStore();

    const beerOrders = await store
        .openSession()
        .query<BeerOrder>({ collection: "BeerOrders" })
        .orderBy("createDate")
        .all();

    return (
        <main className="beer-order-page">
            <h1 className="title">
                Beer Order
            </h1>

            <form action={addOrderAction} className="add-form">
                <label>
                    Type
                    <input type="text" name="beerType" required />
                </label>
                <label>
                    Liters
                    <input type="number" name="liters" required min="1" />
                </label>

                <button className="add-button">
                    Add order
                </button>
            </form>

            {beerOrders.map((order) => (
                <div key={order.id} className="order-item">
                    <div>
                        <form>{order.beerType}</form>
                        <span className="liters-text">
                            {order.liters} liters
                        </span>
                    </div>
                    <form>
                        <button className="delete-button">
                            Delete order
                        </button>
                    </form>
                </div>
            ))}
        </main>
    );
}
I added another order. Now the app should look like this.

Delete / Modify data
We've already shown the delete buttons, now let's write logic for it. We will also add an option to click on a type of beer from the list to mark it as ordered. Let's go to the actions.ts file.
We will add the deleteOrderAction and toggleOrderAction functions here. To make a change in the database, we only need the id.
// actions.ts

...

export async function deleteOrderAction(id: BeerOrder["id"]) {
    if (!id) {
        throw new Error("ID is required")
    };

    const session = store.openSession();

    await session.delete<BeerOrder>(id);
    await session.saveChanges();

    revalidatePath("/");
}

export async function toggleOrderAction(id: BeerOrder["id"]) {
    if (!id) {
        throw new Error("ID is required")
    };

    const session = store.openSession();

    const order = await session.load<BeerOrder>(id);
    if (!order) {
        throw new Error(`Order (${id}) not found`);
    }

    order.isDone = !order.isDone;
    await session.saveChanges();

    revalidatePath("/");
}
Currently, nothing happens from the moment you click "Add order" until a new item appears on the list. Let's change that, and apply it to other buttons.
To make it work we need a client component this time. Create addOrderButton.tsx. From useFormStatus() we can get the pending value.
// addOrderButton.tsx

"use client";

import { useFormStatus } from "react-dom";

export default function AddOrderButton() {
    const { pending } = useFormStatus();

    return (
        <button
            className={`add-button ${pending ? "opacity-50" : ""}`}
            disabled={pending}
        >
            {pending ? "Adding order..." : "Add order"}
        </button>
    );
}
We will do similar things with delete, and toggle buttons.
// deleteButton.tsx

"use client";

import { useFormStatus } from "react-dom";

export default function DeleteButton() {
    const { pending } = useFormStatus();

    return (
        <button
            className={`delete-button ${pending ? "opacity-50" : ""}`}
            disabled={pending}
        >
            {pending ? "Deleting order..." : "Delete order"}
        </button>
    );
}
// toggleOrderButton.tsx

"use client";

import { useFormStatus } from "react-dom";
import { BeerOrder } from "../db/models";

export default function ToggleOrderButton({
    beerType,
    isDone,
}: Pick<BeerOrder, "beerType" | "isDone">) {
    const { pending } = useFormStatus();

    return (
        <button disabled={pending}>
            <span className={`${isDone ? "line-through" : ""} ${pending ? "text-gray-300" : ""}`}>
                {beerType}
            </span>
        </button>
    );
}
Using all together
Now we can use our custom buttons in page.tsx. All together should look like this.
// page.tsx

import { unstable_noStore as noStore } from "next/cache";
import {
    addOrderAction,
    deleteOrderAction,
    toggleOrderAction,
} from "./actions";
import { BeerOrder } from "../db/models";
import { store } from "../db/store";
import AddOrderButton from "./addOrderButton";
import DeleteButton from "./deleteButton";
import ToggleOrderButton from "./toggleOrderButton";
import "./page.css";

export default async function Home() {
    noStore();

    const beerOrders = await store
        .openSession()
        .query<BeerOrder>({ collection: "BeerOrders" })
        .orderBy("createDate")
        .all();

    return (
        <main className="beer-order-page">
            <h1 className="title">
                Beer Order
            </h1>

            <form action={addOrderAction} className="add-form">
                <label>
                    Type
                    <input type="text" name="beerType" required />
                </label>
                <label>
                    Liters
                    <input type="number" name="liters" required min="1" />
                </label>

                <AddOrderButton />
            </form>

            {beerOrders.map((order) => (
                <div key={order.id} className="order-item">
                    <div>
                        <form action={toggleOrderAction.bind(null, order.id)}>
                            <ToggleOrderButton
                                beerType={order.beerType}
                                isDone={order.isDone}
                            />
                        </form>
                        <span className="liters-text">
                            {order.liters} liters
                        </span>
                    </div>
                    <form action={deleteOrderAction.bind(null, order.id)}>
                        <DeleteButton />
                    </form>
                </div>
            ))}
        </main>
    );
}
Now after clicking on any button, you can see the loading state.

Summary
This guide walked through building a beverage ordering app with Next.js and RavenDB, covering database setup, server actions for mutations, and server components for data fetching.
- Next.js server components can query RavenDB directly using async/await — no separate API route needed, which keeps the data-fetching path short and the component code simple.
- Adding
ravendbtoserverComponentsExternalPackagesinnext.config.mjsis required so the Node.js client is not bundled for the browser, where it cannot run. - Server actions let you colocate mutation logic (insert, delete, update) with the components that trigger them, and calling
revalidatePath("/")after each mutation is the idiomatic way to refresh the cached page data. - Using
unstable_noStore()in a server component opts that component out of static caching, which ensures queries always return live data from RavenDB rather than a stale build-time snapshot.
For the complete code, visit the GitHub repository. Happy coding!