How to setup RavenDB with ASP.NET Core 8 application

What you will learn
- How to connect your ASP.NET Core 8 application to a RavenDB database
- How to confirm your connection is established
Introduction
By the end of this tutorial, you'll have your ASP.NET Core 8 web API connected to RavenDB and be ready to integrate it into your projects. Whether you're new to using RavenDB or simply looking for a straightforward setup, this tutorial will smoothly guide you through the whole process.
Prerequisites
What you will need:
- .NET SDK installed on your machine. This article uses 8.0.403
- RavenDB Cloud account and instance with certificate
- Database in RavenDB Cloud
Let's make sure you have everything ready to connect your application to RavenDB. In this tutorial, we will use a RavenDB Cloud instance to start the development in no time.
You can also use your local RavenDB server. Check how to run the server locally in the Getting Started guide.
Let's setup our development environment. The first step is installing the .NET SDK, which in the case of this tutorial is in version 8.0.403. If you want to check your .NET version, open the terminal and run the following command:
dotnet --version
If you see the .NET version in the output, it means the installation was successful. If this command doesn't output your version, download the .NET SDK from the link above.
With your .NET environment set up, let's turn our attention to the RavenDB Cloud. We'll need a RavenDB Cloud instance and a certificate necessary to encrypt the connection between the database and your application. RavenDB Cloud generates the certificate automatically for your instance. If you're new to RavenDB Cloud, don't worry - in this guide, we will also cover how to get started with RavenDB Cloud and how to claim your free instance.
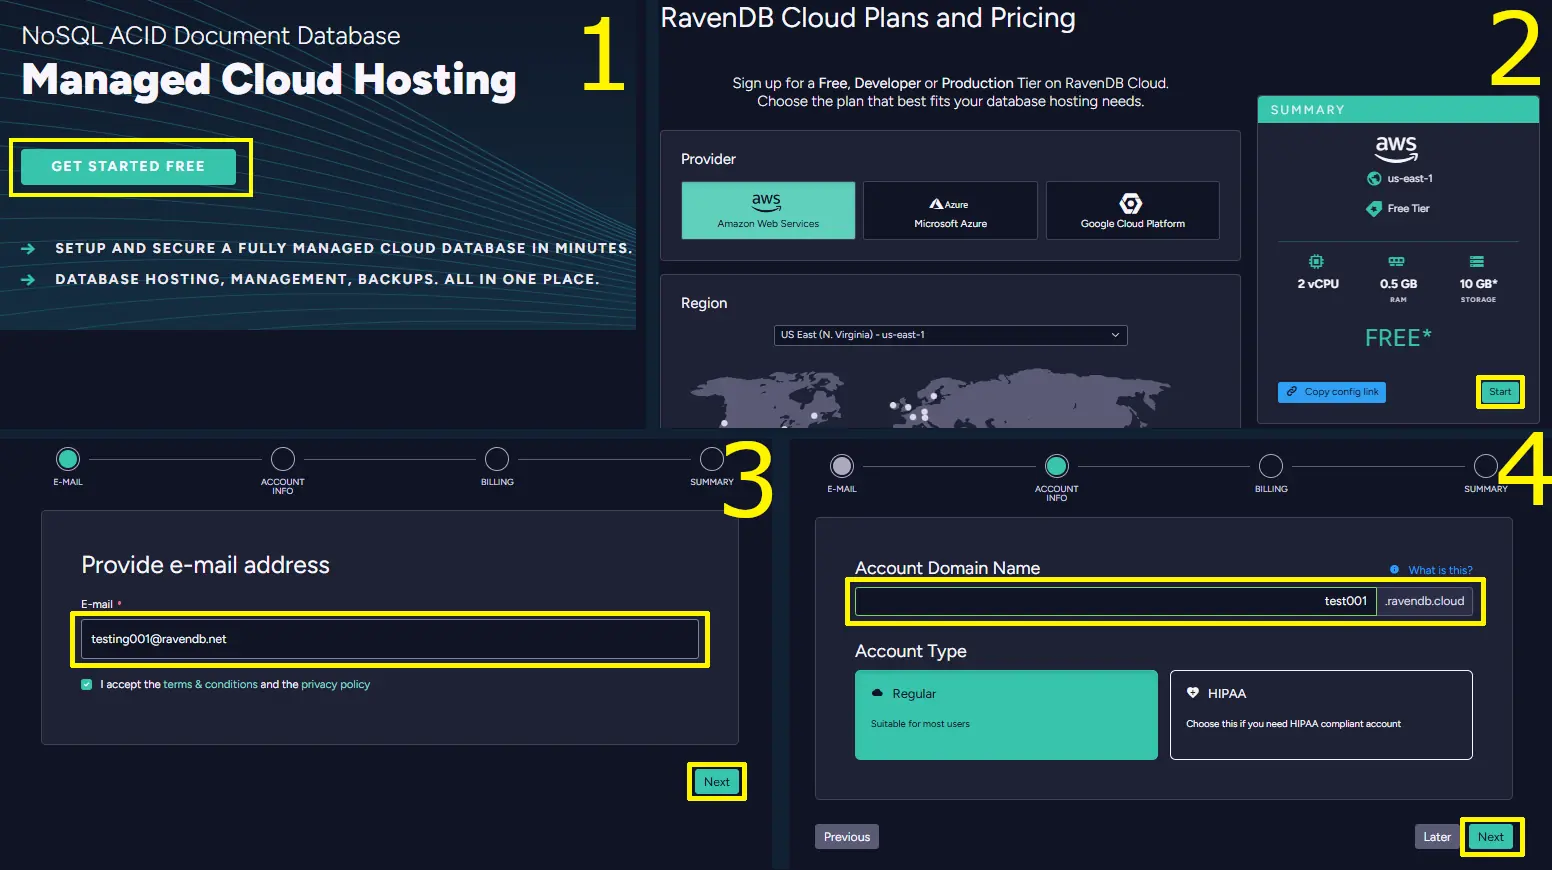
To create your account:
- Click 'Get Started Free'
- To get a free account, click 'Start' without making any changes
- Select 'Register Here' and enter your email address
- Enter the domain name you want, complete the billing, and review the summary
You'll receive an activation link at your email address once the account is created.
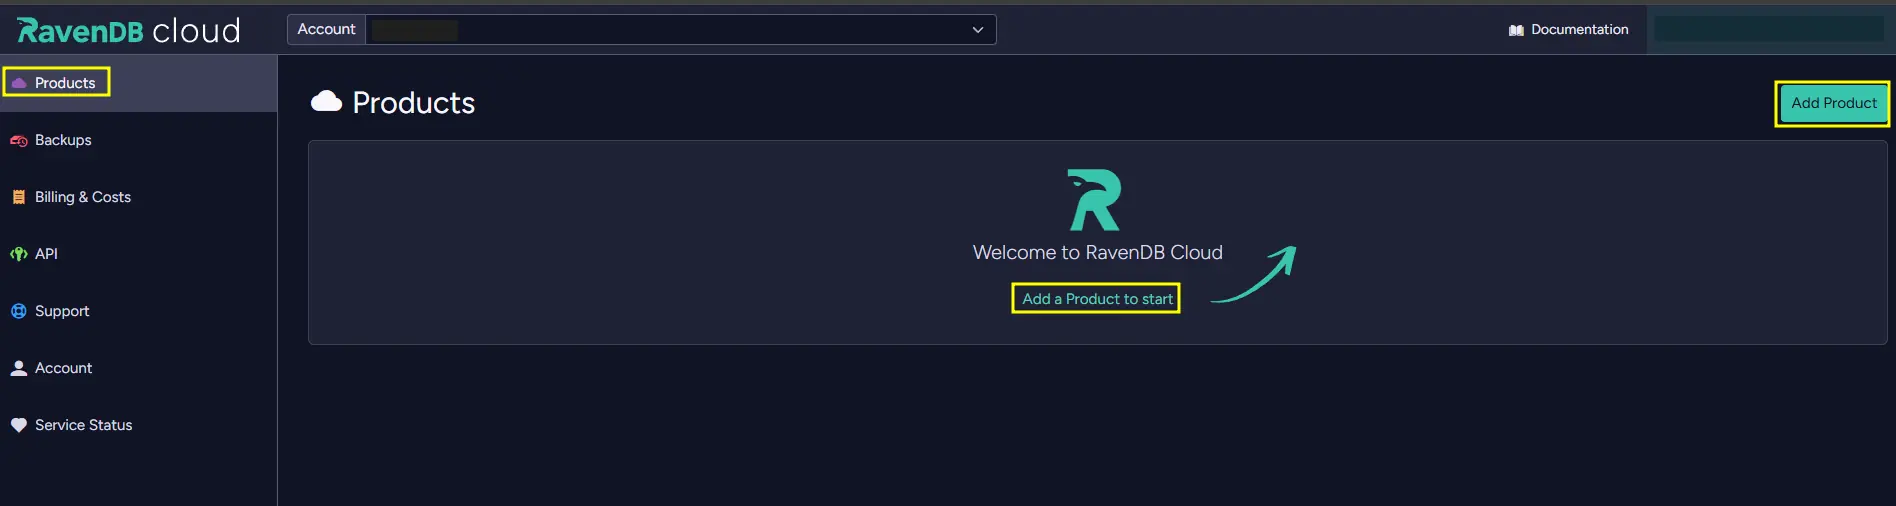
We've successfully created a RavenDB Cloud account. Now, let's create a free instance. Instance is like your personal database server. RavenDB Cloud handles setup, maintenance, and other time-consuming tasks to let you focus on the code. To create an instance, click 'Add Product' on the right of the 'Products' page or just click 'Add new product to start' at the center of the page.
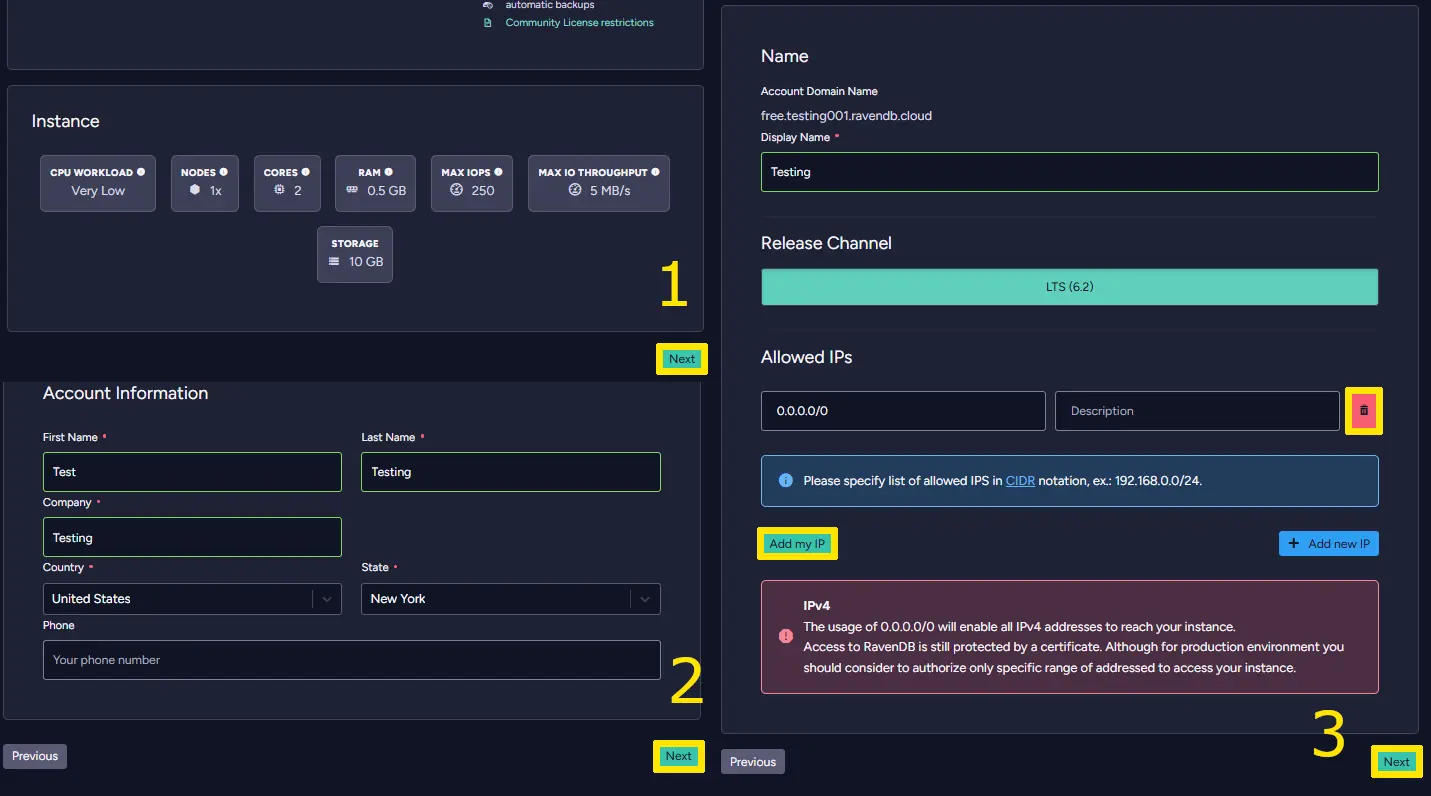
To get a free instance:
- Scroll down and click 'Next' without changing anything
- Enter your account information and go through billing
- On the 'Customize' step, enter a display name for your instance and set the IP access. Leave
0.0.0.0/0to allow connections from anywhere, or click 'Add my IP' to restrict it to your current machine. (0.0.0.0/0is CIDR notation meaning all IPv4 addresses; you can change it later.) - Click 'Next', review the summary, and click 'Create'
For more details on adding a new product, click here.
After configuring your product you will need to wait for the instance to finish setting up before you can access your studio. You will also need a certificate installed.
For a secure connection with RavenDB Studio, let's get a TLS certificate for your instance. We'll also use it in our app later. You can download it by going to the 'Products' tab on the left bar. Then you select the green button 'Download Certificate' on your chosen instance and follow the instructions you get in the pop-up. This pop-up includes a certificate download button and instructions for installing certificates for both Windows and Linux. If you clicked too quickly and got an authentication error, please reload your browser and try again.
Remember to restart your browser after installing the certificate to ensure it recognizes the new certificate.

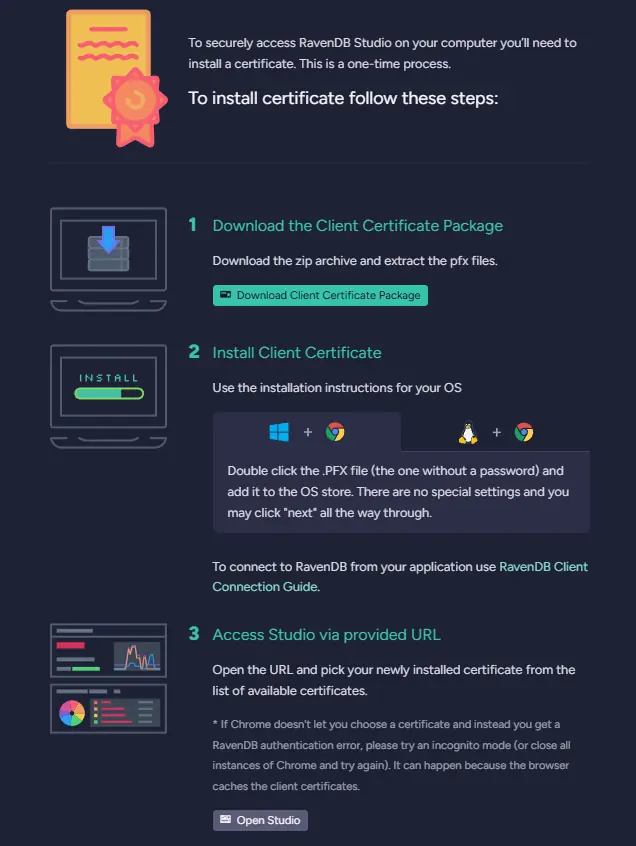
In order to access RavenDB Studio you require a working certificate. While using RavenDB Cloud, the RavenDB Studio is secured by default - you'll need a certificate to access the server UI. You'll also need it to connect to your database within the application code, so this step cannot be skipped. Use your certificate to authorize against RavenDB Studio. Just choose your certificate from the popup window that your browser will display. Once doing so, you should be able to see the UI. Now, let's create a new database for your application. Select the 'Databases' tab and press 'New database' to create a new one.

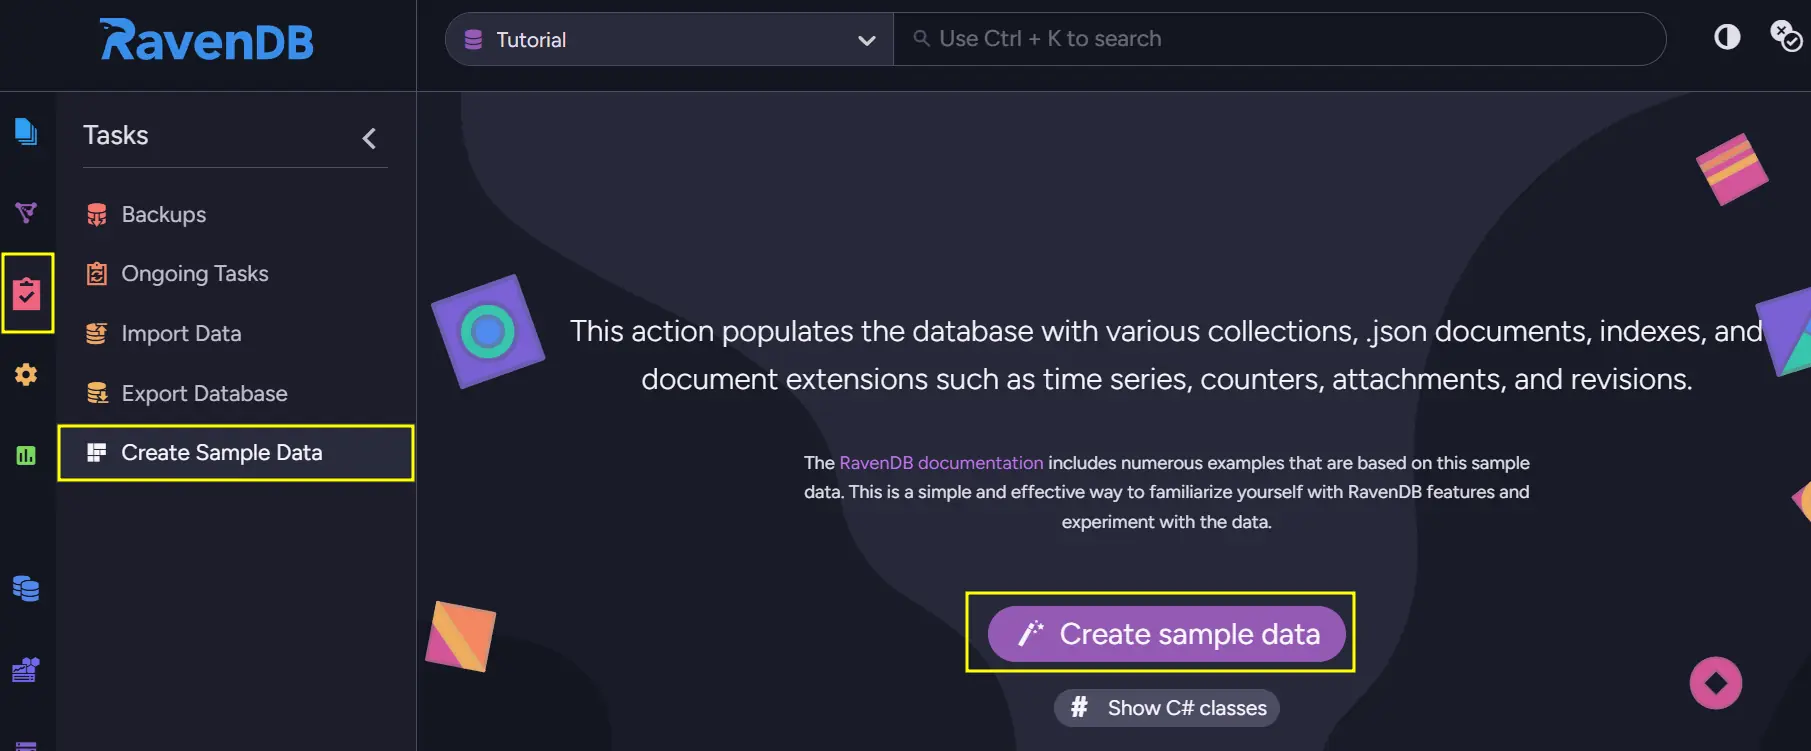
For the purpose of testing, you can also create Sample Data by clicking your database and selecting 'Tasks' on the left bar where you can find the option to create it. This data will come in handy later if you want to test the connection between your application and the database.
Create and Configure
We've prepared everything you need: a functional .NET environment for building your app and a RavenDB database running on RavenDB Cloud to manage your application's data. Let's try to connect a test web application to our instance. First, we will create a new directory for your application file. Use the terminal in your new directory, and execute this command:
dotnet new webapi
Next, we'll need the RavenDB Client package to communicate with our database within the code. You have to add it to your project by executing the following command:
dotnet add package RavenDB.Client
Let's take a look inside our brand-new Program.cs file. Inside, you will find some sample code. Let's cut the unnecessary stuff and only leave the code we need. After clean-up, the code should look like the following:
var builder = WebApplication.CreateBuilder(args);

builder.Services.AddEndpointsApiExplorer();
builder.Services.AddSwaggerGen();

var app = builder.Build();
if (app.Environment.IsDevelopment())
{
    app.UseSwagger();
    app.UseSwaggerUI();
}

//app.UseHttpsRedirection(); // RavenDB uses TLS certificate auth, so HTTPS redirection is not needed here

app.MapGet("/test", () =>
{

})
.WithName("Test")
.WithOpenApi();

app.Run();
Feel free to just copy this into your file. To finally start coding let's import required libs. You want to put them at the beginning of your existing code as usual.
using System.Security.Cryptography.X509Certificates;
using Raven.Client;
using Raven.Client.Documents;
Those three allow us to use DocumentStore and x509Certificate. DocumentStore is the base for all RavenDB actions. It communicates with your cluster and can handle multiple databases. It's important to have a single instance of DocumentStore in place, to maintain a single connection definition to your database. You can learn more about DocumentStore here or here.
To use both of those, first we need to declare a few strings that will allow us to connect to your chosen database. Add this code after builder.Services.AddSwaggerGen() and before builder.Build(). The last line, builder.Services.AddSingleton<IDocumentStore>(documentStore), tells ASP.NET Core to keep your store around for the lifetime of the application and hand it out whenever something needs it - that's what "singleton" means here, one shared instance for everyone. It has to go before builder.Build() because that's the point where ASP.NET Core finalizes the list of available services. Remember to use your own serverURL, databaseName and certificatePath that are connected to your RavenDB database. It should look like this:
string serverURL = "https://your_RavenDB_server_URL";
string databaseName = "your_database_name";
string certificatePath = @"C:\path_to_your_pfx_file\cert.pfx";

var x509Certificate = new X509Certificate2(certificatePath, "your_certificate_password");

IDocumentStore documentStore = new DocumentStore
{
    Urls = new[] { serverURL },
    Database = databaseName,
    Certificate = x509Certificate
};
documentStore.Initialize();

builder.Services.AddSingleton<IDocumentStore>(documentStore);
The certificate password is shown in the RavenDB Cloud download dialog when you click Download Certificate. Copy it from there and replace your_certificate_password above.
Put it all together with the template and your file should now look like this:
using System.Security.Cryptography.X509Certificates;
using Raven.Client;
using Raven.Client.Documents;

var builder = WebApplication.CreateBuilder(args);

builder.Services.AddEndpointsApiExplorer();
builder.Services.AddSwaggerGen();

string serverURL = "https://your_RavenDB_server_URL";
string databaseName = "your_database_name";
string certificatePath = @"C:\path_to_your_pfx_file\cert.pfx";

var x509Certificate = new X509Certificate2(certificatePath, "your_certificate_password");

IDocumentStore documentStore = new DocumentStore
{
    Urls = new[] { serverURL },
    Database = databaseName,
    Certificate = x509Certificate
};
documentStore.Initialize();

builder.Services.AddSingleton<IDocumentStore>(documentStore);

var app = builder.Build();

if (app.Environment.IsDevelopment())
{
    app.UseSwagger();
    app.UseSwaggerUI();
}

//app.UseHttpsRedirection(); // RavenDB uses TLS certificate auth, so HTTPS redirection is not needed here

app.MapGet("/test", () =>
{

})
.WithName("Test")
.WithOpenApi();

app.Run();
Before we modify the endpoint, we need a class that matches the shape of an Employee document in RavenDB. Add the following at the end of your file. It just needs to exist before you try to compile:
class Employees
{
    public required string LastName { get; set; }
    public required string Title { get; set; }
}
Now let's check the connection by loading a document from your database in the RavenDB Cloud. For this purpose, we will modify the existing MapGet to create the desired route. You'll notice we added IDocumentStore store as a parameter to the lambda. Because we registered it as a singleton earlier, ASP.NET Core knows exactly what that is and will supply it automatically every time the endpoint is called, no extra wiring needed on your end. We will use DocumentSession to interact with documents. Session is a basic mechanism that is used to modify, load, create, and keep track of documents. If you wish to learn more about Sessions you can read more in the documentation. In the RavenDB Studio choose one of the documents you want to use. For this example, let's load a single Employee document and return its details from the endpoint:
    (IDocumentStore store) =>
    {
        using (var session = store.OpenSession())
        {
            var employee = session.Load<Employees>("employees/1-A");
            if (employee != null)
            {
                string title = employee.Title;
                string last = employee.LastName;

                return $"{title} {last}";
            }

            return "This Employee does not exist";
        }
}
Your complete application should now look like this:
using System.Security.Cryptography.X509Certificates;
using Raven.Client;
using Raven.Client.Documents;

var builder = WebApplication.CreateBuilder(args);

builder.Services.AddEndpointsApiExplorer();
builder.Services.AddSwaggerGen();

string serverURL = "https://your_RavenDB_server_URL";
string databaseName = "your_database_name";
string certificatePath = @"C:\path_to_your_pfx_file\cert.pfx";

var x509Certificate = new X509Certificate2(certificatePath, "your_certificate_password");

IDocumentStore documentStore = new DocumentStore
{
    Urls = new[] { serverURL },
    Database = databaseName,
    Certificate = x509Certificate
};
documentStore.Initialize();

builder.Services.AddSingleton<IDocumentStore>(documentStore);

var app = builder.Build();

if (app.Environment.IsDevelopment())
{
    app.UseSwagger();
    app.UseSwaggerUI();
}

//app.UseHttpsRedirection(); // RavenDB uses TLS certificate auth, so HTTPS redirection is not needed here

app.MapGet("/test", (IDocumentStore store) =>
{
    using (var session = store.OpenSession())
    {
        var employee = session.Load<Employees>("employees/1-A");
        if (employee != null)
        {
            string title = employee.Title;
            string last = employee.LastName;
            return $"{title} {last}";
        }

        return "This Employee does not exist";
    }
})
.WithName("Test")
.WithOpenApi();

app.Run();

class Employees
{
    public required string LastName { get; set; }
    public required string Title { get; set; }
}
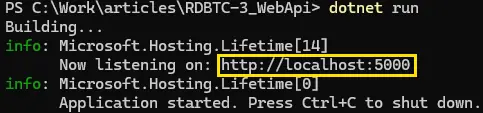
Now using the terminal type dotnet run and wait a few seconds. This command will display the address where your web application is running. Copy that address, paste it into your browser's URL bar, and add /test at the end. Once it loads, you should see the output displayed in the top left corner.

As an ending tip, I would like to remind you that if everything is working properly you should delete sample data from your database so it is clean and ready for your data, or just create a new one, dedicated for your app.
Summary and Next Steps
This guide walked through connecting an ASP.NET Core 8 web API to RavenDB Cloud, from provisioning a free cloud instance and downloading a TLS certificate to initializing a DocumentStore and verifying the connection by loading a document.
- Keep a single DocumentStore instance for the lifetime of your application; creating multiple instances wastes connections and defeats RavenDB's internal connection pooling.
- The TLS certificate serves double duty: it secures browser access to RavenDB Studio and authenticates your application code against the server, so losing or misconfiguring it blocks both.
- Sessions are lightweight and short-lived by design; open one per logical unit of work (a request, a transaction), not one for the whole application.
- Once your connection is confirmed, remove the sample data so your database starts clean, as sample documents share IDs with real Northwind entities and can cause confusion during development.