Studio: Database List View
-
Use Studio's Database List view to see the databases in your cluster, examine the state and statistics of each database, and manage the databases, e.g., disable a database or pause its indexing.
You can also select multiple databases and enable, disable, or delete them at once. -
The database list includes databases that are not hosted by the node that Studio is connected to.
You can filter the list by database name, by database state, and by location (this node or other cluster nodes). -
You can create new databases in this view, from scratch or by restoring a backup.
Creating a database from scratch is described in Create a Database: General Flow, and restoring a database from a backup in Restoring from backup using Studio. -
In this article:
Database list view
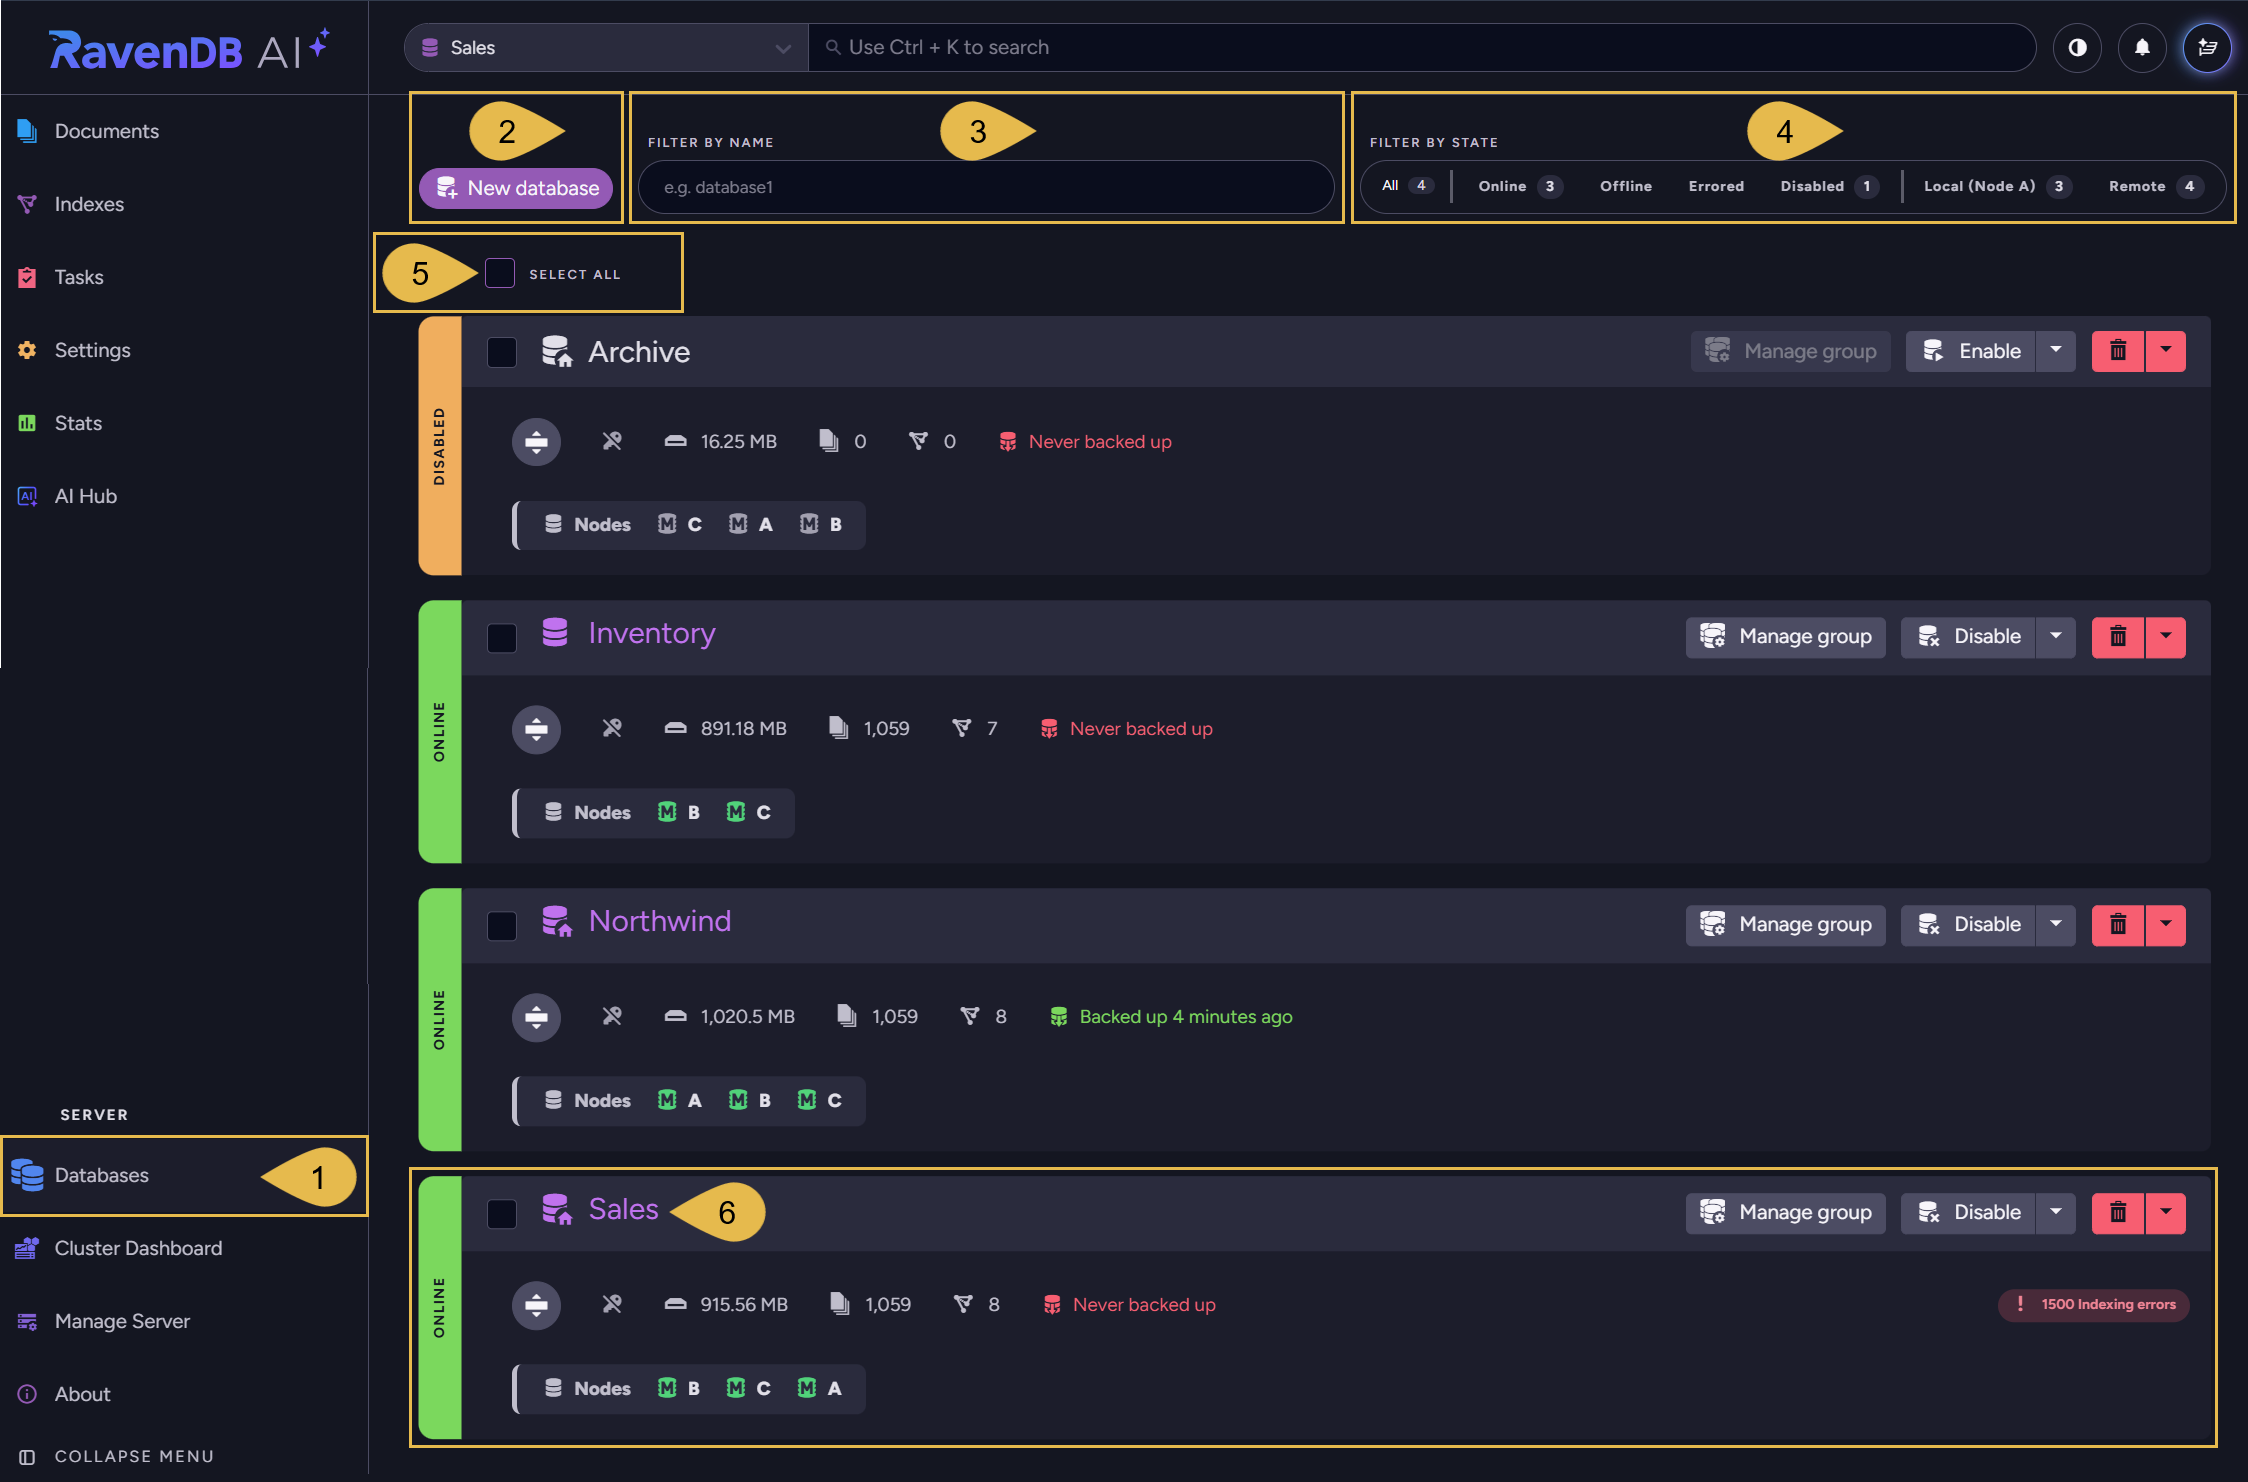
The Database List view shows the databases in your cluster, with the state, statistics, and available actions of each database.
-
Databases
Click Databases, in the Server section of Studio's main menu, to open the Database List view. -
New database
Open a dialog to create a new database.
Learn more in Create a Database: General Flow and Restoring from backup using Studio.- To restore a database from a backup, click Restore from backup at the bottom of the dialog's first step.
- This button is available only to users with
OperatororCluster Adminsecurity clearance.
-
Filter by name
Enter text to list only the databases whose names contain the text. -
Filter by state
Select one or more states to list only the databases in the selected states.
Select Local (Node A) to list the databases hosted by the node that Studio is connected to (node A in this image), or Remote to list the databases hosted by other cluster nodes.- The number next to each option counts the databases that match the option.
- A database that is online on only some of its nodes is counted as both Online and Offline.
-
Select All
Select all the databases displayed in the view (that match the filters you set).
If any displayed databases are already selected, clicking Select All deselects them instead of selecting all displayed databases.
See Actions on selected databases- To select a single database, select the checkbox next to the database's name.
- The checkboxes are available only to users with
OperatororCluster Adminsecurity clearance.
-
A database
Each listed database is displayed with its state, statistics, and the actions you can perform on it.
See Database actions and Database stats
In a browser window narrower than 1400 pixels, the name and state filters are hidden.
To display the filters, click Show Filtering Options next to New database.
Database actions
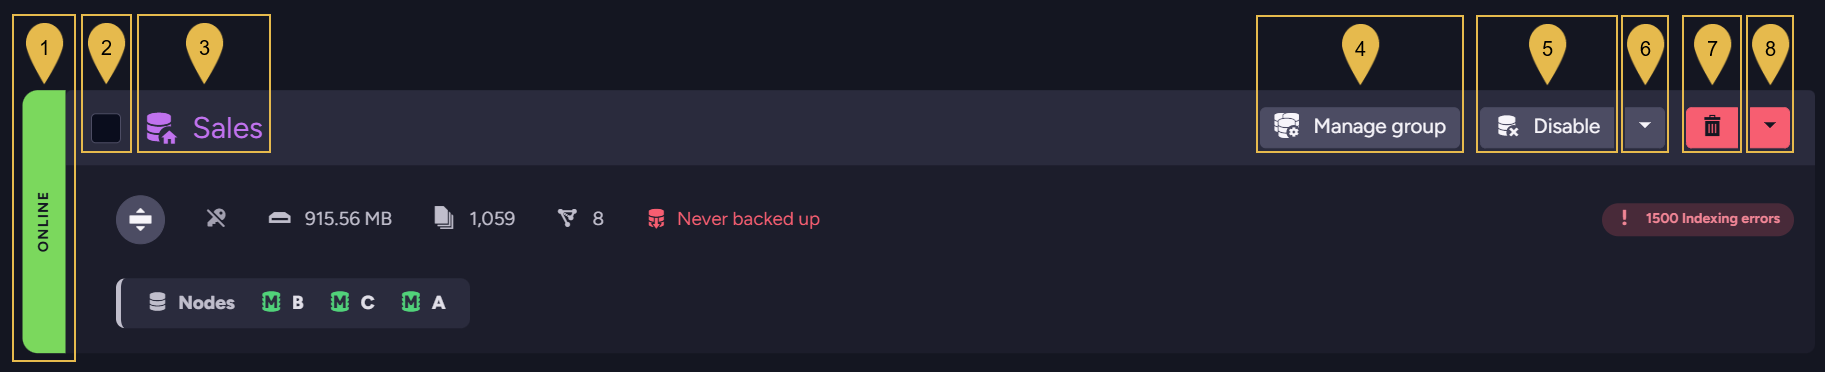
The top line of each listed database shows the database's state and name, and buttons you can use to act on the database.
-
Database state
The state of the database on the nodes of its database group:- Online: the database is loaded by all the nodes of the database group.
- Online (x/y): the database is loaded by only some of the nodes of the database group (x of y nodes).
- Offline: the database is not loaded by any of the nodes of the database group.
RavenDB unloads a database that has not been accessed for a set time (15 minutes by default), and loads the database again when the database is accessed. - Disabled: the database was disabled (see Disable below), and cannot be accessed.
- Error: at least one node of the database group failed to load the database.
- Loading...: Studio has not retrieved the database's state from the nodes yet.
-
Checkbox
Select the database, to perform an action on this database and on other selected databases at once.
See Actions on selected databases -
Database name
Click the name to open the database's Documents view.- A house symbol on the database icon marks a database hosted by the node that Studio is connected to.
- For a database that this node does not host, the Documents view opens in a new browser tab, on a node that hosts the database.
- The name of a disabled database cannot be clicked.
-
Manage group
Open the Manage Database Group view, to manage the database group (the nodes that host the database). -
Disable
Disable the database.
You will be asked to confirm.
A disabled database cannot be accessed, and its data is kept.
To enable a disabled database, click Enable (the label this button shows while the database is disabled). -
More actions
Open a menu of additional actions.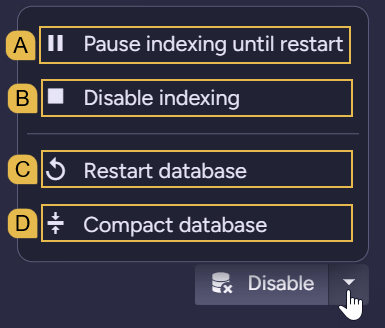
-
A. Pause indexing until restart
Pause the indexing of all the database's indexes, including indexes created while indexing is paused.
In the dialog that opens, click Pause.
When the database is hosted by more than one node or is sharded, the dialog also displays a Select context area, where you can select the nodes (and shards) to pause indexing on.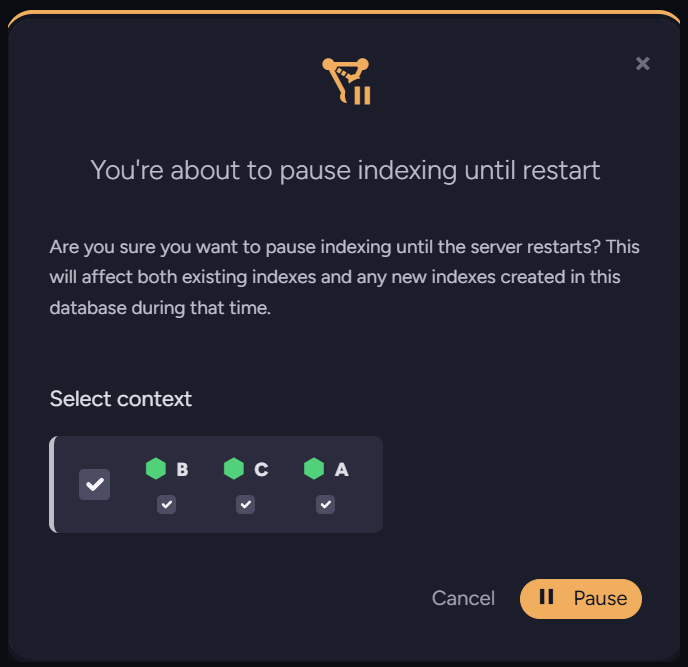
Indexing resumes when the server restarts, when the database is restarted (see Restart database below), or when you resume indexing.
While indexing is paused, an Indexing paused badge is displayed, and Resume indexing appears at the top of the menu.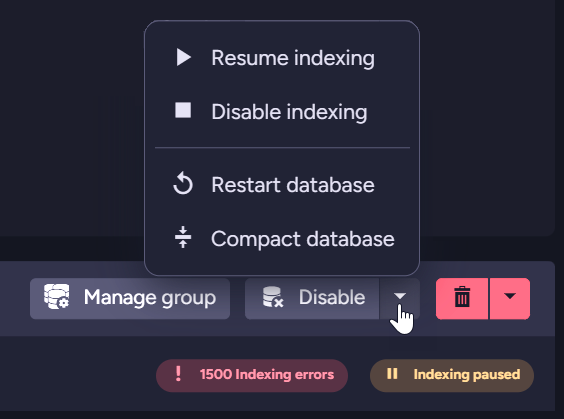
To resume indexing, select Resume indexing and click Resume in the dialog that opens.
- When the database is hosted by more than one node or is sharded, the Resume dialog also displays a Select context area, where you can select the nodes (and shards) to resume indexing on.
- Indexing can also be paused and resumed using the client API.
See Pause Indexing Operation and Resume Indexing Operation
-
B. Disable indexing
Disable the indexing of all the database's indexes, on all the nodes that host the database.
You will be asked to confirm.- The change takes effect only after the database is reloaded.
To reload the database, restart it (see Restart database below), disable and enable it, or restart the server. - Indexing stays disabled after the database is reloaded and after the server restarts, until you select Enable indexing (shown in place of Disable indexing) and reload the database.
- The change takes effect only after the database is reloaded.
-
C. Restart database
Restart the database.
In the dialog that opens, click Restart.
When the database is hosted by more than one node or is sharded, the dialog also displays a Select restart context area, where you can select the nodes (and shards) to restart the database on. -
D. Compact database
Open a dialog to compact the database's documents and indexes, reducing the disk space the database uses.
The database is offline during compaction.
Learn more in Compact Database Operation.
-
-
Delete
Delete the database.
In the dialog that opens, click Delete & Keep Files to delete the database from all the cluster nodes and keep the database's files on disk, or Delete All Data to delete the files as well.- To delete the database from specific nodes only, use the Manage Database Group view.
- The Delete button is disabled when the database's delete lock mode prevents deletion (see Delete lock mode below).
-
Delete lock mode
Set the database's delete lock mode, to allow or prevent the deletion of the database.
You will be asked to confirm the change.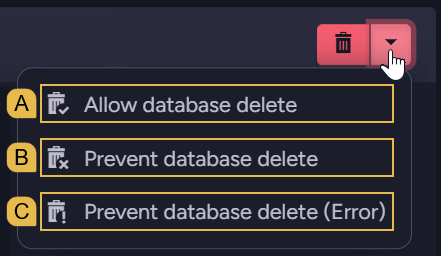
- A. Allow database delete
The database can be deleted.
This is the default mode. - B. Prevent database delete
Requests to delete the database are ignored, and no error is returned. - C. Prevent database delete (Error)
Requests to delete the database fail with an error.
- A. Allow database delete
Database stats
The lower part of each listed database shows the database's statistics, and the nodes of its database group.

-
Expand distribution details
Display the statistics of the database on each node of the database group, in place of the Nodes list.
Click the button again to collapse the distribution details.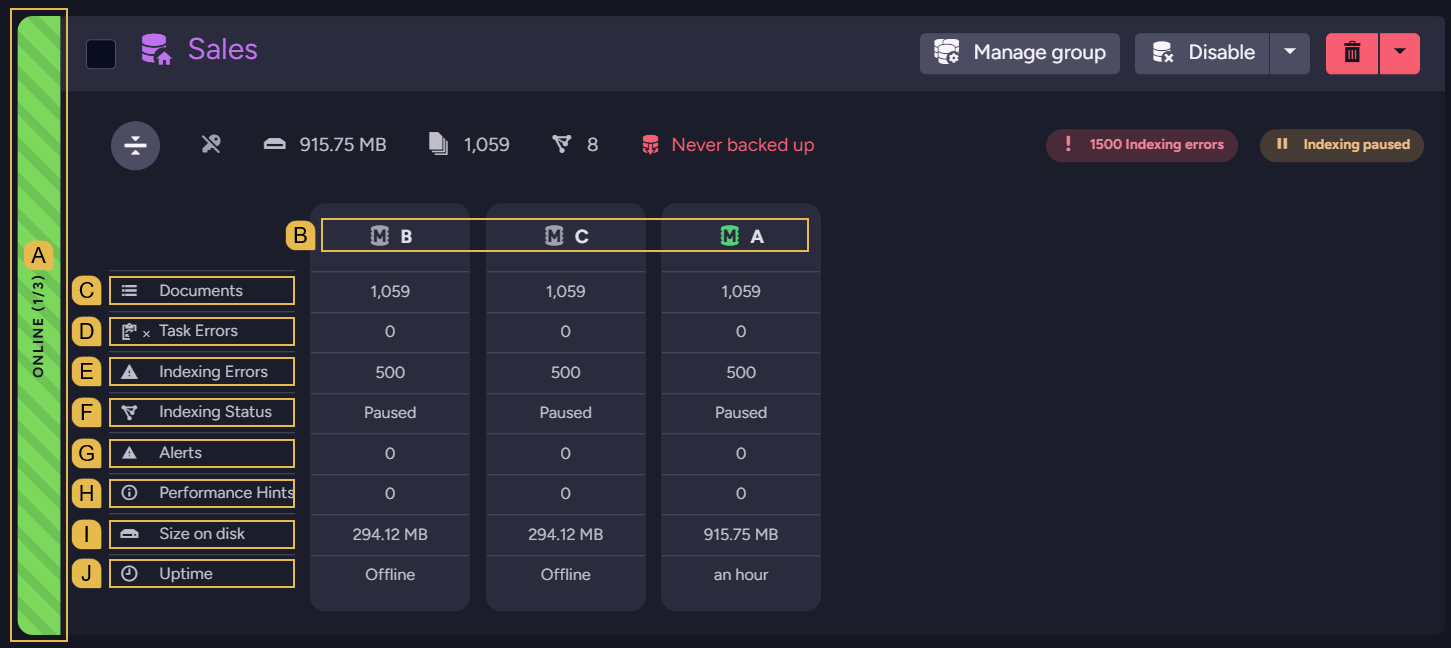
- A. Database state
A striped label marks a database that is loaded by only some of the nodes of its database group (in this image, by one of three nodes). - B. Nodes
The details include a column for each node of the database group.
The node icon is grayed out when the node has not loaded the database. - C. Documents
The number of documents in the database on each node. - D. Task Errors
The number of errors raised by the database's ongoing tasks on each node. - E. Indexing Errors
The number of indexing errors on each node. - F. Indexing Status
The indexing status on each node (e.g.,Running,Paused, orDisabled). - G. Alerts
The number of alerts raised for the database on each node. - H. Performance Hints
The number of performance hints raised for the database on each node. - I. Size on disk
The disk space the database uses on each node. - J. Uptime
The time that has passed since each node loaded the database, orOfflinefor a node that has not loaded the database.
- A. Database state
-
Encryption
An icon that shows whether the database is encrypted.
Hovering over the icon displaysThis database is encryptedorThis database is not encrypted. -
Size
The disk space the database uses, including temporary buffers.
Click the size to open the Database Storage Report view. -
Documents
The number of documents in the database.
Click the number to open the database's Documents view. -
Indexes
The number of indexes in the database.
Click the number to open the Indexes List view. -
Backup status
The time of the database's latest backup, orNever backed upif the database has never been backed up.
The text is green when the latest backup was taken within the last 24 hours, yellow when the latest backup is older than 24 hours, and red when the database has never been backed up.
Click the text to open the database's Backups view. -
Badges
Badges call attention to issues requiring it, and are displayed only when there is an issue to report.- Indexing errors: the number of indexing errors on all the nodes of the database group.
Click the badge to open the Index Errors view.
Learn about indexing errors in Debugging Index Errors. - Task errors: the number of errors raised by the database's ongoing tasks on all the nodes of the database group.
Click the badge to open the Task Errors view. - Indexing paused or Indexing disabled: indexing is paused or disabled on at least one node of the database group.
Click the badge to open the Indexes List view. - Alerts or Performance hints: the number of alerts or performance hints raised for the database on the node that
Studio is connected to.
When other nodes of the database group hold alerts or hints as well, a globe icon is added, with the total number reported by all the nodes of the database group.
Click the badge to open the notification center. - Database has load errors!: at least one node of the database group failed to load the database.
- Indexing errors: the number of indexing errors on all the nodes of the database group.
-
Nodes
The nodes of the database group.
The icon next to each node tag shows the node's state in the database group (Member, Promotable, or Rehab).
Hovering over the icon displays the state.
The database's size, number of documents, and backup status are read from the node that Studio is connected to.
If this node does not host the database, the values are read from one of the nodes that do host it.
Actions on selected databases
To perform an action on several databases at once, select the databases
(see Select All in Database list view).
When one or more databases are selected, a selection bar appears at the right end of the Select All line.

- A. Selected databases
The number of selected databases. - B. Set state
Select Enable or Disable to enable or disable all the selected databases.
You will be asked to confirm. - C. Set delete lock mode
Set the delete lock mode of all the selected databases (see Delete lock mode in Database actions).
You will be asked to confirm. - D. Delete
Delete the selected databases.- Only the selected databases whose delete lock mode allows deletion are deleted.
The Delete button is disabled when the delete lock mode of every selected database prevents deletion. - In the dialog that opens, click Delete & Keep Files or Delete All Data
(see Delete in Database actions).
The option you select applies to all the deleted databases.
- Only the selected databases whose delete lock mode allows deletion are deleted.
- E. Cancel
Deselect all the databases.