SSO: Deploying the SSO Application
-
The SSO application is distributed as a single Docker image (
ravendb/sso) that bundles Nginx, the authentication sidecar, andoauth2-proxy. -
An interactive installer (
install.shfor Linux/macOS,install.ps1for Windows) asks all the questions, pre-flights DNS and host permissions, generates a complete deployment directory, and optionally starts the stack. This is the recommended way to set up a new SSO application. -
In this article:
Prerequisites
- Docker (Compose v2).
- A public domain you control, with the ability to create DNS records.
- At least one of:
- OAuth credentials for GitHub, Google, or Microsoft/Entra ID, or
- A Kerberos keytab for an Active Directory service principal.
- For the bundled Let's Encrypt option: an AWS account with Route53 hosting the SSO domain and an IAM user authorized to create TXT records (DNS-01 challenge). The installer can also wire up a manually-supplied certificate instead.
DNS setup
The SSO application is reached at a base domain (e.g. sso.example.com). Each RavenDB cluster behind it is
exposed at <cluster-alias>.<sso-domain> - for example my-cluster.sso.example.com. You therefore need
both an apex record and a wildcard for sub-aliases:
| Type | Name | Value |
|---|---|---|
A | sso.example.com | your server's public IP |
CNAME | *.sso.example.com | sso.example.com |
The installer probes both records before continuing and will warn (but not block) if they are missing.
Recommended: interactive installer
The installer is a single self-contained script - every template it writes (including nlog.config and
the docker-compose.yml) is embedded inline, so you can download and run it directly.
- Linux / macOS
- Windows
Download and run:
curl -fsSL https://ravendb-build-assets.s3.us-east-1.amazonaws.com/Sso/install.sh -o install.sh
chmod +x install.sh
./install.sh
Or pipe directly into Bash:
bash <(curl -fsSL https://ravendb-build-assets.s3.us-east-1.amazonaws.com/Sso/install.sh)
Download and run:
Invoke-WebRequest -Uri https://ravendb-build-assets.s3.us-east-1.amazonaws.com/Sso/install.ps1 -OutFile install.ps1
.\install.ps1
Or run directly from the URL:
iex (irm https://ravendb-build-assets.s3.us-east-1.amazonaws.com/Sso/install.ps1)
The script walks through the following steps:
- Output directory - defaults to
./sso-deploy. Must be empty. - Host user check (Linux only) - verifies that UID
10000exists; offers to create theravendb-ssosystem user (the SSO container runs as10000:10000). - SSO URL - your public
https://sso.example.com. - DNS sanity check - resolves the apex
Arecord and probes a random subdomain to confirm the wildcardCNAMEis in place. - TLS certificate strategy - pick
certbot-route53(automated Let's Encrypt via Route53 DNS-01) ormanual(you supplyfullchain.pemandprivkey.pem). - Authentication providers - multi-select between GitHub, Google, Microsoft/Entra ID, and Kerberos. Each selected provider expands into its own credential prompts.
- Kerberos files (if Kerberos was chosen) - paths to
krb5.confandkrb5.keytab. On Linux the script verifies that UID10000can read both files and offers to apply an ACL (setfacl -m u:10000:r) if not. - Clusters - for each RavenDB cluster, an alias (lowercase letters, digits, hyphens) and one or more node URLs (HTTPS only).
- Summary and confirmation, then file generation.
What the installer produces
The installer generates a self-contained deployment directory:
sso-deploy/
  sso.env               # SSO secrets - mode 600
  certbot.env           # AWS creds + LE email (only if cert mode = certbot) - mode 600
  docker-compose.yml    # Two services if certbot, one if manual certs
  config/
    settings.json       # Generated cluster topology
    nlog.config         # Logging configuration
  certs/                # Pre-created, owned by UID 10000 (populated by certbot or pre-staged)
  logs/                 # Pre-created, owned by UID 10000
  README-deploy.md      # Per-deployment quick reference
OAUTH2_PROXY_COOKIE_SECRET is generated automatically (32 hex chars). config/, certs/, and logs/
are chowned to 10000:10000 so the container can write to them. After the script finishes, start the
stack from the generated directory:
cd sso-deploy
docker compose up -d
As its final step, the installer offers to run docker compose up -d for you.
Editing the generated deployment
The installer writes a complete deployment directory, sso-deploy by default, with every file the stack needs.
This section covers what each of these files carries and what you would change in it.
The generated docker-compose.yml runs these containers:
- certbot -
certbot/dns-route53
Included only if you picked thecertbot-route53certificate strategy.
Obtains the wildcard certificate on first start and renews every 12 hours. sso-ravendb/sso:latest
Starts oncecertbothas produced a valid certificate, and reloads Nginx every 6 hours to pick up renewals.
1. Fill in the environment files
The installer splits environment variables into two files so AWS credentials aren't exposed to the SSO container:
sso.env- the SSO application's own settings.certbot.env- the AWS credentials and the Let's Encrypt email address.
Edit each file with your domain, OAuth credentials, and AWS keys. The complete list of variables is on the SSO application configuration page.
2. (Optional) Configure clusters via settings.json
The RavenDB clusters that the SSO application proxies are configured in config/settings.json:
{
  "Clusters": [
    {
      "ClusterUrls": ["https://a.my-cluster.example.com"],
      "ClusterAlias": "my-cluster"
    }
  ]
}
Alternatively, set RAVENDBSSO_Clusters in sso.env to the same JSON array - environment variables override
file values.
3. Start the stack
Start, or restart, the stack from the deployment directory:
cd sso-deploy
docker compose up -d
On first run, certbot requests the wildcard certificate from Let's Encrypt; this can take 1-2 minutes
while the DNS TXT record propagates. The SSO container's depends_on waits for certbot to report healthy
before starting Nginx.
4. On-host layout
The deployment directory on the host holds these files:
sso-deploy/
  sso.env                # SSO env vars
  certbot.env            # certbot env vars
  docker-compose.yml
  config/
    settings.json        # optional - clusters can come from env vars instead
    nlog.config          # optional - logging configuration (autoReload)
  certs/                 # populated by certbot
    live/<domain>/
      fullchain.pem
      privkey.pem
  logs/                  # SSO + Nginx logs
Quick start (single container)
For local testing without Let's Encrypt, pull the image and pass credentials on the command line:
docker pull ravendb/sso

docker run --rm -it \
    -p 8080:8080 \
    -e OAUTH2_PROXY_COOKIE_SECRET=$(openssl rand -base64 32) \
    -e GITHUB_CLIENT_ID=... \
    -e GITHUB_CLIENT_SECRET=... \
    -e GOOGLE_CLIENT_ID=... \
    -e GOOGLE_CLIENT_SECRET=... \
    -e MICROSOFT_CLIENT_ID=... \
    -e MICROSOFT_CLIENT_SECRET=... \
    -e MICROSOFT_TENANT=common \
    -v /path/to/app.keytab:/etc/nginx/app.keytab:ro \
    -v /path/to/krb5.conf:/etc/krb5.conf:ro \
    ravendb/sso
Any combination of providers can run concurrently. Volumes for the keytab and krb5.conf are only needed
when using Kerberos.
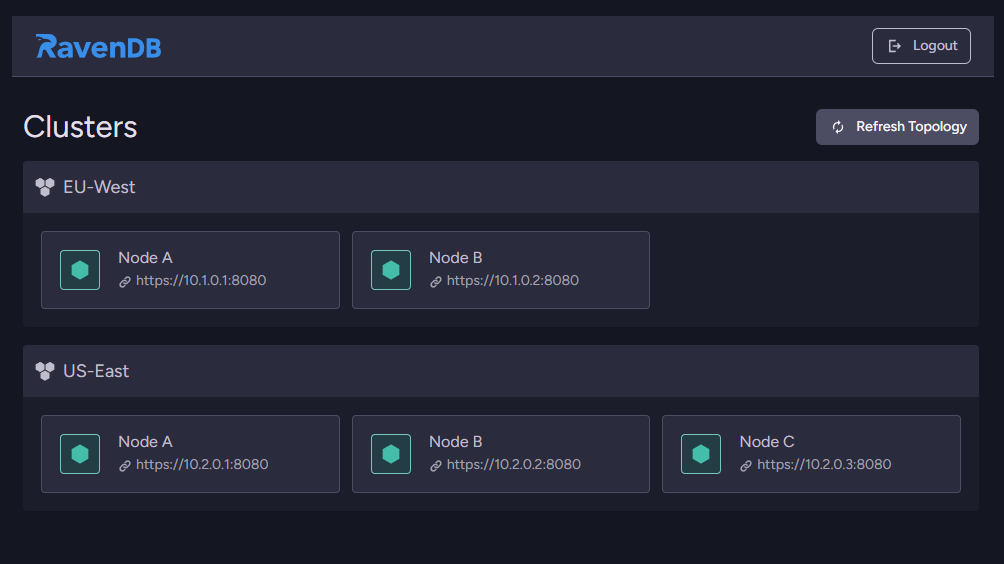
After login, the SSO portal lists the clusters the user can reach - each cluster is exposed under its own sub-alias of the SSO domain:
Registering OAuth providers
For every OAuth provider you enable, the redirect URI is
https://<sso-domain>/oauth2/<provider>/callback.
GitHub
- Open GitHub Settings → Developer settings → OAuth Apps.
- New OAuth App.
- Set Homepage URL to your SSO URL and Authorization callback URL to
https://<sso-domain>/oauth2/github/callback. - Generate a client secret. Set
GITHUB_CLIENT_IDandGITHUB_CLIENT_SECRET.
Google
- In Google Cloud Console → APIs & Services → Credentials, create an OAuth 2.0 Client ID of type Web application.
- Add
https://<sso-domain>/oauth2/google/callbackto Authorized redirect URIs. - Set
GOOGLE_CLIENT_IDandGOOGLE_CLIENT_SECRET.
Microsoft / Entra ID
The SSO image uses oauth2-proxy's entra-id provider, which supports both single-tenant and multi-tenant
apps.
- In Azure Portal → App registrations, click New registration.
- Pick Supported account types - single-tenant, multi-tenant, or multi-tenant + personal accounts.
This must match the
MICROSOFT_TENANTvalue you choose. - Set Redirect URI (Web) to
https://<sso-domain>/oauth2/microsoft/callback. - Under Token configuration, add
emailas an optional claim for the ID token - organizational accounts don't emit it by default, and the SSO application uses it as the username. - Under Certificates & secrets, create a client secret.
- Set
MICROSOFT_CLIENT_ID,MICROSOFT_CLIENT_SECRET, andMICROSOFT_TENANT:- Single-tenant: your tenant GUID.
- Multi-tenant (orgs only):
organizations. - Multi-tenant + personal accounts:
common.
- For multi-tenant apps, scope access by setting
MICROSOFT_ALLOWED_TENANTS(comma-separated tenant GUIDs) and / orMICROSOFT_ALLOWED_EMAIL_DOMAINS. Without these allowlists a multi-tenant app accepts any organization's users.
Cookie secret
oauth2-proxy requires an encryption key for its session cookie.
# Single-container quick-start (32-byte base64):
openssl rand -base64 32

# docker-compose example (16/24/32-char hex):
openssl rand -hex 16
Set the result as OAUTH2_PROXY_COOKIE_SECRET.
Kerberos / Active Directory
On a domain controller (or with delegated rights):
# 1. Create a service account, e.g. svc_docker, then map an SPN to it:
setspn -A HTTP/app.domain.com svc_docker

# 2. Export a keytab:
ktpass /princ HTTP/app.domain.com@DOMAIN.COM `
       /mapuser DOMAIN\svc_docker `
       /pass YourPassword123 `
       /out C:\temp\app.keytab `
       /crypto All `
       /ptype KRB5_NT_PRINCIPAL
Mount the keytab at /etc/nginx/app.keytab and supply a Kerberos client config at /etc/krb5.conf:
[libdefaults]
    default_realm = DOMAIN.COM
    dns_lookup_kdc = true
    dns_lookup_realm = false

[realms]
    DOMAIN.COM = {
        kdc = dc01.domain.com
        admin_server = dc01.domain.com
    }

[domain_realm]
    .domain.com = DOMAIN.COM
    domain.com = DOMAIN.COM
If Kerberos auth fails or isn't available, Nginx falls back to OAuth automatically.
Logs
All logs are written under /app/logs/ inside the container - mount the directory to keep them on the host:
| File | Source | Content |
|---|---|---|
app.log | NLog (rotating, 7-day retention) | Startup, certificate generation, cluster polling, errors |
audit.log | NLog (rotating, 30-day retention) | Login success/failure, access denied, logout - with user and client IP |
app.out.log | stdout | Raw .NET process stdout |
app.err.log | stderr | Raw .NET process stderr |
nginx-access.log | Nginx | Standard combined access log |
nginx-error.log | Nginx | Errors and warnings |
nginx-audit.log | Nginx | Per-request audit log - real client IP, authenticated user, target host, status, response time |
nlog.config is loaded from /app/config/nlog.config at startup with autoReload="true", so log levels
can be changed without restarting the container.
Troubleshooting
Common symptoms and their likely causes:
| Symptom | Likely cause |
|---|---|
certbot fails with a Route53 error | AWS credentials or the DNS zone isn't actually in Route53. |
sso container exits immediately | RAVENDBSSO_Url not set in sso.env. |
502 Bad Gateway shortly after startup | The .NET sidecar on 127.0.0.1:3000 is still warming up - retry. |
| Login loops back to the provider | Wrong callback URL registered, or OAUTH2_PROXY_COOKIE_SECRET length is invalid (must be 16, 24, or 32 chars). |
To find the cause of any of these symptoms, check the container logs:
docker logs ravendb-sso     # nginx + .NET app
docker logs certbot         # certificate issues
Next steps
Once the SSO application is up, register its certificate and create SSO user entries in your RavenDB cluster following SSO Certificates and Users.